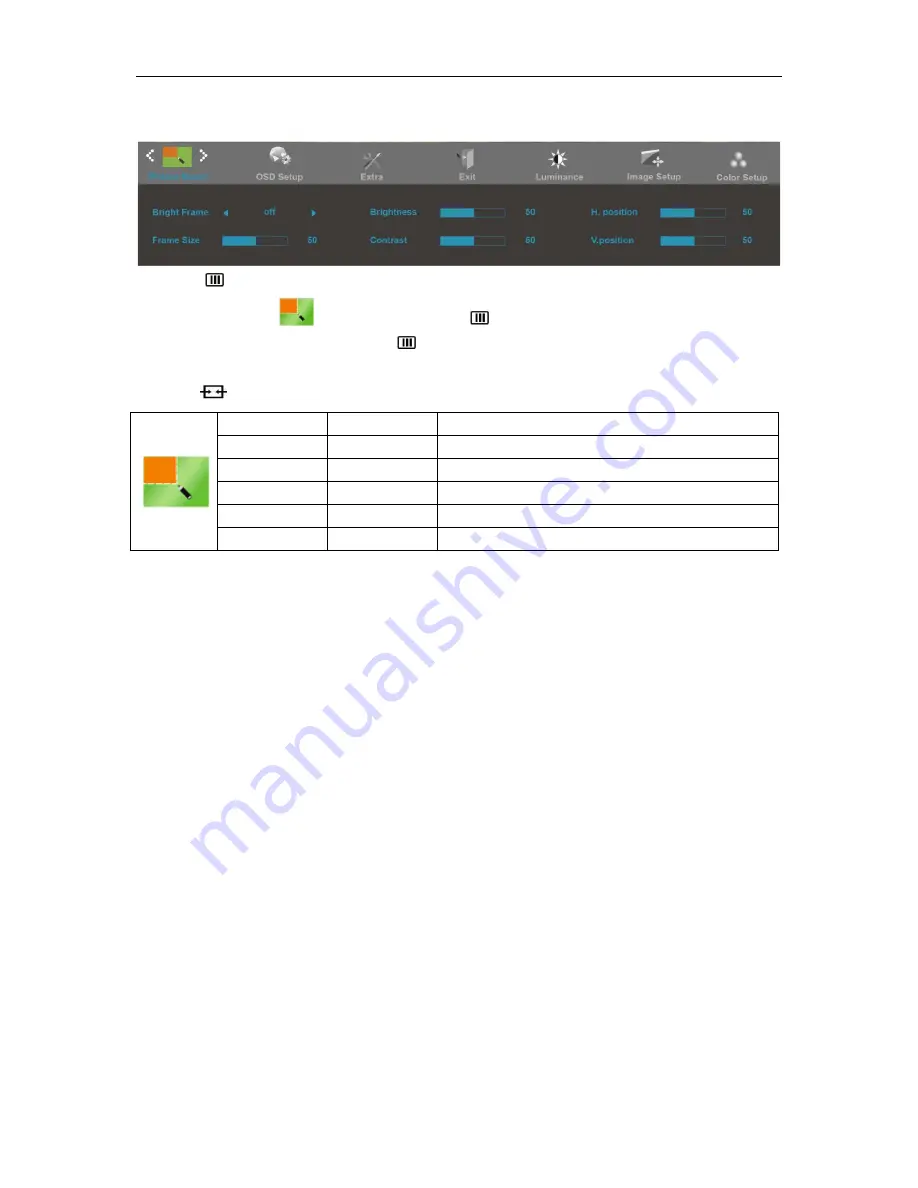
AOC G2260VWQ6 User Manual Download Page 28


Picture Boost 


1.  Press 

(Menu) to display menu. 

2.  Press< or >to select

  (Picture Boost), and press

to enter. 

3.  Press< or >to select submenu, and press

to enter. 

4.  Press< or >to adjust. 

5.  Press

to exit

.


Frame Size   

14-100   

Adjust Frame Size   

Brightness   

0-100   

Adjust Frame Brightness   

Contrast   

0-100   

Adjust Frame Contrast   

H. position   

0-100  

Adjust Frame horizontal Position 

V.position 

0-100  

Adjust Frame vertical Position 

Bright Frame   

on or off   

Disable or Enable Bright Frame   


Note:


Adjust the brightness, contrast, and position of the Bright Frame for better viewing experience. 


28 

Summary of Contents for G2260VWQ6

Page 1: ...LCD Monitor User Manual G2260VWQ6 LED Backlight...

Page 2: ...tting Optimal Resolution 14 Windows 8 14 Windows 7 16 Windows Vista 18 Windows XP 20 Windows ME 2000 21 Hotkeys 22 OSD Setting 23 Luminance 24 Image Setup 26 Color Setup 27 Picture Boost 28 OSD Setup...

Page 3: ...Declaration for India 56 EPA Energy Star 57 EPEAT Declaration 57 Service 58 Warranty Statement for Europe 58 Warranty Statement for Middle East and Africa MEA 60 AOC PIXEL POLICY 62 ISO 9241 307 CLAS...

Page 4: ...sed as follows NOTE A NOTE indicates important information that helps you make better use of your computer system CAUTION A CAUTION indicates either potential damage to hardware or loss of data and te...

Page 5: ...he appliance safely Do not defeat the safety purpose of the grounded plug Unplug the unit during a lightning storm or when it will not be used for long periods of time This will protect the monitor fr...

Page 6: ...should be moved with care Never push any object into the slot on the monitor cabinet It could damage circuit parts causing a fire or electric shock Never spill liquids on the monitor Do not place the...

Page 7: ...the stain instead of strong detergent which will cauterize the product cabinet When cleaning make sure no detergent is leaked into the product The cleaning cloth should not be too roughas it will scr...

Page 8: ...lug IMMEDIATELY and contact a Service Center Make sure that the ventilating openings are not blocked by a table or curtain Do not engage the LCD monitor in severe vibration or high impact conditions d...

Page 9: ...itor Base Power Cable Analog Cable HDMI Cable DP Cable Audio Cable Not all signal cables Analog DP HDMI and Audio cables will be provided for all countries and regions Please check with the local deal...

Page 10: ...Setup Stand Base Please setup or remove the base following the steps as below Setup Remove 10...

Page 11: ...then adjust the monitor s angle to your own preference Hold the stand so you will not topple the monitor when you change the monitor s angle You are able to adjust the monitor s angle from 5 to 20 NOT...

Page 12: ...her end to the computer s D Sub port 3 Optional Requires a video card with HDMI port Connect one end of the HDMI cable to the back of the monitor and connect the other end to the computer s HDMI port...

Page 13: ...ing arm you purchase separately Disconnect power before this procedure Follow these steps 1 Remove the base 2 Follow the manufacturer s instructions to assemble the wall mounting arm 3 Place the wall...

Page 14: ...Adjusting Setting Optimal Resolution Windows 8 For Windows 8 1 Right click and click All apps at the bottom right of the screen 2 Set the View by to Category 3 Click Appearance and Personalization 14...

Page 15: ...4 Click DISPLAY 5 Set the resolution SLIDE BAR to Optimal preset resolution 15...

Page 16: ...Windows 7 For Windows 7 1 Click START 2 Click CONTROL PANEL 3 Click Appearance 16...

Page 17: ...4 Click DISPLAY 5 Set the resolution SLIDE BAR to Optimal preset resolution 17...

Page 18: ...Windows Vista For Windows Vista 1 Click START 2 Click CONTROL PANEL 3 Click Appearance and Personalization 4 Click Personalization 18...

Page 19: ...5 Click Display Settings 6 Set the resolution SLIDE BAR to Optimal preset resolution 19...

Page 20: ...Windows XP For Windows XP 1 Click START 2 Click SETTINGS 3 Click CONTROL PANEL 4 Click Appearance and Themes 5 Double click DISPLAY 20...

Page 21: ...ion SLIDE BAR to Optimal preset resolution Windows ME 2000 For Windows ME 2000 1 Click START 2 Click SETTINGS 3 Click CONTROL PANEL 4 Double click DISPLAY 5 Click SETTINGS 6 Set the resolution SLIDE B...

Page 22: ...ess or to adjust volume Game Mode When there is no OSD press the minus key to open game mode function then press or key to select game mode FPS RTS Racing Gamer 1 or Gamer 2 basing on the different ga...

Page 23: ...e settings of the selected function Press to exit If you want to adjust any other function repeat steps 2 3 4 OSD Lock Function To lock the OSD press and hold the button while the monitor is off and t...

Page 24: ...register Eco mode Standard Standard Mode Text Text Mode Internet Internet Mode Game Game Mode Movie Movie Mode Sports Sports Mode Gamma Gamma1 Adjust to Gamma1 Gamma2 Adjust to Gamma 2 Gamma3 Adjust...

Page 25: ...2 User s preference settings saved as Gamer 2 off No optimization by Smartimage game Shadow Control 0 100 Shadow Control Default is 50 then end user can adjust from 50 to 100 or 0 to increase contrast...

Page 26: ...ter 4 Press or to adjust 5 Press to exit Clock 0 100 Adjust picture Clock to reduce Vertical Line noise Phase 0 100 Adjust Picture Phase to reduce Horizontal Line noise Sharpness 0 100 Adjust picture...

Page 27: ...mperature from EEPROM sRGB Recall SRGB Color Temperature from EEPROM User Red Red Gain from Digital register Green Green Gain Digital register Blue Blue Gain from Digital register DCB Mode Full Enhanc...

Page 28: ...o exit Frame Size 14 100 Adjust Frame Size Brightness 0 100 Adjust Frame Brightness Contrast 0 100 Adjust Frame Contrast H position 0 100 Adjust Frame horizontal Position V position 0 100 Adjust Frame...

Page 29: ...100 Adjust the horizontal position of OSD V Position 0 100 Adjust the vertical position of OSD Timeout 5 120 Adjust the OSD Timeout Transparence 0 100 Adjust the transparence of OSD Language Select th...

Page 30: ...Input Select AUTO D SUB HDMI DP Select Input Signal Source Auto Config yes or no Auto adjust the picture to default Off timer 0 24hrs Select DC off time Image Ratio Wide 4 3 Select image ratio for dis...

Page 31: ...Exit 1 Press Menu to display menu 2 Press or to select Exit and press to enter 3 Press to exit Exit Exit the main OSD LED Indicator Status LED Color Full Power Mode Green Active off Mode Orange 31...

Page 32: ...river Monitor Driver Windows 8 1 Start Windows 8 2 Right click and click All apps at the bottom right of the screen 3 Click on the Control panel icon 4 Set the View by to Large icons or Small icons 32...

Page 33: ...5 Click on the Display icon 6 Click on the Change display settings button 7 Click the Advanced Settings button 33...

Page 34: ...ab and then click the Properties button 9 Click the Driver tab 10 Open the Update Driver Software Generic PnP Monitor window by clicking on Update Driver and then click the Browse my computer for driv...

Page 35: ...ve letter designator for the CD ROM drive 13 Select the xxx inf file and click the Open button Click the OK button 14 Select your monitor model and click the Next button The files will be copied from...

Page 36: ...Windows 7 1 Start Windows 7 2 Click on the Start button and then click on Control Panel 3 Click on the Display icon 36...

Page 37: ...4 Ckick on the Change display settings button 5 Click the AdvancedSettings button 6 Click the Monitor tab and then click the Properties button 37...

Page 38: ...8 Open the Update Driver Software Generic PnP Monitor window by clicking on Update Driver and then click the Browse my computer for driver software button 9 Select Let me pick from a list of device dr...

Page 39: ...M drive 11 Select the xxx inf file and click the Open button Click the OK button 12 Select your monitor model and click the Next button The files will be copied from the CD to your hard disk drive 13...

Page 40: ...Windows Vista 1 Click Start and Control Panel Then double click on Appearance and Personalization 2 Click Personalization and then Display Settings 3 Click Advanced Settings 40...

Page 41: ...lick Continue 5 Click Update Driver in the Driver tab 6 Check the Browse my computer for driver software checkbox and click Let me pick from a list of device drivers on my computer 7 Click on the Have...

Page 42: ...Windows XP 1 Start Windows XP 2 Click on the Start button and then click on Control Panel 3 Select and click on the category Appearance and Themes 4 Click on the Display Item 42...

Page 43: ...or tab If the Properties button is inactive it means your monitor is properly configured Please stop installation If the Properties button is active click on Properties button Please follow the steps...

Page 44: ...utton and then select the appropriate drive F CD ROM Drive 11 Click on the Open button then click the OK button 12 Select your monitor model and click on the Next button If you can see the has not pas...

Page 45: ...pen button then click on the OK button 10 Select your monitor model and click on the Next button 11 Click on the Finish button then the Close button If you can see the Digital Signature Not Found wind...

Page 46: ...sy to adjust your monitor display setting by using on screen menus instead of the OSD button on the monitor To complete installation please follow the installation guide The software Supported operati...

Page 47: ...wizard to complete software installation Under each of the four PC status you may choose from the pull down menu the desired time in minutes for your monitor to automatically shutdown The example abov...

Page 48: ...s and each panel displays a different window You only need to drag the window to a corresponding panel when you want to access it It supports multiple monitor display to make your task easier Please f...

Page 49: ...n extension cable or switch box We recommend plugging the monitor directly to the video card output connector on the back Picture Bounces Flickers Or Wave Pattern Appears In The Picture Move electrica...

Page 50: ...VESA DDC2B CI Input Connector VGA HDMI DP Audio input Input Video Signal Analog 0 7Vp p standard 75 OHM HDMI DP Output Connector earphone Power Source 100 240V 50 60Hz Power Consumption Typical Bright...

Page 51: ...156 56 250 800 600 60Hz 37 879 60 317 800 600 72Hz 48 077 72 188 800 600 75Hz 46 875 75 000 832 624 75Hz 49 725 74 551 XGA 1024 768 60Hz 48 363 60 004 1024 768 70Hz 56 476 70 069 1024 768 75Hz 60 023...

Page 52: ...tect Cable 13 H sync 6 GND R 14 V sync 7 GND G 15 DDC Serial clock 8 GND B Pin No Signal Name Pin No Signal Name Pin No Signal Name 1 TMDS Data 2 9 TMDS Data 0 17 DDC CEC Ground 2 TMDS Data 2 Shield 1...

Page 53: ...No Signal Name 1 ML_Lane 3 n 11 GND 2 GND 12 ML_Lane 0 p 3 ML_Lane 3 p 13 CONFIG1 4 ML_Lane 2 n 14 CONFIG2 5 GND 15 AUX_CH p 6 ML_Lane 2 p 16 GND 7 ML_Lane 1 n 17 AUX_CH n 8 GND 18 Hot Plug Detect 9...

Page 54: ...DDC STANDARD It allows the monitor to inform the host system of its identity and depending on the level of DDC used communicate additional information about its display capabilities The DDC2B is a bi...

Page 55: ...etermined by turning the equipment off and on the user is encouraged to try to correct the interference by one or more of the following measures Reorient or relocate the receiving antenna Increase the...

Page 56: ...ility to dispose of your waste equipment by handing it over to a designated collection point for the recycling of waste electrical and electronic equipment The separate collection and recycling of you...

Page 57: ...to reduce the environmental impact of its products AOC believes in protecting the environment With a key concern for the conservation of natural resources as well as land ll protection AOC announces...

Page 58: ...on the address label Put the RMA number on the shipping carton AOC International Europe B V will pay the return shipping charges within one of the countries specified within this warranty statement AO...

Page 59: ...EUROPE B V OBLIGATIONS AND YOUR REMEDIES HEREUNDER ARE SOLELY AND EXCULSIVELY AS STATED HERE AOC INTERNATIONAL EUROPE B V LIABILITY WHETHER BASED ON CONTRACT TORT WARRANTY STRICT LIABILITY OR OTHER TH...

Page 60: ...are out of warranty as per the product ID serial number and for such exceptional cases Original Invoice Proof Of Purchase Receipt is mandatory If the product appears to be defective please contact you...

Page 61: ...FOR THIS PRODUCT INCLUDING THE WARRANTIES OF MERCHANTABILITY AND FITNESS FOR A PARTICULAR PURPOSE ARE LIMITED IN DURATION TO A PERIOD OF ONE 1 to THREE 3 YEARS FOR PARTS AND LABOR FROM THE ORIGINAL DA...

Page 62: ...ceptable defect levels for each type In order to qualify for repair or replacement under warranty the number of pixel defects on a TFT monitor panel must exceed these acceptable levels Pixels and Sub...

Page 63: ...e during shipment Pay all shipping charges EPI is not responsible for damage to inbound product that was not properly packaged EPI will pay the return shipment charges within one of the countries spec...

Page 64: ...AGES SO THE ABOVE LIMITATION MAY NOT APPLY TO YOU ALTHOUGH THIS LIMITED WARRANTY GIVES YOU SPECIFIC LEGAL RIGHTS YOU MAY HAVE OTHER RIGHTS WHICH MAY VARY FROM STATE TO STATE In the United States of Am...

Page 65: ...a UPS Call Tag to pick up the defective unit Step 6 Please review the following chart to see your EASE program qualifications WARRANTY PERIOD COVERAGE AT NO CHARGE CUSTOMER CHARGES Within the first th...

Reviews: