12
P/N 1011308 Rev. E 11/16
Checking the Conveyor Belt Chains
for Stretching
1. Set the Bun Thickness Compres-
sion Knobs to 6 and 6 and ensure
both Belt Wraps are removed.
2. Locate the approximate center-
point of the Conveyor Belt Chain.
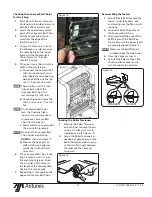
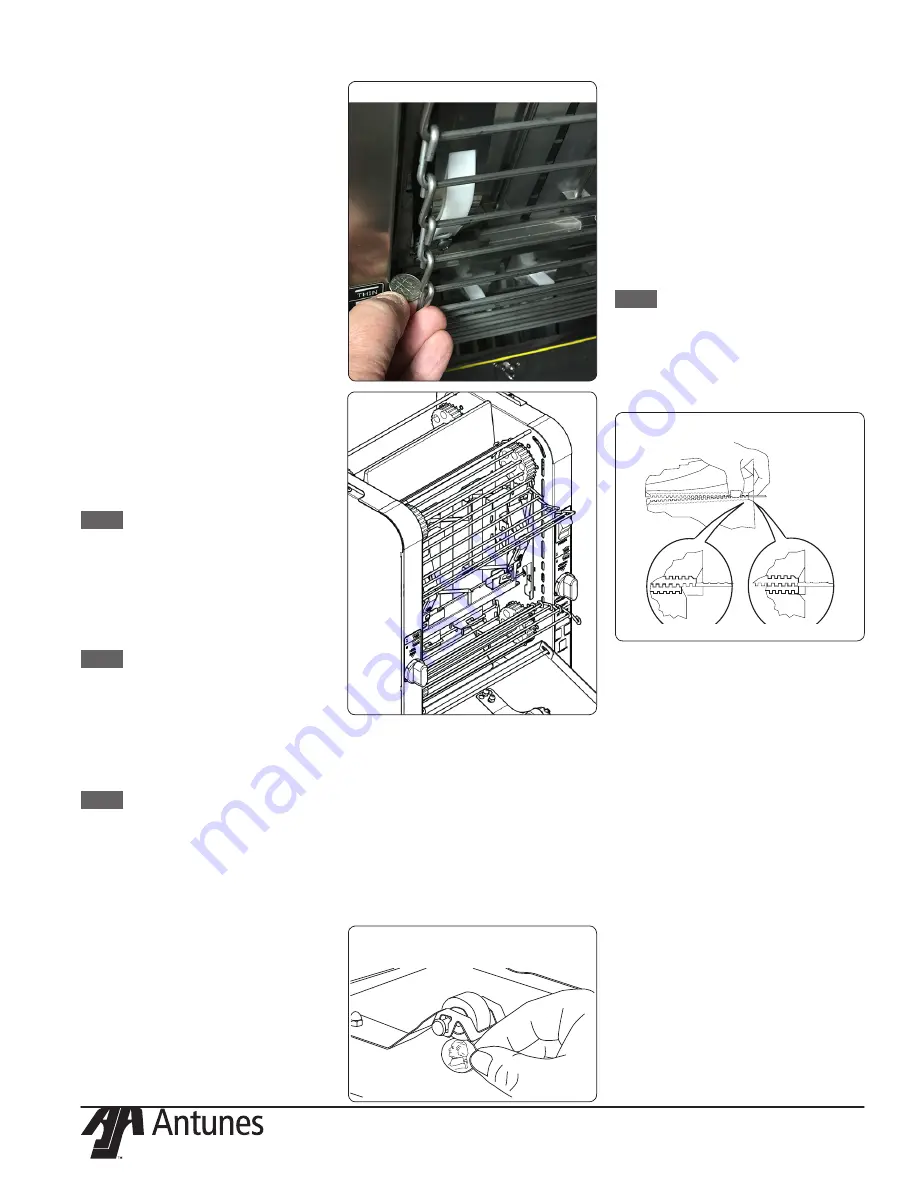
3. Pull the Conveyor Belt Chain
away from the edge of the
toaster (Figure 10).
4. Using a U.S. Dime coin (1.8 cm)
for reference or a ruler, measure
the space between the toaster
frame and the Conveyor Belt
Chain (Figure 10). The coin
should fit snugly.
5. If the gap is more than twice the
width of the coin (2.6 cm):
a. Disconnect the Conveyor Belt
chain by squeezing any two
links together and unhooking
both ends of the one link (Fig-
ure 11). Pliers may be used.
NOTE:
There are two small 1/2 inch
links on each side of the
Conveyor Belt Chain. The
rest are large 3/4 inch links.
b. Depending on how loose the
chain is, remove a 1/2” or 2/4”
link.
NOTE:
It is recommended to per-
form the Quarterly Clean-
ing any time you disconnect
or remove a Conveyor Belt
Chain from the toaster.
c. Reassemble the Conveyor Belt
Chain onto the sprockets.
NOTE:
Make sure the Conveyor Belt
Chain hooks are pointing
DOWN as shown in Figure 10.
d. Measure the gap again to
confirm the gap is approxi-
mately the width of the U.S.
Dime coin.
6. If the Conveyor Belt Chain is too
tight, remove a small 1/2 inch
link and install a large 3/4 inch
link in its place. This increases
the length of the Conveyor Belt
Chain by 1/4 inch overall.
7. Repeat steps 1 through 6 on the
opposite Conveyor Belt Chain.
Checking the Roller Tensioners
1. Measure the Roller Tensioner
on both inner Conveyor Covers
using a U.S. Nickel (2.1 cm) for
reference or a ruler (Figure 12).
2. Adjust the Roller Tensioners as
needed by applying pressure to
bend the tensioner down or up
so the coin fits snugly between
the roller and the Conveyor
Cover wall.
Reassembling the Toaster
1. Reinstall the Belt Wraps onto the
toaster under the yellow rods
and making sure the flap is point-
ing down.
2. Connect the Belt Wrap clips to
the Conveyor Belt Chain.
3. Then, reconnect the ends of the
Belt Wraps with the Belt Wrap
Pin, making sure the zipper teeth
are properly aligned (Figure 13)
NOTE:
Make sure the Belt Wraps are
installed under the yellow rods.
4. Close the Conveyor Covers.
5. Reinstall the Release Sheet, Bun
Chute, and Bun Feeder and re-
turn the toaster to operation.
Figure 10
Figure 12
Figure 11
INCORRECT
CORRECT
Figure 13

