background image

N

13

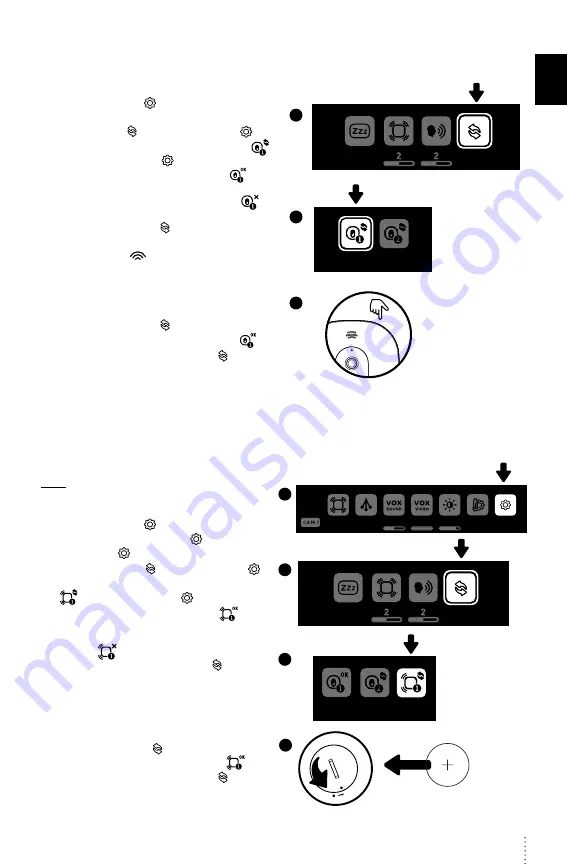
LOSS OF CONNECTIVITY BETWEEN THE NURSERY UNIT AND PARENT UNIT

•  If your Nursery Unit becomes un-paired from your Parent Unit, please follow the steps below to re-pair them. 

1. 

Turn ON the Parent Unit and keep the Nursery Unit OFF.

2. 

Press menu button. 

3. 

It will directly jump to General setting menu. Select 
the Pairing Icon   and press menu button. 

4. 

In the Pairing Menu, select Nursery Unit 1 Icon 


and press menu button. 

• 

If Nursery Unit 1 is marked as connected 

 select 

it to go the Nursery Unit 1 Pairing option. You will now 
need to remove it by selecting the red icon. 


The linking icon will appear on the screen until 
Successful Pairing Icon   appears on the screen. 
You’ll now be able to proceed with step 4.

5. 

The Linking Icon 

 will appear on the screen.

6. 

Turn ON the Nursery Unit and press and hold its 

pause/pairing

” button until the power LED starts 

blinking while pairing.

7. 

If the connection has been made, the Green 
Successful Pairing Icon   will appear on the screen 
and the menu will show the OK Paired Icon. 

8. 

Otherwise, the Red Failed Pairing Icon   will appear 
on the screen. You will need to try again.

6

3

4

3 MIN

LOSS OF CONNECTIVITY BETWEEN THE SENSOR PAD AND THE NURSERY UNIT

•  If your Sensor Pad becomes un-paired from your Parent Unit, please follow the steps below to re-pair them. In 

order to reconnect your Sensor Pad to your Nursery Unit, you need to make sure the Nursery Unit is paired with the 
Parent Unit first.

1. 

Remove the battery of the Sensor Pad.

Note: 

If you have two Sensor Pads, you will need to 

remove the battery from both of them first and then 
follow the steps below.

2. 

Press menu button. 

3. 

Select the General setting menu 

 and press 

menu button. 


4. 

Select the Pairing Icon   and press menu button. 


5. 

In the Pairing Menu, select Sensor Pad 1 Icon 

 and press menu button. 

• 

If Sensor Pad is marked as connected 
select it to go the the Sensor Pad Pairing option. 
You will now need to remove it by selecting the 
red icon. 

 The linking icon will appear on the 

screen until Successful Pairing Icon   appears 
on the screen. You’ll now be able to proceed 
with step 5.

6. 

Insert the battery into the Sensor Pad. It will 
automatically activate it.

7. 

If the connection has been made, the Green 
Successful Pairing Icon   will appear on the screen 
and the menu will show the OK Paired Icon. 


8. 

Otherwise, the Red Failed Pairing Icon   will 
appear on the screen. You will need to try again.

4

5

3

3 MIN

ON

ON

4

2

3

6

Summary of Contents for AC327

Page 1: ...h or damage to the product WARNING USER MANUAL IMPORTANT INTENDED USE This product is NOT intended and should NOT be used to prevent Sudden Infant Death Syndrome SIDS This product is NOT intended to diagnose treat mitigate cure or prevent any disease or condition This is a product to monitor the movement of healthy babies and is not a substitute for parental care Model AC327 Baby Movement Sound an...

Page 2: ...n wipe with a dry lint free cloth 13 The Sensor Pad is not suitable for use above age 24 months 14 This product cannot replace responsible adult supervision This product is designed to aid in the monitoring of your child When using the monitor you must still provide the supervision necessary for the continued safety of your child WARNING MOVEMENT SENSOR PAD NO ALARM Sources of vibration movement o...

Page 3: ...ery see Technical Specification Danger of explosion if the wrong battery is used or if replaced incorrectly Refer to User s Guide for correct battery installation DO NOT short circuit supply terminals 27 DO NOT mix old and new batteries and only use Angelcare recommended replacement batteries see Technical Specification 28 The Coin Button Cell Battery represents a small part and a choking hazard K...

Page 4: ... easily accessible Make sure to plug the adaptor to the socket outlet nearest to the equipment and that is easily accessible To disconnect from mains unplug the adaptor STOP using the Power Adaptor if it gets damaged or broken in any way 41 Only use attachments accessories and replacement parts specified by the manufacturer Any mounting of the product should follow the manufacturer s instructions ...

Page 5: ...nt is detected for 20 seconds 1 2 1 Use a coin to remove replace the battery cover and insert the battery face with face up 2 Replace the battery cover align 2 dots and click to secure Correct positioning for slatted base 3 3 Remove the mattress from the cot place Sensor Pad Angelcare logo side up on base in approximate centre of mattress along the length It should be centred on the hardboard if y...

Page 6: ... if unsure of mattress compatibility The hardboard maintains a constant pressure on the Sensor Pad enabling it to detect the baby s movements even when the baby is at the edges of the cot IMPORTANT 3 SETTING UP THE NURSERY UNIT Tabletop Sensor Pad Wall Mounted The mounting height of the Nursery Unit should be less than 2 metres Place the Nursery Unit and Adaptor cord at least 1 metre from the cot ...

Page 7: ...larm single beep tone designed to stir baby if no movement has been detected for 15 seconds If no further movement is detected the main alarm will sound at 20 seconds a series of continuous beeps SENSOR PAD FOUR CORNER TEST 1 Place the Sensor Pad at the approximate centre of baby s sleeping area and put the mattress back in place 2 Switch ON both Nursery Parent Units check both units are paired co...

Page 8: ...r Pad Pairing button 7 Power ON OFF 8 Magnet for tabletop stand and wall mount FRONT SIDE REAR SIDE 1 2 3 5 7 6 8 4 PARENT UNIT 1 Power ON OFF Press Hold Sleep mode Quickly press release 2 Talk back Return save settings 3 Menu Select 4 Zoom pan feature Navigate left Switch Nursery Unit sound 5 Movement indicator TIC function 6 Power indicator 7 Visual sound indicator 8 Microphone 9 Volume up Navig...

Page 9: ...Power indicator will slowly blink Ensure to un pause the Sensor Pad before putting baby in the cot Turn movement detection ON OFF When your baby gets older allows you to turn movement detection OFF and use your monitor for video only 2 Tic Activation If movement detection is activated allows you to hear a Tic sound every 5 seconds In the event you have two Sensor Pads connected the Tic indication ...

Page 10: ...and maximum temperature can not be less than 4 C 7 F 3 Set Celsius or Fahrenheit display 4 Activate the temperature alarm GENERAL SETTINGS MENU 3 MIN 1 2 3 4 1 Sleep Mode Set Up 2 Set Sensor Pad sensitivity To ensure adequate monitoring of your child s movements you can adjust the sensitivity of the Sensor Pad 3 Set Nursery Unit speaker volume 4 Pairing Menu PAIRING MENU 1 2 3 1 Nursery Unit 1 Sta...

Page 11: ...e mode the movement detection feature is disabled To reactivate the Sensor Pad simply un pause the Sensor Pad into the first menu 6 ADDING ACCESSORIES Your Angelcare monitor allows you to add an additional Nursery Unit and Sensor Pad Please contact your local distributor to see what is available in your country IMPORTANT When using two Nursery Units you will only be able to hear audio from one Nur...

Page 12: ...OVEMENT SENSOR PAD NO ALARM Sources of vibration movement other than your baby s can be detected by the Sensor Pad and the alarm will not sound Refer to Warnings 3 to 11 and see STEP 4 TEST THE SENSOR PAD MOVEMENT SENSOR PAD FALSE ALARMS Replace the Sensor Pad battery CR2450 Turn OFF the Nursery Unit Sensor Pad False alarms may happen for several reasons always be sure to immediately check on baby...

Page 13: ...l need to try again 6 3 4 3 MIN LOSS OF CONNECTIVITY BETWEEN THE SENSOR PAD AND THE NURSERY UNIT If your Sensor Pad becomes un paired from your Parent Unit please follow the steps below to re pair them In order to reconnect your Sensor Pad to your Nursery Unit you need to make sure the Nursery Unit is paired with the Parent Unit first 1 Remove the battery of the Sensor Pad Note If you have two Sen...

Page 14: ... liable for any incidental or consequential damages with regard to this product The warranty also excludes any liability other than what is stated above No other warranty is given This warranty does not cover products and accessories which are not Angelcare branded or any problems that result from usage that is not in accordance with product instructions failure to follow the product instructions ...

Page 15: ...hildren Batteries CAUTION RISK OF EXPLOSION IF BATTERY IS REPLACED BY AN INCORRECT TYPE DISPOSE OF USED BATTERIES ACCORDING TO THE INSTRUCTIONS Transmission Transmission between the Parent Unit and the Nursery Unit is made on 2 4 GHz frequency Transmission between the Nursery Unit and the Sensor Pad is made on 2 4 GHz frequency Hereby Angelcare Canada Inc declares that this Baby Monitor is in comp...

Page 16: ...s product United States and Canada Please contact us at info angelcarebaby com Other countries Find your local distributor by visiting our website angelcarebaby com distributeurs TO LEARN MORE To learn more watch the set up videos and other functionalities on our website https angelcare zendesk com hc Angelcare Canada Inc 2000 McGill College Avenue Suite 250 Montreal Quebec Canada H3A 3H3 Imported...

Reviews: