background image

3

EN

IMPROPER USE


1.   Never point gun towards people or animals.

2.     Never exceed maximum working pressure or maximum operating 

Temperature

3.   Always release air and fluid pressure before cleaning, disassembling 

or servicing.

 Otherwise, remaining pressure can cause bodily injury due to 

improper operation or scattering of cleaning liquid.

4.   Tip of fluid needle set has a sharp point. 

Do not touch the tip during maintenance to avoid accidents.

5.   Never use this gun to spray foods or chemicals. 

Otherwise, foreign sub-

stance, could cause corrosion of fluid passages which could adversely affect 
health.

6.   Never alter this spray gun, 

to avoid insufficient performance and damage.

7.   If something goes wrong, immediately stop operation and find the cause. 

Do not use again, until you have solved the problem.

8.   Do not enter working areas, where robots, reciprocators, etc. are used, 

until they have been turned off. 

Otherwise, they could cause injury.

3. HOW TO CONNECT

 CAUTION

-    Use clean air filtered through air dryer and air filter.
-    When using this gun for the first time after purchase, adjust fluid needle 

packing set, spray cleaner to clean fluid passages and remove rust pre-
ventive oil.

-    Firmly fix hose or container to spray gun, to avoid disconnection of hose 

or container, that can cause bodily injury.

1. 

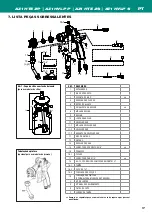
  Firmly connect an air hose to air nipple G1/4”(17).

2.


Pressure model:

 Firmly connect the fluid hose or optional paint tube G3/8”F-

G3/8”M (19) to fluid nipple G3/8”(15).


Suction model:

 Firmly connect 1l. aluminium pin lock cup AG-1 (18) to fluid 

nipple G3/8”(15).

3.

   Flush fluid passages with a compatible cleaner.

4.

   Pour paint into container, test spray, adjust fluid output and pattern width.

4. HOW TO OPERATE

_  Suggested atomizing air pressure varies according to each model, and it is 

listed in the Specifications Table.

_   Recommended paint viscosity differs according to paint property and painting 

conditions.

_   Set the spray distance from the gun to the work piece, as near as possiblewi-

thin the range of 100-250 mm (3.9 - 9.8 in).

_  The gun should be held so that it is perpendicular to the surface of the  


  workpiece at all times. Then, the gun should move in a straight and horizon-  
  tal line. Arcing the gun causes uneven painting.

2. SAFETY WARNING

  FIRE AND EXPLOSION 


1.   Never use the following HALOGENATED HYDROCARBON SOLVENTS:


which can cause cracks or dissolution of gun body (aluminium) due to  


 chemical reaction. UNSUITABLE SOLVENTS: methyl chloride, dichloromethane, 
1.2-dichloroethane, carbon tetrachloride,  trichloroethylene,   


1.1.1-trichloroethane                           

2.   Sparks and open flames are strictly prohibited.

 Paints can be highly  


 flammable and can cause fire. Do not expose to open flames, electrical  


 goods, cigarettes etc.

3.   Securely ground spray gun using conductive air hose. 

(Less than1M

Ω

Always ensure that the spray gun is earthed correctly.

PROTECTION OF HUMAN BODY

1.  Use in a well-ventilated site, using a spray booth.


Poor ventilation can cause organic solvent poisoning and fire.

2.   Always wear protective gear (safety glasses, mask, gloves) to avoid  

inflammation of eyes and skin.


In case of any physical discomfort, immediately seek medical advice.

3.   Wear earplugs if necessary.


Noise level can exceed 80 dB(A), depending on operating conditions and  
painting site.

4.   Pulling the trigger many times during operation, may cause carpal 

tunnel syndrome

. Always rest, in case of tiredness.

This  AIRGUNSA spray guns kit complies
to ATEX regulations 

2014/34/EU. 

Protection level: II 2G X Suitable for using Zones 1 and 2.
X marking: Any static electricity discharge from the spray gun is to be diverted to 
the ground via the conductive air hose as stipulated. 

ALWAYS observe WARNINGS and CAUTIONS in this 


instruction manual.

Before use, adjustment or maintenance, it is important  

to read this instruction manual very carefully. 

This manual must be stored in a safe place for any future 

reference.

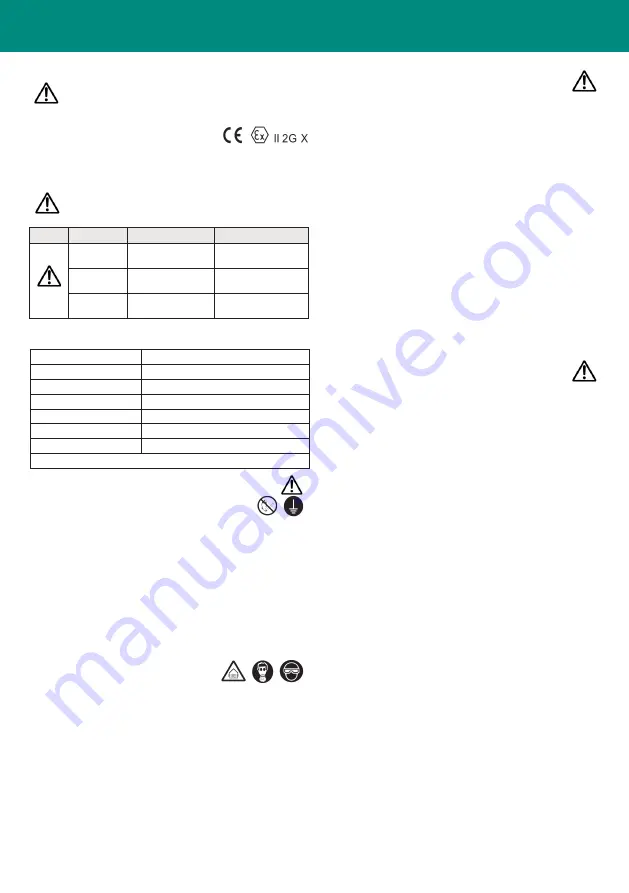
Symbol WARNING

Hazard level

Consequence

WARNING

Potentially hazardous 

situation

Death or serious injury

CAUTION

Potentially hazardous 

situation

Minor to moderate injury

IMPORTANT

Potentially hazardous 

situation

Property damage

AZ1 HTE 2P | AZ1 HVLP P | AZ1 HTE 2S | AZ1 HVLP S

1. TECHNICAL SPECIFICATIONS

Max. working air pressure: 

7.0 bar (100 PSI)

Weight g (lbs): (without cup)

476 (1.05)

Noise level (LAeqT)*: 

77.6 dB(A)

Air Connection

G1/4” M

Fluid Connection (Pressure)

G1/4”M or G3/8”M

Fluid Connection (Suction)

G3/8”M

Max. Temperature range: 

Atmosphere 5 ~ 40 °C / Air-Fluid 5 ~ 43 °C

* Measuring point: 1m backwards from gun, 1.6 m height.  

Summary of Contents for AIRGUNSA AZ1 HTE 2P

Page 1: ...en it fr es pt de se AZ1 HTE 2P AZ1 HTE HVLP P AZ1 HTE 2S AZ1 HTE HVLP S USE and MAINTENANCE INSTRUCTION MANUAL Pressure and Suction SPRAY GUNS ...

Page 2: ...1 HTE 2S 1 0 HTE P0 2 5 66 184 170 1 3 80 190 1 5 113 200 1 8 154 220 2 0 169 230 2 5 HTE P3 167 333 250 3 0 205 290 3 5 217 300 The HVLP spray guns follows all compliant HVLP mandates Follow the indications of the inlet air pressure to achieve atomizing pressure of 0 7 bar 10 PSI at the center of the air cap PRESSURE AZ1 HVLP P 1 0 HVLP P6 1 4 400 280 310 1 3 360 1 5 1 8 380 2 0 2 5 HVLP P7 1 2 2...

Page 3: ...move in a straight and horizon tal line Arcing the gun causes uneven painting 2 SAFETY WARNING FIRE AND EXPLOSION 1 Never use the following HALOGENATED HYDROCARBON SOLVENTS which can cause cracks or dissolution of gun body aluminium due to chemical reaction UNSUITABLE SOLVENTS methyl chloride dichloromethane 1 2 dichloroethane carbon tetrachloride trichloroethylene 1 1 1 trichloroethane 2 Sparks a...

Page 4: ...RE DISASSEMBLY CLEAN FLUID PASSAGES a Disassemble fluid nozzle 2 while keeping fluid needle 9 pulled triggering in order to protect its seat section b Disassemble fluid needle set 9 only when strictly necessary c Remove the fluid adj knob 6 and needle spring 8 extracting the spring and fluid needle set 9 from the back of fluid adj guide 7 set still assembled on the gun body d Adjustment of the nee...

Page 5: ...IGGER STUD 13 TRIGGER 14 AIR ADJUSTMENT SET 15 FLUID NIPPLE G3 8 16 SCREW 16 1 PLUG 17 AIR NIPPLE G1 4 18 AG 1 1 lt CONTAINER SET 18 1 LID SET 18 2 1 LT CONTAINER 18 3 SUCTION TUBE 19 PAINT TUBE OPTIONAL FOR PRESSURE MODELS C PACKING SET D SLIDE RING SET E PAINT FILTER SET F LID PACKING SET Paint Tube Optional for pressure models 18 1 F 18 2 18 3 E 18 AG 1 1l Pin Lock Cup for suction models 1 2 3 ...

Page 6: ...linee orizzontali Eventuali spostamenti della pistola potrebbero provocare una verniciatura non uniforme 2 AVVERTENZE DI SICUREZZA RISCHI DI INCENDI ED ESPLOSIONI 1 Mai utilizzare SOLVENTI IDROCARBURI ALOGENATI che potrebbero causare danni e scioglimento delle parti in alluminio del corpo pistola provocati da reazioni chimiche SOLVENTI INCOMPATIBILI cloruro di metile diclorometano 1 2 dicloroetano...

Page 7: ...egolazione del ventaglio e o dell aria assicuratevi che queste operazioni vengano effettuate sempre con la regola zione completamente aperta IT I passaggi del materiale devono essere accuratamente puliti do po ogni utilizzo della pistola ed in particolar modo dopo l uso di vernici bi componenti Una pulizia incompleta potrebbe causa re difetti alla forma del ventaglio Prima di procedere a qualsiasi...

Page 8: ...VALVOLA ARIA 12 PERNO GRILLETTO 13 GRILLETTO 14 SET REGOLAZIONE ARIA 15 RACCORDO MATERIALE G3 8 16 VITE 16 1 TAPPO 17 RACCORDO ARIA G1 4 18 SERBATOIO COMPLETO DA 1L CON CHIUSURA A BAIONETTA 18 1 COPERCHIO 18 2 SERBATOIO DA 1 LT 18 3 TUBO DI PESCAGGIO 19 TUBO VERNICE OPZIONALE PER MODELLI A PRESSIONE G3 8 C SET GUARNIZIONI D SET ANELLO DI SCORRIMENTO E SET FILTRI TAZZA F SET GUARNIZIONI COPERCHIO T...

Page 9: ...l aiguille a un côté coupant Ne pas toucher l extrémité de l aiguille pour éviter de vous blesser 5 Ne jamais pulvériser de produits alimentaires ou chimiques avec ce pistolet cela peut causer des accidents liés à la corrosion des conduits du produit ou des dommages à la santé dus au mélange avec des matériaux étrangers 6 Ne jamais modifier le pistolet pour pulvérisation pour éviter tout endomma g...

Page 10: ...r complètement et dévisser à l aide de la clé de montage le côté hexagonal en le tournant dans le sens inverse des aiguilles d une montre Pour réassembler le réglage du jet 5 et ou le réglage de l air 14 procéder dans l ordre inverse IMPORTANT Avant de réassembler le réglage du jet et ou de l air s assurer que ces opérations soient toujours effectuées avec le réglage complètement ouvert FR En part...

Page 11: ...IÉGE CLAPET D AIR 12 AXE DE GÂCHETTE 13 GÂCHETTE 14 RÉGLAGE D AIR 15 RACCORD PRODUIT G 3 8 16 VIS 16 1 BOUCHON 17 RACCORD D AIR G1 4 18 AG 1 RESERVOIR COMPLET À SUCCION DE 1 LITRE 18 1 COUVERCLE 18 2 CUVE DE GODET 1 LT 18 3 TUBE PLONGEUR 19 TUYAU PEINTURE EN OPTION POUR MODÈLES À PRESSION C POCHETTE DE JOINTS D BAGUE D ÉTAINCHÉITÉ E JOINTS DE GODET F JOINTS DE COUVERCLE Tuyau peinture en option po...

Page 12: ...Además lo mejor es que la pistola trabaje siempre por franjas horizontales El posible desplazamiento de la pistola podría provocar una pintura poco uniforme ES 2 ADVERTENCIAS DE SEGURIDAD RIESGO DE INCENDIO Y EXPLOSIONES 1 No utilice DISOLVENTES DE HIDROCARBONO HALOGENADO que pueden provocar grietas o fundir el cuerpo de la pistola de pulverización aluminio debido a reaccio nes químicas DISOLVENTE...

Page 13: ...flujo de aire 14 efectúe las operaciones en el orden contra rio IMPORTANTE antes de montar nuevamente el grupo de regulación del abani co y o la válvula reguladora de aire compruebe que estas operaciones se hagan siempre con la regulación completamente abierta Antes de comenzar cualquier operación de revisión o de manteni miento lea y respete siempre escrupulosamente todas las indica ciones de las...

Page 14: ...RE 11 3 ASIENTO VÁLVULA AIRE 12 PERNO GATILLO 13 GATILLO 14 GRUPO REGULACIÓN AIRE 15 CONEXIÓN FLUIDO G3 8 16 TORNILLO 16 1 TAPÓN 17 CONEXIÓN AIRE G1 4 18 AG 1 DEPÓSITO CON CIERRE A BAYONETA DE 1 LT 18 1 TAPA 18 2 DEPÓSITO DE 1 LT 18 3 TUBERÍA DE ASPIRACIÓN 19 TUBERÍA FLUIDO OPCIONAL PARA LOS MODELOS A PRESIÓN C GRUPO JUNTAS D GRUPO ANILLO DE DESPLAZAMIENTO E GRUPO FILTROS F GRUPO JUNTAS TAPA Tuber...

Page 15: ...uais deslocamentos da pistola pode provocar uma pintura não uniforme PT 2 ADVERTÊNCIAS DE SEGURANÇA RISCOS DE INCÊNDIOS E EXPLOSÕES 1 Nunca utilize SOLVENTES HIDROCARBONETOS HALOGENADOS que poderiam causar danos e dissolução das partes em alumínio do corpo da pistola provocados por reacções químicas SOLVENTES INCOMPATÍVEIS cloreto de metileno diclorometano 1 2 dicloroetano tetracloreto de carbono ...

Page 16: ...rtido IMPORTANTE Antes de remontar o regulador do leque e ou do ar certifique se que estas operações sejam efectuadas sempre com o ajuste completa mente aberto PT UMA LIMPEZA INCOMPLETA PODE CAUSAR DEFEITOS NA FORMA DO LEQUE LIMPE COMPLETA E IMEDIATAMENTE APÓS O USO DO PRODUTO COM TINTA BICOMPOSTA 6 PROBLEMAS CAUSAS E SOLUÇÕES FALTA DE SAÍDA DE TINTA Botão de ajuste do produto Verifique e ajuste 6...

Page 17: ...NTO DA VÁLVULA DE AR 12 EIXO DE GATILHO 13 GATILHO 14 REGULADOR DE AR 15 CONECTOR DO PRODUTO G3 8 16 PARAFUSO 16 1 PLUGUE 17 CONECTOR DO AR G1 4 18 AG 1 COPO DE SIFÃO COM FECHO BAIONETA 1 LT 18 1 TAMPA 18 2 COPO DE 1 LT 18 3 TUBULAÇÃO DE SUCÇÃO 19 TUBULAÇÃO DE PINTURA OPCIONAL PARA MODELOS DE PRESSÃO C KIT DE JUNTAS D KIT ANEL DE DESLIZAMENTO E FILTRO DO COPO F JUNÇÃO DA TAMPA Tubulação de pintura...

Page 18: ... 9 9 8 in kalibrieren _ Die Pistole sollte stets senkrecht zur Oberfläche des zu bearbeitenden Teils gehalten werden Außerdem sollte die Pistole stets in horizontalen Linien arbeiten Eventuelle Verschiebungen AZ1 HTE 2P AZ1 HVLP P AZ1 HTE 2S AZ1 HVLP S Die AIRGUNSA Spritzpistole ist in Übereinstimmung mit den Rechtsvorschriften ATEX 2014 34 EU Schutzgrad Gerätekategorie II 2G X geeignet für den Ge...

Page 19: ...t wird Zur Montage des Spritzstrahlreglers 5 und oder des Luftreglers 14 in umgekehrter Reihenfolge vorgehen WICHTIG Um den Spritzstrahlregler und oder Luftregler wieder zu mon tieren sicherstellen dass diese Vorgänge stets bei völlig geöffneter Einstellung erfolgen Unvollständige Reinigung kann zu einem fehlerhaften Spritzstrahl führen Nach Anwendung von Zweikomponenten lack eine schnelle und vol...

Page 20: ...L 11 3 LUFTVENTILSITZ 12 VERBINDUNGSTEIL FÜR ABZUGSBÜGEL 13 ABZUGSBÜGEL 14 LUFTREGULIERVENTIL 15 MATERIALANSCHLUSS G 3 8 16 SCHRAUBE 16 1 BLINDSTOPFEN 17 DRUCKLUFTANSCHLUSS G1 4 18 AG 1 SAUGBECHER IN ALUMINIUM 1 LT 18 1 DECKEL 18 2 BEHÄLTER 1 LT 18 3 ABSAUGSCHLAUCH 19 FARBROHR FAKULTATIV FÜR DRUCK MODELLE C DICHTUNG SET D SPRENGRING SET E FILTER SET F DECKELDICHTUNG SET Farbrohrf Fakultativ für Dr...

Page 21: ...la linjer Eventuella förflyttningar av pistolen kan ge ett ojämnt lackeringsresultat SE 2 SÄKERHETSFÖRESKRIFTER BRAND OCH EXPLOSION 1 Använd aldrig LÖSNINGSMEDEL MED HALOGENKOLVÄTEN som kan orska skador och upplösning av delarna i aluminium hos själva pistolkroppen beroende på kemiska reaktioner ICKE KOMPATIBLA LÖSNINGSMEDEL metylenklorid diklormetan 1 2 diklormetan koltetraklorid trikloretylen 1 ...

Page 22: ...cket och färgnå lens ände Doppa aldrig ned pistolen fullständigt i vätskor som lösningsmedel 5 1 PROCEDUR FÖR MANUELL RENGÖRING Lämna aldrig luftmunstycket 1 i tvättmedel under en längre tid eller vid rengöring Använd aldrig metallföremål för att rengöra pistolen 1 Rengör alla stegen i färgen och av luftmunstycket 1 Spraya en liten mängd rengöringsvätska för att rengöra färgpassager 2 Rengör varje...

Page 23: ...VENTILSATS 11 1 LUFTVENTILFJÄDER 11 2 LUFTVENTIL 11 3 LUFTVENTILSÄTE 12 AVTRYCKARSTIFT 13 AVTRYCKARE 14 LUFTREGLERVENTIL 15 FÄRGNIPPEL G 3 8 16 SKRUV 16 1 PLUGG 17 LUFTNIPPEL G1 4 18 AG 1 COMPLETT KOPP SET 1 lt 18 1 LOCK SET 18 2 BEHÄLLARE 1 LT 18 3 SUGRÖR 19 FÄRGRÖR VALFRITT FÖR TRYCKMODELLER C PACKNINGS SET D JUSTERINGS RING SET E FÄRG FILTER SET F LOCK PACKNING SET Färgrör valfritt för tryckmod...

Page 24: ...ons Corporation Yokohama JAPAN www anest iwataeu co jp ASIA ANEST IWATA France S A Saint Quentin Fallavier Lyon FRANCE info anest iwata fr www anest iwata fr ANEST IWATA U K Ltd St Neots Cambridgeshire ENGLAND enquiries anest iwata co uk www anest iwata co uk ANEST IWATA Scandinavia AB Partille Göteborg SWEDEN info anest iwata se www anest iwata se ANEST IWATA Iberica S L Badalona Barcelona SPAIN ...

Reviews: