background image

OCTO range 

Chapter 1 : INTRODUCTION (continued)  


PAGE 7 

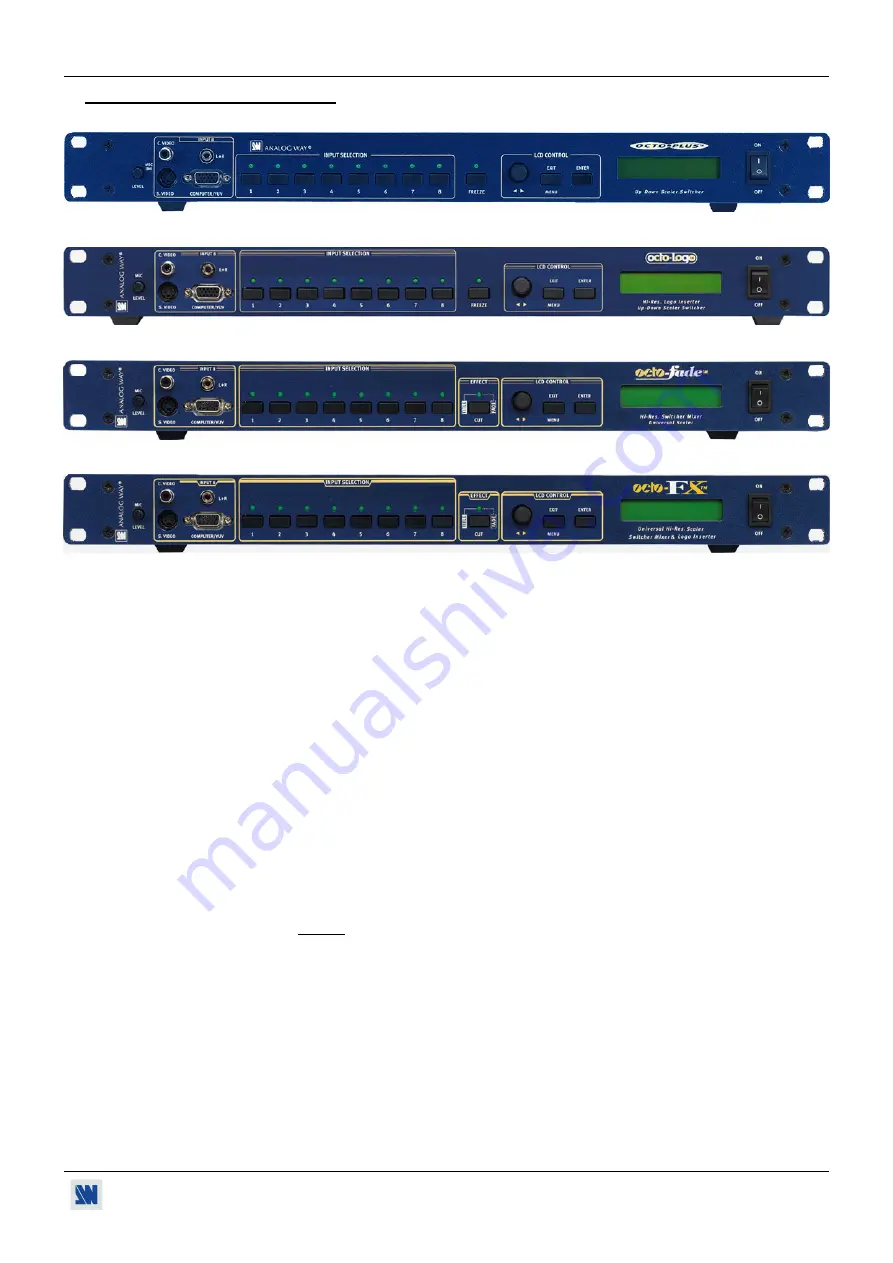
1-6. FRONT PANELS DESCRIPTION 

 FRONT PANEL OF THE OCTO-PLUS


 FRONT PANEL OF THE OCTO-LOGO


 FRONT PANEL OF THE OCTO-FADE


 FRONT PANEL OF THE OCTO-FX


MIC LEVEL:


Microphone audio level adjustment.


INPUT 8:


Universal (computer and video) input # 8. 

C.VIDEO:


Composite Video input (RCA female connector). 

S.VIDEO: 

S.VIDEO (Y/C) input (4-pin mini DIN female connector).


L+R:


Audio stereo unbalanced input (jack 3.5 mm female connector). 

COMPUTER/YUV:

  Computer (PC, MAC, WORKSTATION), YUV (component) and HDTV input (HD15 

female connector). 

INPUT SELECTION:


 Selection of the 8 input sources (short push). 

 A long push (1 second) on the selected input button allows to active the 

BLACK


function. A black screen is displayed onto the output (the blinking LED indicates that this 
function is active). A short push on an INPUT SELECTION button allows to inactive this 
function. 

FREEZE: 

Allows to freeze the displayed output (the blinking LED indicates the FREEZE is active). 

(OCP802 & OLG802)


EFFECT:


Allows to select a type of effect between: CUT, FADE and TITLE. 

(OFD802 & OFX802)


 LED OFF = CUT effect selected (SEAMLESS transition). 

 LED blinking = FADE effect selected. 

 LED ON = TITLE effect selected. 

NOTE:

 These effects are active between the reference computer input and the other 

inputs. In other cases the transition operates with a FADE COLOR. 

LCD CONTROL 


Allows to scroll thru the different menus (in Control mode) or to adjust the


master volume 

(in Status mode). 

EXIT MENU:


Switches between Status and Control mode. 

ENTER:


Validates a selected item. 

ON / OFF:


AC power switch (O = OFF, I = ON). 


Summary of Contents for OCP802

Page 1: ...PROGRAMMER S GUIDE 33 Chapter 10 OPTIONAL ACCESSORY THE REMOTE KEYPAD RK802 F 40 Chapter 11 TECHNICAL SPECIFICATIONS 41 WARRANTY 84 TABLE DES MATI RES INSTRUCTIONS DE S CURIT 3 Chapitre 1 INTRODUCTIO...

Page 2: ...d from wall outlet In both cases please follow these instructions The power cord of the device should be unplugged from the outlet when left unused for several days To unplug the device do not pull on...

Page 3: ...struer ses ouvertures Si un liquide ou un objet p n tre l int rieur de l appareil d branchez imm diatement l appareil et faites le contr ler par un personnel qualifi avant de le remettre en service IS...

Page 4: ...e lea cuidadosamente todas las consignas de seguridad y de funcionamiento del aparato antes de usarlo Conserve las instrucciones de seguridad y de funcionamiento para que pueda consultarlas posteriorm...

Page 5: ...r switcher featuring FADING TITLING effects Fitted with 8 universal A V inputs it performs a fast and ultra smooth transition between any video or computer sources It also allows a true seamless switc...

Page 6: ...NT The openings in the rear and side panels are for cooling Do not cover these openings Be sure that no weight is added to the OCTO in excess of 2 kg 4 4 lbs The maximum ambient operating temperature...

Page 7: ...the BLACK function A black screen is displayed onto the output the blinking LED indicates that this function is active A short push on an INPUT SELECTION button allows to inactive this function FREEZ...

Page 8: ...all of your audio sources to the corresponding AUDIO IN connectors g Connect the AUDIO OUT connector to your sound system h Connect the DISPLAY OUT connector to the DATA INPUT of your display device...

Page 9: ...A or BNC connector NOTE The INPUT 8 is provided with a RCA connector Front panel 2 3 S VIDEO SOURCES The S VIDEO signal also called Y C HI 8 or S VHS is available on most DVD players and high quality...

Page 10: ...M is widely used in broadcasting and is available on high quality DVD players The COMPONENT signal is transmitted with 3 coaxial cables and also has a better picture quality than COMPOSITE and S VIDEO...

Page 11: ...nector 3 5 mm jack female connector The INPUTS 6 7 and 8 are equipped with this audio connector This connector allows connecting only UNBALANCED audio source Connect your UNBALANCED audio sources as f...

Page 12: ...se see the Switching mode table below g If you have selected the fast switching mode select one of the output formats with the LCD menu OUTPUT output format NOTE For fixed pixels display device DMD LC...

Page 13: ...s TITLE available on the OCTO FADE and the OCTO FX only The TITLE effect allows to insert text onto an another source video or computer This effect is only active between the reference input and the o...

Page 14: ...ntering pattern IMPORTANT For best results display a full size bright image no black border to perform a centering If necessary correct the adjustment with the position size functions IMAGE pos settin...

Page 15: ...HOW TO ASSIGN A LOGO NOTE You can assign the stored logos to one or many of the 8 inputs up to 2 logos by inputs g In the assignment menu LOGOS FRAME use logo frame assignment select the input that yo...

Page 16: ...ture you can use the FREEZE function before doing the memorization HOW TO ASSIGN A FRAME f In the assignment menu LOGOS FRAME use logo frame assignment select the input that you want to assign the FRA...

Page 17: ...display the CONTROL MODE In the CONTROL MODE press this button to return to the previous menu without safeguarding the selection return to the STATUS MODE press several times ENTER button From the STA...

Page 18: ...3 freeze 1 4 display logo 2 1 used 2 screen 16 9 5 test pattern 1 no pattern 2 centering 1 H position 3 color bar 2 V position 3 H size 4 V size 3 SWITCHING 1 fast switching output rate computer 1 co...

Page 19: ...t 2 Index 2 none 2 frame 3 logo 1 2 record logo 1 H position 8 input 8 4 empty 2 V position 3 H size 10 logo 8 4 V size 3 record frame 1 store 4 erase 7 EFFECT 1 1 fade timing fade timing 3 5 s 2 shad...

Page 20: ...is assign to the FREEZE function available on the OFD802 OFX802 only display logos The input button is assign to the display logos function available on the OFX802 only 1 4 H sync load ENTER Select f...

Page 21: ...TER no pattern No test pattern is displayed centering Displays onto the output a centering pattern for position and size adjustments NOTE In seamless mode you can adjust the centering pattern position...

Page 22: ...s ENTER Adjust the Brightness with ENTER 4 6 contrast ENTER Adjust the Contrast with ENTER 4 7 color ENTER Adjust the Color with ENTER 4 8 hue ENTER Adjust the Tint of the picture NTSC only with ENTER...

Page 23: ...lect an item with ENTER 5 5 1 tone ENTER Adjust the microphone tone with ENTER 5 5 2 compression ENTER Select an item with ENTER no linear output versus input 2 1 the output is compressed in order to...

Page 24: ...at a same time Select an item with ENTER 6 2 1 H position ENTER Adjust the Horizontal position of the logo area with ENTER 6 2 2 V position ENTER Adjust the Vertical position of the logo area with ENT...

Page 25: ...aximum To obtain the grey color set the 3 levels in the middle 8 3 2 fade frame ENTER available on the OCTO LOGO and the OCTO FX only This function allows switching by a fading image instead of a colo...

Page 26: ...ay address should be the IP address of the router connected to the same LAN segment as the unit Select the gateway address with ENTER Default value 192 168 0 1 local port Every TCP connection and ever...

Page 27: ...0 4 6 contrast 0 4 6 color 0 4 7 color 0 4 7 optimize 0 4 8 hue 0 4 9 under overscan overscan 4 10 sharpness 3 5 1 master volume 191 5 2 audio source auto follow 5 3 audio level 48 5 4 audio balance...

Page 28: ...COM port connected to the device e Click on START on the SOFTWARE f Press the ENTER button of the OCTO FRONT PANEL and SWITCH it ON simultaneously FRONT PANEL SWITCH I The LCD screen displays Download...

Page 29: ...ndow will open automatically e Select the language of the CD ROM menus then click on Install a Remote Control Software and select the name of your device IMPORTANT If the Autorun is not enabled From t...

Page 30: ...enu of the software select RS232 LAN setup and LAN Setup Then configure the Local port the Remote IP address and the Remote port and click on Apply to setup the new values The software will also displ...

Page 31: ...Output Sync the Type of screen and the Output format in FAST mode only e Click on the Image tab and adjust all your inputs If the selected input is a video source If the selected input is a computer s...

Page 32: ...ment table NOTE The ON OFF buttons allow to display ON or OFF the assigned logos of each input In the Use menu adjust the position of each logo with the H pos and V pos functions Record logo Record fr...

Page 33: ...he command cannot be executed value out of range no signal on the selected input the OCTO will just sends back the current status of the corresponding parameters If the command is invalid an error res...

Page 34: ...te 1 SDTV S VIDEO 2 SDTV YUV 3 SDTV RGBS TTL 4 SDTV RGsB 5 SDTV RGBS ana 6 Computer SOG 7 Computer H V C 8 HDTV 9 Audio only PI PSTD Input standard selection according to PCH Rd Wr 0 6 0 NTSC PAL SECA...

Page 35: ...Rd Wr 0 255 QR RLV Red level adjustment computer Rd Wr 0 127 QG GLV Green level adjustment computer Rd Wr 0 127 QB BLV Bleu level adjustment computer Rd Wr 0 127 mc CLK Number of pixels per line compu...

Page 36: ...c reset Lo LOFM Output format during the logo storing Rd 0 11 Identical as F command LA LABT Stop the frame storing Rd Wr 0 1 1 stop the frame storing automatic reset Lt LSTY Frame logo type Rd 0 1 0...

Page 37: ...lect the input 1 with the 1c command 3 0 CONTROLS COMMANDS xu VERU Device version Rd 0 65535 Example 104 Version 1 4 xi I Identification number Rd 0 65535 Value displayed in hexadecimal in the device...

Page 38: ...50 Hz 12 RGB 60 Hz 13 VGA1 350L 14 VGA2 400L 15 VGA3 480L 16 PLASMA 42 17 SVGA 18 MAC 19 XGA 20 PLASMA 50 21 MAC 21 22 SXGA 23 UXGA 24 1080i 50 Hz 25 1080i 59 94 60 26 480p 59 94 60 27 720p 59 94 60 X...

Page 39: ...04 29 41 I 49 73 i 69 105 2A 42 J 4A 74 j 6A 106 2B 43 K 4B 75 k 6B 107 2C 44 L 4C 76 l 6C 108 2D 45 M 4D 77 m 6D 109 2E 46 N 4E 78 n 6E 110 2 F 47 O 4 F 79 o 6 F 111 0 30 48 P 50 80 p 70 112 1 31 49...

Page 40: ...lected AUDIO MUTE Allows to switch OFF the audio output short push BREAKAWAY Allows to permanently diffuse an audio source Select a source with the INPUT SELECTION button then press and hold on the BR...

Page 41: ...5 625 kHz 50 Hz 625 lines 15 735 kHz 60 Hz 525 lines Levels Y 1 Vp p 0 7 V Luma 0 3 V Sync R Y 0 7 Vp p B Y 0 7 Vp p Impedance Y R Y B Y 75 Ohms HDTV on HD15 female connector Formats 720p 1035i 1080i...

Page 42: ...N 11 PIN 12 PIN 13 H sync or C sync S C sync S PIN 14 V sync PIN 15 11 2 DISPLAY OUTPUT HD15 female connectors Levels R G B 0 7 Vp p Sync Separate H V TTL Composite TTL Impedance R G B 75 Ohms Format...

Page 43: ...RTS RS 232 on DB9 female connector Data Rate 9600 Bauds 8 data bits 1 stop bit no parity bit no flow control LAN Optional on RJ45 connector Protocol UDP User Datagram Protocol Data Rate 10 100 Mbps LE...

Page 44: ......

Page 45: ...de fondu encha n et de titrage Equip de 8 entr es universelles il effectue une commutation ultra douce entre toutes les sources informatiques et vid os Il permet galement la r alisation d une commutat...

Page 46: ...ans les c t s sont utilis es pour le refroidissement de l appareil Ne pas bloquer ces ouvertures Assurez vous qu aucun poids ne d passant 2 kg 4 4 lbs ne soit pos sur l OCTO La temp rature ambiante ma...

Page 47: ...ction BLACK La sortie vid o passe alors au noir la LED clignote pour indiquer que cette fonction est active Un appui bref sur une des touches de s lection permet de d sactiver cette fonction FREEZE Ge...

Page 48: ...z toutes les sources audio aux connecteurs AUDIO IN correspondants g Raccordez votre syst me audio au connecteur AUDIO OUT h Raccordez le connecteur DISPLAY OUT sur l entr e DATA de votre afficheur pr...

Page 49: ...ecteur RCA ou BNC NOTE L entr e n 8 est quip e d un connecteur RCA Face avant de l OCTO 2 3 SOURCES S VIDEO Le signal S VIDEO aussi appel Y C HI 8 ou S VHS est disponible sur les lecteurs de DVD et su...

Page 50: ...M sont largement utilis s dans le milieu broadcast mais sont aussi disponibles sur certain lecteur de DVD Les signaux Composantes sont transmis par 3 c bles coaxiaux donnant ainsi une qualit d image s...

Page 51: ...jack 3 5 mm femelle Les entr es n 6 7 et 8 sont quip es de ce connecteur audio Ce connecteur permet de raccorder uniquement des sources audio asym triques Raccordez vos sources asym triques comme ci...

Page 52: ...or seamless Voir le tableau des modes de commutation ci dessous g Si vous avez s lectionn le mode fast switching S lectionnez un format de sortie OUTPUT output format NOTE Pour les afficheurs matrice...

Page 53: ...ux sources TITLE disponible sur l OCTO FADE et l OCTO FX uniquement L effet TITLE permet d ins rer du texte sur une autre source vid o et informatique Cet effet est actif uniquement entre l entr e inf...

Page 54: ...Si n cessaire corrigez le cadrage avec les r glages de position et de taille IMAGE pos settings NOTE La fonction centering est disponible uniquement pour les sources informatique NOTE De plus lorsque...

Page 55: ...ttribuer les logos m moris s une ou plusieurs des 8 entr es jusqu 2 logos par entr es g Dans le menu assignment LOGOS FRAME use logo frame assignment s lectionnez l entr e laquelle vous souhaitez attr...

Page 56: ...prendra environ 2 minutes NOTE Pour les images en mouvement vous pouvez utiliser la fonction FREEZE avant d effectuer la m morisation ATTRIBUTION DE LA FRAME f Dans le menu assignment LOGOS FRAME use...

Page 57: ...ODE R GLAGE Dans le MODE R GLAGE permet de revenir au menu pr c dent sans valider la s lection revenir au MODE TAT plusieurs appuis ENTER Dans le MODE TAT permet d acc der au mode R GLAGE Dans le MODE...

Page 58: ...pos settings 1 H position 2 V position 3 H size computer 1 computer 8 1 output 4 3 2 output 16 9 4 IMAGE 1 centering 4 V size 3 SWITCHING 1 fast switching output rate 1 H position 3 color bar 2 V pos...

Page 59: ...locking 1 red level 3 transition 1 fade color 2 shadow title Shadow title OFF ON 1 shadow V size 2 shadow V pos 3 record frame 1 store 4 erase 7 EFFECT 1 1 fade timing fade timing 3 5 s 3 logo 1 2 re...

Page 60: ...d si aucun signal n est raccord l entr e freeze La touche de cette entr e est attribu e la fonction FREEZE disponible sur OFD802 et OFX802 display logos La touche de cette entr e est attribu e la fonc...

Page 61: ...tern Aucune mire n est affich e centering Affiche sur la sortie une mire de cadrage NOTE En mode seamless r glez la mire de cadrage avec les fonctions suivantes H position R glez la position horizonta...

Page 62: ...suivantes 4 5 brightness ENTER R glez la luminosit avec ENTER 4 6 contrast ENTER R glez le contraste avec ENTER 4 7 color ENTER R glez la couleur avec ENTER 4 8 hue ENTER R glez la teinte de l image...

Page 63: ...une fonction avec ENTER 5 5 1 tone ENTER R glez la tonalit du microphone avec ENTER 5 5 2 compression ENTER S lectionnez une fonction avec ENTER no la sortie est lin aire par rapport l entr e 2 1 la s...

Page 64: ...s en m me temps S lectionnez une fonction avec ENTER 6 2 1 H position ENTER R glez la position horizontale de la zone du logo avec ENTER 6 2 2 V position ENTER R glez la position verticale de la zone...

Page 65: ...itionnez les 3 niveaux au milieu 8 3 2 fade frame ENTER disponible uniquement sur l OCTO LOGO et sur l OCTO FX Cette fonction permet de commuter par une image fondue au lieu d une couleur R glez ensui...

Page 66: ...gateway doit tre l adresse IP du router raccord au m me r seau LAN que l appareil S lectionnez l adresse gateway avec ENTER Valeur par d faut 192 168 0 1 local port Chaque connexion TCP et UDP est d...

Page 67: ...el 0 4 6 contrast 0 4 6 color 0 4 7 color 0 4 7 optimize 0 4 8 hue 0 4 9 under overscan overscan 4 10 sharpness 3 5 1 master volume 191 5 2 audio source auto follow 5 3 audio level 48 5 4 audio balanc...

Page 68: ...u produit e Cliquez sur la touche START du logiciel f Maintenez enfoncer la touche ENTER de l OCTO puis mettez l OCTO sous tension INTERRUPTEUR DE LA FACE AVANT I L cran LCD va afficher Downloading Le...

Page 69: ...ouvre alors automatiquement e S lectionnez le langage des menus du CD ROM ensuite cliquez sur Installer un programme de contr le distance et s lectionnez le nom votre appareil IMPORTANT Si l autorun...

Page 70: ...AN setup puis LAN Setup Remplissez ensuite les champs en face de Local port Remote IP address et Remote port puis validez en cliquant sur Apply Le logiciel va alors afficher Device connected NOTE Pour...

Page 71: ...cran Type of Screen et le format de sortie Output Format en mode FAST uniquement e Cliquez sur l onglet Image puis effectuez les r glages pour toutes les entr es Si l entr e s lectionn e est une sour...

Page 72: ...ON OFF permettent de faire appara tre dispara tre les logos de chaque entr e Dans le menu Use r glez la position de chaque logo avec les fonctions H pos et V pos Modes Record logo Record frame Pour m...

Page 73: ...e valeur en dehors de la plage pas de signal sur l entr e s lectionn e l appareil renvoie uniquement les tats des param tres correspondant Si la commande est invalide une r ponse d erreur sera retourn...

Page 74: ...V 3 SDTV RGBS TTL 4 SDTV RGsB 5 SDTV RGBS ana 6 Computer SOG 7 Computer H V C 8 HDTV 9 Audio only PI PSTD S lection du standard d entr e selon PCH Rd Wr 0 6 0 NTSC PAL SECAM 1 NTSC 2 PAL 3 NTSC 4 43 6...

Page 75: ...glage du niveau de noir computer Rd Wr 0 255 QR RLV R glage du niveau de rouge comput Rd Wr 0 127 QG GLV R glage du niveau de vert computer Rd Wr 0 127 QB BLV R glage du niveau de bleu computer Rd Wr...

Page 76: ...de sortie pendant m morisation Rd 0 11 Identique la commande F LA LABT Arr t de la m morisation Rd Wr 0 1 1 arr te la m morisation raz automatique Lt LSTY Type de frame logo Rd 0 1 0 frame 1 logo Ls L...

Page 77: ...1 g Pour arr ter le TITRAGE s lectionnez l entr e n 1 avec 1c 3 0 COMMANDES DE CONTR LE xu VERU Version de l appareil Rd 0 65355 Exemple 104 Version 1 4 xi I Num ro d identification Rd 0 65535 Valeur...

Page 78: ...3 VGA1 350L 14 VGA2 400L 15 VGA3 480L 16 PLASMA 42 17 SVGA 18 MAC 19 XGA 20 PLASMA 50 21 MAC 21 22 SXGA 23 UXGA 24 1080i 50 Hz 25 1080i 59 94 60 26 480p 59 94 60 27 720p 59 94 60 XT REFT Fr quence tra...

Page 79: ...104 29 41 I 49 73 i 69 105 2A 42 J 4A 74 j 6A 106 2B 43 K 4B 75 k 6B 107 2C 44 L 4C 76 l 6C 108 2D 45 M 4D 77 m 6D 109 2E 46 N 4E 78 n 6E 110 2 F 47 O 4 F 79 o 6 F 111 0 30 48 P 50 80 p 70 112 1 31 4...

Page 80: ...e FADE LED allum e TITLE AUDIO MUTE Permet d teindre la sortie audio appui court BREAKAWAY Permet de diffuser en permanence une source audio S lectionnez une source puis maintenez appuy 1 seconde la t...

Page 81: ...ence 15 625 kHz 50 Hz 625 lignes 15 735 kHz 60 Hz 525 lignes Niveaux Y 1 Vc c 0 7 V Luma 0 3 V Synchro R Y 0 7 Vc c B Y 0 7 Vc c Imp dance Y R Y B Y 75 Ohms HDTV sur connecteur HD15 femelle Formats 72...

Page 82: ...13 Synchro H ou synchro C Synchro C S 14 Synchro V 15 11 2 SORTIES DATA DISPLAY OUT connecteurs HD15 femelle Niveaux R G B 0 7 Vc c Synchro H et V S par es TTL Composite TTL Imp dance R G B 75 Ohms F...

Page 83: ...9 femelle D bit 9600 Bauds 8 bits de donn es 1 bit stop pas de bit de parit pas de contr le de flux LAN sur connecteur RJ45 optionnel Protocole UDP User Datagram Protocol D bit 10 100 Mbps Fonctions d...

Page 84: ...scription of the problem and then call your authorized dealer GARANTIE Analog Way garantie le produit contre les d fauts mat riels et vices de fabrication pour une p riode de 3 ans partir de la date d...

Reviews: