background image

EVAL-AD7175-8SDZ User Guide 

UG-901


Rev. 0 | Page 7 of 10 

EVALUATION BOARD SOFTWARE 

SOFTWARE INSTALLATION 

The 

EVAL-AD7175-8SDZ

 evaluation kit includes software on 

a CD. Double-click the 

setup.exe

 file from the CD to run the 

installer. The default installation location for the software is 

C:\Program Files\Analog Devices\EVAL-AD7175-8SDZ\

Install the evaluation software before connecting the evaluation 
board and SDP-B controller board to the USB port of the PC to 
ensure that the evaluation system is correctly recognized when 
connected to the PC. 

There are two parts to the installation: 


AD7175-8

 evaluation board software installation 


EVAL-SDP-CB1Z

 SDP-B board drivers installation 

Place the software and drivers in the appropriate locations by 
proceeding through all of the installation steps. Connect the 
SDP-B board to the PC only after the software and drivers are 
installed. The installer may prompt for permission to allow the 
program to make changes to the computer. Click 

Yes

 to proceed 

(see Figure 3). 

13767

-003


Figure 3. User Account Control Permission Dialog Box 

A security warning may appear as part of the SDP-B controller 
board driver installation. Click 

Install

 to proceed with the 

installation of the driver (see Figure 4). Without this 
confirmation, the software cannot operate correctly. 

13

76

7-

0

04


Figure 4. SDP-B Drivers Installation Confirmation Dialog Box 

After installation is complete, connect th

EVAL-AD7175-8SDZ


evaluation board to the 

EVAL-SDP-CB1Z

 SDP-B board, as 

shown in Figure 2. Connect the SDP-B board via the USB cable 
to the computer.  

Take the following steps to verify that the SDP-B controller 
board driver is installed and working correctly: 

1.


Allow the 

Found New Hardware Wizard

 to run.  

2.


After the drivers are installed, check that the board has 
connected correctly by looking at the 

Device Manager

 of 

the PC. The 

Device Manager

 can be found by right 

clicking 

My Computer

, selecting 

Manage

, and then 

Device Manager

 from the list of 

System Tools

 (see Figure 5). 

3.


The SDP-B board appears under 

ADI Development Tools 

as 

Analog Devices System Development Platform

 or 

similar. The installation is complete. 

137

67

-005


Figure 5. Device Manager 

LAUNCHING THE SOFTWARE 

The 

AD7175-8

 software can be launched when th

EVAL-

AD7175-8SDZ

 evaluation board and th

EVAL-SDP-CB1Z


SDP-B controller board are correctly connected to the PC.  

To launch the software, do the following: 

1.


From the 

Start

 menu, click 

Programs

Analog Devices

and then 

EVAL-AD7175-8SDZ

. The main window of the 

software then displays (see Figure 7).  
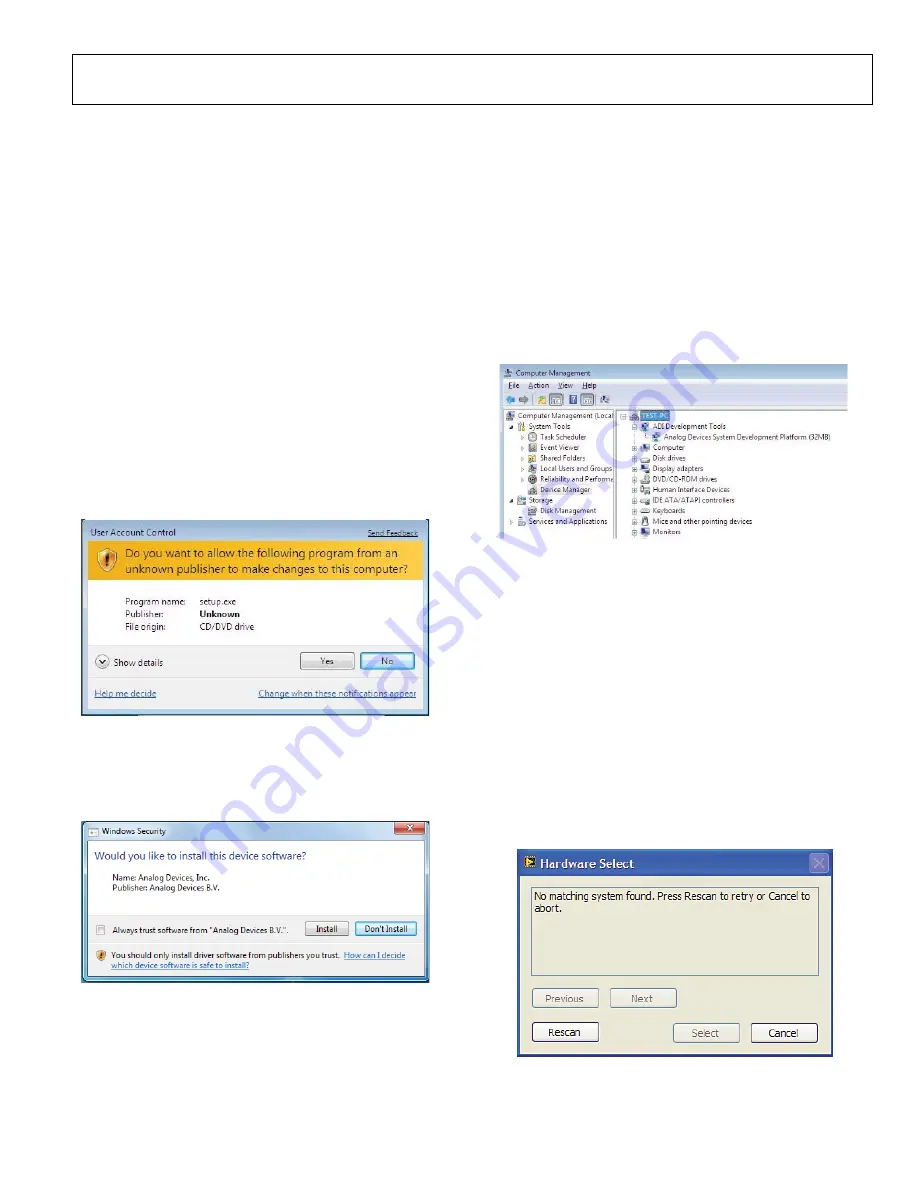
2.


If th

AD7175-8

 evaluation system is not connected to 

the USB port via the SDP-B board when the software is 
launched, a connectivity error displays (see Figure 6). 
Connect the evaluation board to the USB port of the PC, 
wait a few seconds, click 

Rescan

, and follow the 

instructions. 

13767

-006


Figure 6. Connectivity Error Alert Dialog Box 


Summary of Contents for EVAL-AD7175-8SDZ

Page 1: ... on the information therein All referenced brands product names service names and trademarks are the property of their respective owners 00000005981LF 000 EOS Power Buy Now We have 45 000 LP502030 PCM NTC LD A02554 EEMB Lithium Battery Rectangular 3 7V 250mAh Rechargeable in stock now Starting at 0 034 This EEMB part is fully warrantied and traceable 1 855 837 4225 Give us a call International 1 5...

Page 2: ...board connects to a USB port via the SDP B system demonstration platform controller board EVAL SDP CB1Z The AD7175 8 evaluation software fully configures the AD7175 8 device functionality via a user accessible register interface and provides dc time domain analysis in the form of waveform graphs histograms and associated noise analysis for ADC performance evaluation Full specifications on the AD71...

Page 3: ...oise Test 3 Evaluation Board Hardware 4 Device Description 4 Hardware Link Options 4 Sockets and Connectors 5 Serial Interface 5 Power Supplies 5 Power Supply Configurations 6 Analog Inputs 6 Reference Options 6 Evaluation Board Software 7 Software Installation 7 Launching the Software 7 Software Operation 8 Overview of the Main Window 8 Control Toolbar 8 Data Section 9 Analysis Section 9 Status 9...

Page 4: ... B board to the PC via the USB cable For Windows XP you may need to search for the SDP drivers Choose to automatically search for the drivers for the SDP B board if prompted by the operating system 6 From the Analog Devices subfolder in the Programs menu launch the AD7175 8 software QUICK START NOISE TEST Use the following procedure to quickly test the noise performance 1 Insert Link LK5 to Link L...

Page 5: ... the following Position A AIN1 REF2 pin on the AD7175 8 Position B Buffer U6 Position C U7 for use with a single ended to differential driver circuit Position D J15 7 SL2 A Routes A2 to one of the following Position A AIN2 pin on the AD7175 8 Position B Buffer U10 Position C U9 for use with a single ended to differential driver circuit SL3 A Routes A3 to one of the following Position A AIN3 pin on...

Page 6: ...t MC 1 5 6 G 3 81 FEC3704762 J15 Optional header 7 way 2 54 mm pin header Samtec SSW 107 01 T S FEC1803478 J16 Optional header 7 way 2 54 mm socket Samtec TLW 107 05 G S FEC1668499 1 Order codes starting with FEC are for Farnell SERIAL INTERFACE The EVAL AD7175 8SDZ evaluation board connects to the Blackfin ADSP BF527 on the SDP B controller board via the serial peripheral interface SPI There are ...

Page 7: ...ed in Table 1 Split Supply Regulated To set up the board use the following procedure 1 Remove SL12 to SL15 These links connect AVSS to AGND 2 Connect a bench top power supply to J3 and set LK2 to Position A Make sure that AVSS 2 5 V in this case 3 Set LK1 to Position B This sets the input to the power monitor circuitry to work with the lower AVDD1 supply of 2 5 V Set all other links and solder lin...

Page 8: ...ers Installation Confirmation Dialog Box After installation is complete connect the EVAL AD7175 8SDZ evaluation board to the EVAL SDP CB1Z SDP B board as shown in Figure 2 Connect the SDP B board via the USB cable to the computer Take the following steps to verify that the SDP B controller board driver is installed and working correctly 1 Allow the Found New Hardware Wizard to run 2 After the driv...

Page 9: ...in the graphs of the DATA and ANALYSIS sections of the main window The Samples numeric control is the number of samples gathered per batch Sampling Sampling set to Capture in Figure 7 enacts the sampling mode used by the software This is unrelated to the ADC mode The user can capture a defined sample set or continuously gather batches of samples In both cases the number of samples set in the Sampl...

Page 10: ...inputs for that channel labeled next to the on and off controls These controls only affect the display of the channels and do not have any effect on the channel settings in the ADC register map Latest Data These indicators show the value of the last sample gathered on the corresponding channel see Channel Selection ANALYSIS SECTION Analysis Histogram and Analysis Channel The histogram shows the an...

Page 11: ...ny other party for any reason Upon discontinuation of use of the Evaluation Board or termination of this Agreement Customer agrees to promptly return the Evaluation Board to ADI ADDITIONAL RESTRICTIONS Customer may not disassemble decompile or reverse engineer chips on the Evaluation Board Customer shall inform ADI of any occurred damages or any modifications or alterations it makes to the Evaluat...

Reviews: