


Installation Guide
NXA-WC80211G/CF
Wireless 802.11g CompactFlash Card
Note
: Since the wireless card was replaced, all previous WAP security and
communication parameters are no longer available and must be reset.
3.
Toggle the
DHCP/Static
field (from the IP Settings section) until the choice
cycles to
DHCP
.
Except for the Host Name, all other fields are then disabled.
4.
Press the optional
Host Name
field to open an on-screen Keyboard and enter
the Host Name information.
5.
Press
Done
after you’re finished assigning the alpha-numeric string.
6.
Do not alter any of the remaining disabled fields in the IP Settings section. Once
the panel is rebooted, these values are obtained by the unit and displayed in the
DNS
fields after power-up.
Note
: This information can be found in either the Workspace - System name > Define
Device section of your code (that defines the properties for your panel), or in the
Device Addressing/Network Addresses section of the Tools > NetLinx Diagnostics
dialog.
7.
From within the Wireless Security section, press/toggle On the
Open (Clear
Text)
button. By default, this field displays an SSID entry of
AMX
.
8.
From within the Open (Clear Text) Settings page, press the red
SSID
field to
display the
Network Name (SSID)
keyboard and enter the SSID name assigned
to the target WAP (
case-sensitive
).
•
The card should be given the SSID used by the target WAP. If this field is left
blank, the unit will attempt to connect to the first available WAP. By default, all
WAP250Gs use
AMX
as their assigned SSID value.
•
One of the most common problems associated with connection to a WAP arise
because the SSID was not entered properly.
The SSID is case-sensitive.
9.
Press the
Done
button when complete.
Do not leave this field blank.
10.
From the Open (Clear Text) Settings page, press the Save button to incorporate
your new information into the panel and begin the communication process.
11.
From within the RF Link Info section, verify the SSID name has properly been
entered and stored.
12.
Verify the IP Settings section fields have been properly set.
13.
Press the
Back
button to navigate to the Protected Setup page.
14.
Press the on-screen
Reboot
button to both save any changes and restart the
panel.
Remember that you will need to navigate to the System Settings page and
configure the connection to a target Master.
15.
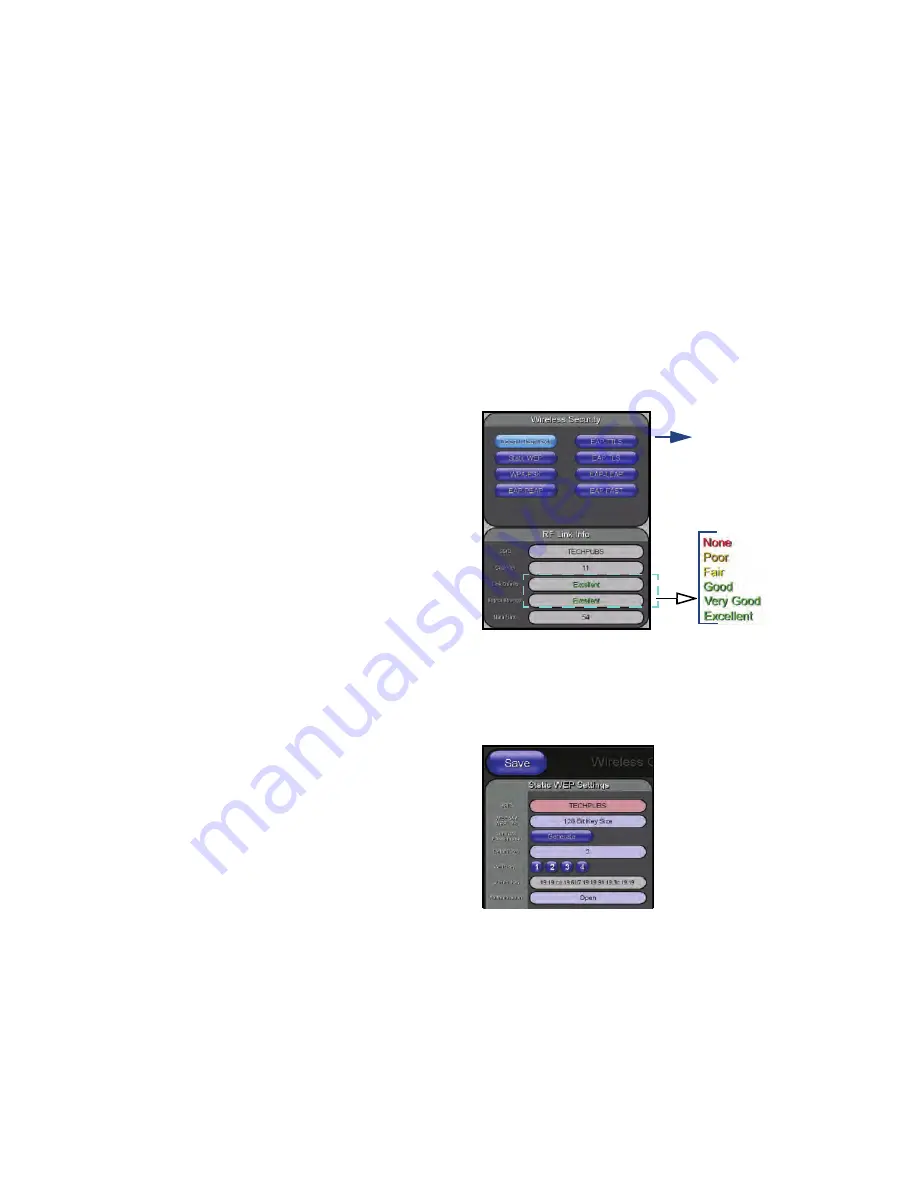
After the panel restarts, return to the Wireless/Secondary Connection page to
verify the Link Quality and Signal Strength:
The descriptions are:
None
,
Poor
,
Fair
,
Good
,
Very Good
, and
Excellent
.
Note
: Use of the following encryption methods require the upload of a secured
certificate to the target panel prior to usage:
EAP-PEAP
,
EAP-TTLS
,
EAP-TLS
,
EAP-FAST
.
Secure Panel Access Using a Static IP
By default, wireless Modero panels are configured for unsecured communication to a
WAP. To properly setup both a WAP250G and panel for secure communication, you
must first prepare the Modero panel and then use the information given to fill out the
fields within the WAP’s browser-based Basic Wireless Configuration page.
Although a DHCP Address can be used to configure a secure connection, it can
become more difficult to connect to a WAP using a Dynamic IP Address if for some
reason that device has lost its last address from the DHCP Server. Using a pre-
reserved IP Address (Static) can provide the user with a consistent IP Address for
connection to the target WAP.
These procedures outline the process of configuring a secure Static connection to a
target NXA-WAP250G using a WEP 128-bit encryption method (
Static WEP
). The
new NXA-WC80211GCF card provides additional methods which are discussed in
more detail within the specific panel’s instruction manual.
Step 1: Setup a Static IP Connection
1.
Cycle power to the panel (this allows a detection of the new internal wireless
card).
2.
Press the
Protected Setup
button (located on the lower-left of the panel page)
to open the Protected Setup page and display an on-screen keypad.
3.
Enter
1988
into the Keypad’s password field and press
Done
when finished.
4.
Press the
Wireless Settings
button (located on the lower-left) to open the
Wireless Settings page.
Note
:
Check with your System Administrator for a pre-reserved Static IP Address
assigned to the panel. This address must be obtained before Static assignment of the
panel continues.
5.
Toggle the
DHCP/Static
field (
from the IP Settings section
) until the choice
cycles to
Static
. The
IP Address
,
Subnet Mask
, and
Gateway
fields then
become user-editable (red).
6.
Press the
IP Address
field to open an on-screen Keyboard and enter the Static
IP Address (
provided by your System Administrator
).
7.
Press
Done
after you are finished entering the IP information.
8.
Repeat the same process for the
Subnet Mask
and
Gateway
fields.
9.
Press the optional
Host Name
field to open an on-screen Keyboard and enter
the Host Name information.
10.
Press
Done
after you are finished assigning the alpha-numeric string of the host
name.
11.
Press the
Primary DNS
field to open an on-screen Keyboard, enter the Primary
DNS Address (
provided by your System Administrator
) and press
Done
when
compete. Repeat this process for the
Secondary DNS
field.
12.
Press the
Domain
field to open a Keyboard, enter the resolvable domain
Address (
this is provided by your System Administrator and equates to a unique
Internet name for the panel
), and press
Done
when complete.
13.
Setup the security and communication parameters between the wireless card
and the target WAP by configuring the Wireless Settings section on this page
(Step 2).
Step 2: Configure a Secure Connection to your WAP250G
Since the code key generator on Modero panels use the same key generation formula,
all panels generate identical keys for the same Passphrase. The generators used on
WAPs will not produce the same key as the Modero generator even if you use the
same Passphrase.
For this reason, we recommend first creating the Current Key on the Modero, then
entering that information into the appropriate WAP250G fields.
1.
Repeat the first four actions from the preceding Step 1 to open the Wireless
Settings page and then locate the Wireless Settings section(FIG. 12).
Note
: You must first take the SSID name, Current Key string value, and panel MAC
Address information and then later enter it into the appropriate WAP dialog fields in
order to "sync-up" the secure connection. These values must be identically
reproduced on the target WAP.
2.
From within the Wireless Security section, press the
Static WEP
button to open
the on-screen Static WEP Settings window (FIG. 13).
3.
Touch the red
SSID
field and from the Network Name (SSID) keyboard, enter the
SSID name you are using on your target Wireless Access Point (
case sensitive
)
and then press
Done
.
The card should be given the SSID used by the target WAP. If this field is left
blank, the unit will attempt to connect to the first available WAP. By default, all
WAP250Gs use AMX as their assigned SSID value.
One of the most common problems associated with connection to a WAP arise
because the SSID was not entered properly.
The SSID is case-sensitive.
4.
Toggle the blue
WEP 64/WEP128
field until it reads
64 Bit Key Size
or
128 Bit
Key Size
. The 64/128 selection reflects the bit-level of encryption security. This
WEP encryption level must match the encryption level being used on the WAP.
For example: if you have your Wireless Access Point set to default key 4 (which
was 01:02:03:04:05), you must set the panel’s key 4 to 01:02:03:04:05.
FIG. 12
Wireless Security section
FIG. 13
Static WEP Settings window
Wireless card communication
settings (for use with a target
WAP)
page 5 of 6


