

800-3002 REV:A
Last Revised: 1/2016
© 2016 Harman. All rights reserved. Modero, AMX, AV FOR AN IT WORLD, HARMAN, and their respective logos are registered trademarks of
HARMAN. Oracle, Java and any other company or brand name referenced may be trademarks/registered trademarks of their respective companies.
AMX does not assume responsibility for errors or omissions. AMX also reserves the right to alter specifications without prior notice at any time.
The AMX Warranty and Return Policy and related documents can be viewed/downloaded at www.amx.com.
3000 RESEARCH DRIVE, RICHARDSON, TX 75082 AMX.com | 800.222.0193 | 469.624.8000 | +1.469.624.7400 | fax 469.624.7153
AMX (UK) LTD, AMX by HARMAN - Unit C, Auster Road, Clifton Moor, York, YO30 4GD United Kingdom • +44 1904-343-100 • www.amx.com/eu/
FIG. 2
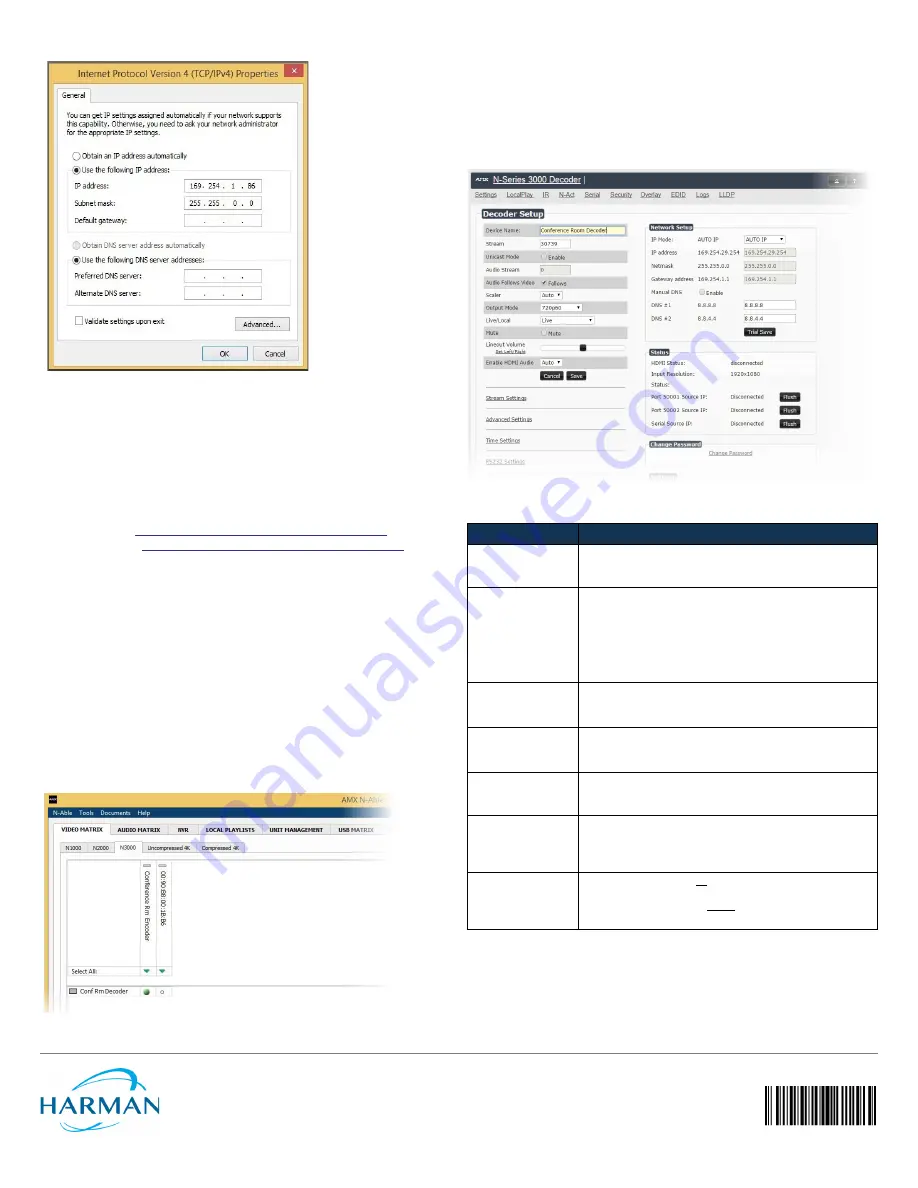
SETTING A STATIC IP ADDRESS
NOTE: If the computer does not need Internet access, you can simply enter a
unique 169.254.xxx.xxx IP address with a 255.255.0.0 Subnet mask. Please
contact your network administrator if you are unsure of how to configure the
existing interface. If the computer has a statically-assigned IP address, click
on the Advanced button. Then click Add to enter a unique 169.254.xxx.xxx
address with a subnet of 255.255.0.0.
Steps for auto discovering devices on the network:
1.
Use the host computer to download and install the latest version of
N-Able:
PC version -
http://www.amx.com/products/N-ABLE-PC.asp
Mac version -
http://www.amx.com/products/N-ABLE-MAC.asp
2.
Attach your N3X32 unit(s) to the layer-3 network switch.
3.
Disable the wireless adapter on your computer (it must be hard-wired
to the switch).
4.
Connect the host computer to the layer-3 network switch.
5.
Open the N-Able application.
If all devices do not appear automatically, click the
Auto
Discover
button on
the
Unit
Management
tab. This issues a broadcast command that will
discover all units even if they are not in the same IP subnet.
Logging in Using N-Able Software
Once the host IP address is configured properly, you can view all discovered
units using N-Able. Access the N3X32 units from the following tabs:
•
Unit Management
tab -
Type
field lists
N3000 Encoder/Decoder
.
•
Video Matrix
tab - N3X32 units are found on the
N3000
sub-tab of this
screen (as shown below).
FIG. 3
VIDEO MATRIX
Double-click the unit’s name (in one of the lists mentioned previously) to
view its control pages. If prompted, enter
admin
and
password
for the
default username and password. Once logged in, you can change the
username and password (using the options on the unit’s
Settings
page).
NOTE: If you would like for N-Able to support auto-login to your units, make
sure N-Able’s Device Auto-login settings match the unit’s username and
password (by selecting N-Able > Settings from the N-Able tool bar).
FIG. 4
N3000 SETTINGS PAGE
Troubleshooting Guidelines
Contact SVSI technical support at [email protected] or
256.461.7143 x9900 for any installation issues.
Problem
Possible Solution
Video is not
transmitting.
• Verify that the Encoder
TX Enable
setting is turned on.
(Encoders ship from the factory with their video output
turned off by default.)
Local Play
graphic is
displayed.
• Verify Decoder is assigned to view a valid stream in the
N-Able matrix.
• Verify Decoder is currently in live play mode (black text on
matrix view).
• Verify network is properly configured and set up. If needed,
connect Encoder directly to Decoder to verify network
issues.
Host Play
graphic is
displayed.
• Verify Encoder is in live play mode (black text in matrix).
• Verify source is attached and is outputting a valid signal
(
HDMI
LED on Encoder is on).
Unsupported
Resolution
graphic is
displayed.
• Change source resolution to a valid resolution (try
720p60).
• Verify cabling is correct.
Copy Protected
Content
screen is
displayed.
• Contact SVSI technical support.
Black screen/no
graphic is displayed.
• Set Decoder to local play. If the local play graphic does not
appear, check the display input settings and cabling.
• If local play appears, set Decoder to live play and verify
network is configured properly.
No audio is detected. • If there is no audio on all
Decoders, verify audio settings are
correct on Encoder.
• If there is no audio on a single Decoder, verify audio
settings are correct on Decoder.


