For full warranty information, refer to the AMX Instruction Manual(s) associated with your Product(s).
7/07
©2007 AMX. All rights reserved. AMX and the AMX logo are registered trademarks of AMX.
AMX reserves the right to alter specifications without notice at any time.
3000 RESEARCH DRIVE, RICHARDSON, TX 75082 • 800.222.0193 • fax 469.624.7153 • technical support 800.932.6993 • www.amx.com
93-2255-07
REV: E
9.
Press the optional
Host Name
field to open an on-screen Keyboard and
enter the Host Name information.
10. Press
Done
after you are finished assigning the alpha-numeric string of
the host name.
11. Press the
Primary DNS
field to open an on-screen Keyboard, enter the
Primary DNS Address (
provided by your System Administrator
) and press
Done
when compete. Repeat this process for the
Secondary DNS
field.
12. Press the
Domain
field to open a Keyboard, enter the resolvable domain
Address (
this is provided by your System Administrator and equates to a
unique Internet name for the panel
), and press
Done
when complete.
13. Setup the security and communication parameters between the
wireless card and the target WAP by configuring the Wireless
Settings section on this page (Step 2).
Step 2: Configure a Secure Connection to your WAP250G
Since the code key generator on Modero panels use the same key generation
formula, all panels generate identical keys for the same Passphrase. The
generators used on WAPs will not produce the same key as the Modero
generator even if you use the same Passphrase.
For this reason, we recommend FIRST creating the Current Key on the Modero
and then entering that information into the appropriate WAP250G fields.
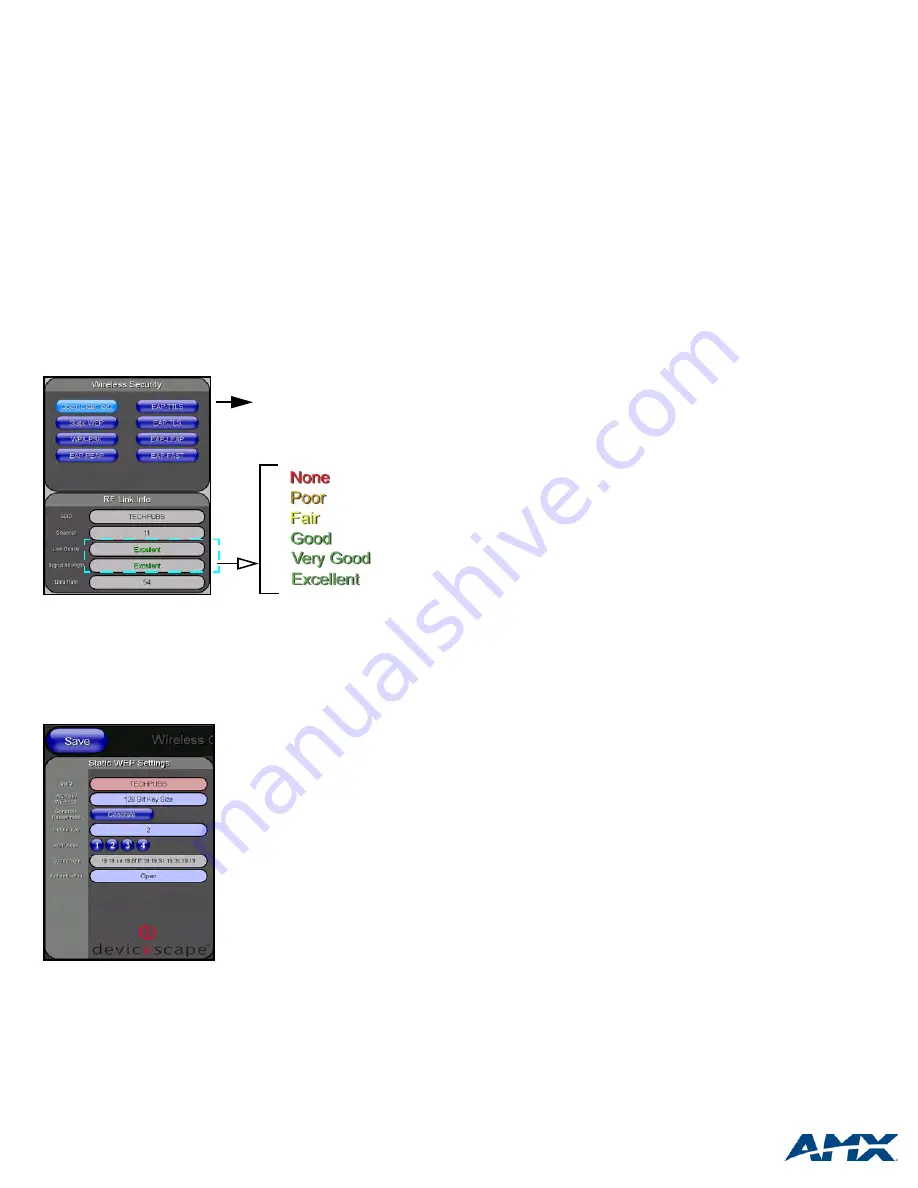
1.
Repeat the first four actions from the preceding Step 1 to open the
Wireless Settings page and then locate the Wireless Settings section
(FIG. 12).
Note
: You must first take the SSID name, Current Key string value, and
panel MAC Address information and then later enter it into the appropriate
WAP dialog fields in order to "sync-up" the secure connection. These
values must be identically reproduced on the target WAP.
2.
From within the Wireless Security section, press the
Static WEP
button to
open the on-screen Static WEP Settings window (FIG. 13).
3.
Touch the red
SSID
field and from the Network Name (SSID) keyboard,
enter the SSID name you are using on your target Wireless Access Point
(
case sensitive
) and then press
Done
.
• The card should be given the SSID used by the target WAP. If this field is
left blank, the unit will attempt to connect to the first available WAP. By
default, all WAP250Gs use AMX as their assigned SSID value.
• One of the most common problems associated with connection to a WAP
arise because the SSID was not entered properly. You must maintain the
same case when entering the SSID information.
ABC is not the same as Abc.
4.
Toggle the blue
WEP 64/WEP128
field until it reads
64 Bit Key Size
or
128 Bit Key Size
. The 64/128 selection reflects the bit-level of encryption
security. This WEP encryption level must match the encryption level
being used on the WAP.
Note
: WEP will not work unless the same Default Key is set on both the
panel and the Wireless Access Point.
For example: if you have your Wireless Access Point set to default key 4
(which was 01:02:03:04:05), you must set the panel’s key 4 to 01:02:03:04:05.
5.
Toggle the
Default Key
field until the you’ve chosen a WEP Key value
(from
1- 4
) that matches what you’ll be using on your target WAP250G.
These WEP Key identifier values must match for both devices.
6.
With the proper WEP Key value displayed, press the
Generate
button to launch the WEP Passphrase keyboard.
This keyboard allows
you to enter a Passphrase (such as
AMXPanel
) and then
automatically generate a WEP key which is compatible only among all
Modero panels.
7.
Within this on-screen WEP Passphrase keyboard, enter a character
string or word (
such as
AMXPanel
) and press
Done
when you have
finished.
• As an example, enter the word
AMXPanel
using a 128-bit hex digit
encryption. After pressing Done, the on-screen Current Key field displays
a long string of characters (separated by colons) which represents the
encryption key equivalent to the word
AMXPanel
.
8.
Write down this Current Key string value for later entry into your WAP’s
WEP Key field (
typically entered without colons
) and into other
communicating panel’s Current Key field.
9.
Leave the
Authentication
field reading
Open
(default).
10. Press the
Save
button to store this configuration and return to the
previous Wireless Settings page.
11. Press the
Back
button to navigate to the Protected Setup page and press
the on-screen
Reboot
button to both save any changes and restart the
panel.
Remember that you will need to navigate to the System
Settings page and configure the connection to a target Master.
FIG. 12
Wireless Security section
FIG. 13
Static WEP Settings window
Wireless card communication
settings (for use with a target
WAP)


