background image

Modero X Series® G5 Touch Panels

7

MXD/T-701 7" Modero X Series® G5 Touch Panels

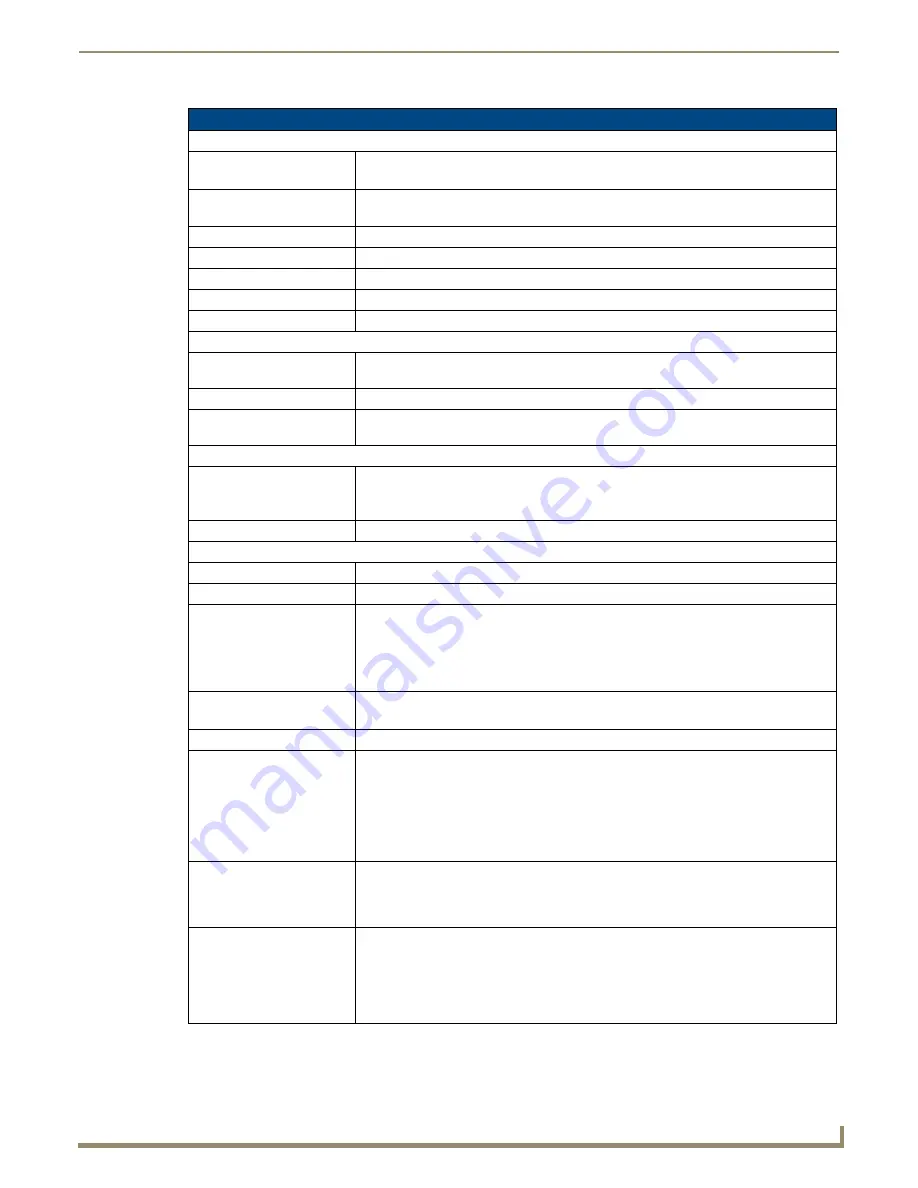
MXD-701 Specifications (Cont.)

Touch Panel Display (Cont.):

Screen Resolution
(W x H):

Landscape:

 1024x600

Portrait:

 600x1024

Aspect Ratio 
(W x H):

Landscape

: 16:9

Portrait

: 9:16

Brightness:

400 cd/m2

Contrast Ratio:

700:1

Color Depth:

16,7M colors

Backlight Type:

LED

Touch Overlay:

Projected Capacitive; Multi-touch support, 3 simultaneous max.

Communications:

Ethernet:

10/100 port, RJ-45 connector and cable. Supported IP and IP-based protocols: 
UDP, TCP, ICMP, ICSP, IGMP, DHCP, SSH, DNS, RFB (for VNC), HTTP

USB:

1 - USB host 2.0, Type A ports 

Near Field Communications 
(NFC): 

Supports standards ISO/IEC 15693, ISO/IEC 14443A, ISO/IEC 14443B; Unique Identifier 
(UID), Typical Range = .25", Maximum Range = .5"

Video:

Supported Video Codecs:

• MPEG2-TS: MPEG-2 Main Profile @High Level up to 720p at 25 fps, H.264 (decode 

only)

• MJPEG up to 720p at 25 fps (decode only)

Streaming/File Formats:

MPEG-TS for H.264, MPEG2; HTTP for MJPEG

Audio:

Streaming/File Formats:

WAV, MP3

Intercom:

Full Duplex VoIP

(see note)

Operating 
Environment:

• Operating Temperature: 32° F to 104° F (0° C to 40° C)
• Storage Temperature: 4° F to 140° F (-20° C to 60° C)
• Humidity Operating: 20% to 85% RH
• Humidity Storage: 5% to 85% RH
• Power ("Heat") Dissipation: On: 27.3 BTU/hr, Standby: 10.9 BTU/hr

Dimensions (HWD):

Landscape:

 4.8" x 7.3" x 2.5" (122 mm x 186 mm x 63 mm)

Portrait:

 7.3" x 4.8" x 2.5" (186 mm x 122 mm x 63 mm)

Weight:

1.4 lbs (0.64 Kg)

Certifications:

• FCC Part 15 Class B
• C-Tick CISPR 22 Class B
• CE EN 55022 Class B and EN 55024
• CB Scheme IEC 60950-1
• IC
• IEC/EN-60950
• RoHS/WEEE compliant

Included Accessories: 

• MXD-701 Installation Guide (

93-5968-54

)

• MXA-CLK Modero X Series Cleaning Kit (

FG5968-16

)

• MXD-701 Installation Template (

68-5968-04

• MXD-701 Back Box (

68-5968-04

)

Other AMX Equipment:

• PS-POE-AF-TC, POE Injector, 802.3af Compliant (

FG423-83

)

• CB-MXP7, Rough-In Box and Cover Plate for Modero X Series Touch Panel, 7" 

(

FG039-18

)

• NXA-ENET8-2POE, Gigabit Switch, 8 Port POE, 2 Port SFP (

FG2178-63

)

• MXA-RMK-07, Rack Mount Kit (

FG5969-63

)

• MXA-FMK-07, Flush Mount Kit (

FG5968-71

)

Summary of Contents for MXD-701

Page 1: ...Operation Reference Guide Touch Panels MXT D 701 7 Modero X Series G5 Tabletop Touch Panel 7 Modero X Series G5 Wall Flush Mount Touch Panel Initial Release 3 18 2014 ...

Page 2: ...rked on the outside of each box The RMA is valid for a 30 day period After the 30 day period the RMA will be cancelled Any shipments received not consistent with the RMA or after the RMA is cancelled will be refused AMX is not responsible for products returned without a valid RMA number AMX is not liable for any damages caused by its products or for the failure of its products to perform This incl...

Page 3: ...On The Touch Panel Aspect Ratio 8 Memory 8 Basic Operation 8 Powering on the MXD 701 8 Microphone 8 Audio Video Capabilities 8 MXD T 701 Features 9 Configuration 9 NFC 9 Cleaning the Touch Overlay and Case 9 Installation 11 MXT 701 Installation 11 Power via Power Over Ethernet 11 Ethernet Cable Installation and Modification 11 A Note About Wall and Rack Installation 13 Installation Recommendations...

Page 4: ... Settings to Factory Defaults 24 Resetting to Factory Installed Firmware 25 Installing Previous Firmware 25 Installing New Firmware From An External USB Stick 26 Installing Touch Panel Pages From An External Disk 27 Removing User Pages From a Touch Panel 27 Upgrading Firmware Via NetLinx Studio v3 4 or higher 27 Appendix Troubleshooting 31 Overview 31 Panel Doesn t Respond To Touches 31 Panel Isn ...

Page 5: ...ates Latest Communication Technologies Supports Near Field Communication NFC short range wireless technologies that deliver peer to peer communication by sharing pairing and transaction between RF devices like exchanging data identities Enhanced Usability HD video streaming Perfect From Any Angle Includes In Plane Switching IPS the latest technology in popular tablet mobile devices that delivers t...

Page 6: ... used to manage systems throughout the house The MXT 701 features a 7 3 x 4 8 186 mm x 122 mm 8 8 222 mm diagonal display with a viewable area of 6 05 x 3 54 154 mm x 90 mm 7 0 178 mm diagonal The device communicates via Ethernet 10 100 port RJ 45 connector supported IP and IP based protocols UDP TCP ICMP ICSP IGMP DHCP SSH DNS RFB for VNC and HTTP and USB 2 USB host 2 0 Type A ports The MXT 701 a...

Page 7: ...d mouse or USB drive Ethernet 10 100 Port and Cable 10 100 Base T RJ 45 connector for Ethernet connectivity and PoE Touch Panel Display Display Type TFT Active Matrix Color LCD with Fringe Field Switching FFS Wide viewing angle technology Display Size 7 3 x 4 8 186 mm x 122 mm 8 8 222 mm diagonal Viewable Area 6 05 x 3 54 154 mm x 90 mm 7 0 178 mm diagonal Viewing Angle Vertical 89 Horizontal 89 S...

Page 8: ...ting Temperature 32 F to 104 F 0 C to 40 C Storage Temperature 4 F to 140 F 20 C to 60 C Humidity Operating 20 to 85 RH Humidity Storage 5 to 85 RH Power Heat Dissipation On 27 3 BTU hr Standby 10 9 BTU hr Dimensions HWD 5 x 7 5 16 x 4 1 8 126 mm x 187 mm x 105 mm Weight 1 8 lbs 0 82 Kg Certifications FCC Part 15 Class B C Tick CISPR 22 Class B CE EN 55022 Class B and EN 55024 CB Scheme IEC 60950 ...

Page 9: ...5 Wall Flush Mount Touch Panels Portrait Wall Mount FG5968 54 Landscape Wall Mount FG5968 55 are ideal for boardrooms conference rooms or auditoriums where a panoramic control surface is needed to provide access to multiple functions simultaneously while remaining elegantly unobtrusive In residences they are perfect for kitchens home theaters or home offices where the panoramic control surface can...

Page 10: ...ngle button on edge of panel for placing panel in sleep mode for powering off the panel and for accessing the Settings app Microphone 42dB 3dB sensitivity FET microphone Speakers 4 ohm 2 Watt 300Hz cutoff frequency Rear Panel Components USB Port USB connector used for keyboard and mouse connections or for firmware uploads Ethernet 10 100 Port 10 100 Base T RJ 45 connector for Ethernet connectivity...

Page 11: ...mats MPEG TS for H 264 MPEG2 HTTP for MJPEG Audio Streaming File Formats WAV MP3 Intercom Full Duplex VoIP see note Operating Environment Operating Temperature 32 F to 104 F 0 C to 40 C Storage Temperature 4 F to 140 F 20 C to 60 C Humidity Operating 20 to 85 RH Humidity Storage 5 to 85 RH Power Heat Dissipation On 27 3 BTU hr Standby 10 9 BTU hr Dimensions HWD Landscape 4 8 x 7 3 x 2 5 122 mm x 1...

Page 12: ...the device FIG 4 If the device has gone into its Sleep Mode a touch of the touchscreen or of the Sleep Settings button will reactivate it Powering on the MXD 701 The MXD 701 may be powered on by touching and holding the Sleep Settings button on the top of the device Microphone The MXD 701 contains a built in microphone above the touch screen for video and audio conferencing capabilities This micro...

Page 13: ...h the MXT 701 you should align your device s antenna with the center of the touch panel s antenna FIG 1 and FIG 4 Cleaning the Touch Overlay and Case Both the MXT 701 and the MXD 701 come with the MXA CLK Modero X Series Cleaning Kit FG5968 16 which may be used to clean fingerprints and dirt from the device This kit comes with cleaning cloths and a bottle of cleaning fluid specifically for use wit...

Page 14: ...Modero X Series G5 Touch Panels 10 MXD T 701 7 Modero X Series G5 Touch Panels ...

Page 15: ...able should be connected to the RJ45 port on the cable attached to the device FIG 8 Ethernet Cable Installation and Modification In installations where you wish to conceal the Ethernet cable a hole at least 1 00 2 54 cm in diameter is required in the surface to allow passage of the female RJ45 connector FIG 8 If using a smaller hole is unavoidable you will need to disconnect the Ethernet cable ECA...

Page 16: ...le ECA5968 05 through the hole with the RJ45 connector on the other side of the installation surface from the device 5 Press the Ethernet cable back into the clamp Do NOT tighten the clamp at this time 6 Using a nonconductive item such as a wooden stick reinsert the Ethernet cable connector into the device Use the stick to ensure that the connector is properly seated 7 Tighten the clamp to secure ...

Page 17: ... a filled volume such as with insulation or concrete as well as with a closed volume such as between studs in an otherwise finished wall The diagram shows how heat generated by the device or other devices may have no way to escape and may build up to levels that may affect device operation In FIG 11 the diagram displays an AMX device in a typical rack mounting with full air circulation around the ...

Page 18: ...as the back box FIG 12 This back box is removed when installing the device into a wall or when using the optional Rough In Box accessory FG039 18 Power Via Power Over Ethernet Power for the MXD 701 is supplied via Power Over Ethernet PoE utilizing an AMX certified capacitive touch compliant PoE injector or other approved AMX PoE power source The incoming Ethernet cable should be connected to the R...

Page 19: ...ack box Back box knockouts Locking tab When installing the backbox make sure that the assembly is in the correct position and in the correct place Once the locking tabs are extended and locked into place removing the backbox may be difficult without having access to the back of the wall or causing damage to the wall For typical mounting surfaces such as drywall use the locking tabs as the primary ...

Page 20: ... on the plastic back box is 5 IN LB 56 N CM Applying excessive torque while tightening the tab screws such as with powered screwdrivers can strip out the locking tabs or damage the plastic back box FIG 16 MXD 701 Installation Template 7 5 16 6 9 16 4 1 16 4 13 16 10 32 cm 12 22 cm 18 50 cm 16 67 cm Using the included template to select the final placement of the back box is highly recommended The ...

Page 21: ...e top and bottom tabs is highly recommended Apply enough pressure to the screw head to keep the box flush with the wall this ensures that the locking tabs will tighten up against the inside of the wall The back box is clear to allow visual confirmation that the tabs have been extended and are gripping the wall as well as in assisting with removal if necessary 9 For additional strength 4 mounting s...

Page 22: ...irmly on the ends until the snaps click to lock it down 13 Reconnect the terminal Ethernet and USB to their respective locations on the Ethernet port Do not disconnect the connectors from the touch panel The unit must be installed with the attached connectors before being inserted into the mounting surface FIG 18 Installing the MXD 701 Mounting Surface Back Box Latch Hooks Snaps If you see a gap b...

Page 23: ...enter row 2 With a stout strong point a push pin or straightened paper clip for example carefully press into the access holes in either end of the molding FIG 20 until the snap is disconnected To facilitate the disconnection grasp the bottom of the panel Landscape or right side Portrait and pull gently outward until the side of the panel is free of the snap Use your other hand to hold stable the f...

Page 24: ...Installation 20 MXD T 701 7 Modero X Series G5 Touch Panels ...

Page 25: ...X Series G5 Programming Guide Information on the Settings app panel configuration and programming is included in the Modero X Series G5 Programming Guide available at www amx com Programming the MXT 701 and MXD 701 require the use of the latest versions of NetLinx Studio and TPDesign 5 both available at www amx com ...

Page 26: ...Configuration and Programming 22 MXD T 701 7 Modero X Series G5 Touch Panels ...

Page 27: ... FIG 3 Load the Firmware on a USB Flash Drive 1 Insert the USB flash drive in an available USB port on your PC The flash drive must be in either FAT32 or FAT16 format For wall mounted panels MXD xxx accessing the USB ports may require removing the panel from the wall mount if a USB extension was not already installed 2 Copy the firmware kit file to be transferred for example SW5968_ModeroX_v2_103_...

Page 28: ...anel click the Reset Device button at the bottom of the window To return to the Reset and Update menu without making any changes select Reset and Update at the top of the window Resetting the Touch Panel Settings to Factory Defaults 1 From the Reset and Update menu select Reset Settings to open the Reset Settings window FIG 23 2 To reset the touch panel s settings to factory defaults click Yes To ...

Page 29: ... touch panel will reboot and restart with the factory default firmware Installing Previous Firmware In certain circumstances it may be necessary to revert to a previously installed version of the touch panel firmware To reset the touch panel to its previously installed firmware via the Settings app 1 From the Firmware Update window select Revert to Previous Firmware Version If no previous version ...

Page 30: ...ed touch panels to access the USB ports if a USB extension was not already installed 3 From the Firmware Update window select Install Firmware from USB to open the KIT File Browser window FIG 26 4 Select the KIT file to be installed 5 The device will now upload the new firmware FIG 27 and then reboot The firmware can be saved at the root directory or be saved in a folder in the USB stick directory...

Page 31: ...and Update menu select Remove User Pages to open the Remove User Pages window FIG 29 2 To return to the Reset and Update menu without saving any changes click No To remove the user pages from the touch panel click Yes Upgrading Firmware Via NetLinx Studio v3 4 or higher G5 touch panels use an Ethernet connection for programming firmware updates and touch panel file transfer via NetLinx Studio If y...

Page 32: ... 5 In the Files window click to select the G5 kit file to transfer FIG 31 6 Click Send to initiate the firmware file transfer The progress of the transfer is indicated in the progress bars 7 The Panel will display the Message Updating System Files then restart itself 8 The Installing System Update page will be displayed on the panel until the firmware upgrade process is complete At this point the ...

Page 33: ...e indicates the approximate length of time to send a kit file via the legacy file transfer method By default Change the HTTP Port used to transfer the KIT file is selected Use this option to change the HTTP port assignment in cases where the IP port default 80 is in conflict or blocked on the PC This option will restart the web server with a different HTTP port assignment and restart the file tran...

Page 34: ...Upgrading Firmware 30 MXD T 701 7 Modero X Series G5 Touch Panels ...

Page 35: ...ilable and to reply with a connection failure instantly if it is not Without using the ping feature a connection may still be attempted but a failure will take longer to be recognized When connecting to a NetLinx Master controller via TCP IP the program will first try to ping the controller before attempting a connection Pinging a device is relatively fast and will determine if the device is off l...

Page 36: ...registered trademarks of AMX AMX reserves the right to alter specifications without notice at any time It s Your World Take Control 3000 RESEARCH DRIVE RICHARDSON TX 75082 USA 800 222 0193 469 624 8000 469 624 7153 fax 800 932 6993 technical support www amx com ...

Reviews: