

For full warranty information, refer to the AMX Instruction Manual(s) associated with your Product(s).
5/10
©2010 AMX. All rights reserved. AMX and the AMX logo are registered trademarks of AMX.
AMX reserves the right to alter specifications without notice at any time.
3000 RESEARCH DRIVE, RICHARDSON, TX 75082 • 800.222.0193 • fax 469.624.7153 • technical support 800.932.6993 • www.amx.com
93-5967-01
REV: A
power or wireless connection fails during a firmware upgrade, the panel flash
file system may become corrupted.
Setup Pages
The panel is equipped with setup pages that allow you to set and configure
various features on the panel. Consult the
MVP-9000i Operation/Reference
Guide
for detailed information on the
Setup
pages.
Accessing The Protected Setup Page
1.
Press down and hold both the bottom left pushbutton and down on the
directional pad (indicated in FIG. 1) simultaneously for 3-5 seconds. This
opens the
Setup
page.
2.
Press the
Protected Setup
button on the Setup page. This opens a
keypad for password entry.
3.
Enter the panel password into the keypad (default is
1988)
and select
Done
to access the
Protected Setup
page.
Setting the Panel’s Device Number
In the
Protected Setup
page:
1.
Press the
Device Number
field to open the Device Number keypad.
2.
Enter a unique Device Number assignment for the panel
.
3.
Press
Done
to return to the
Protected Setup
page.
Configuring the Panel’s Wireless IP Settings
The first step is to configure the wireless communication parameters. This only
configures the card to communicate to a target WAP and it is still necessary to
tell the panel which Master it should be communicating with; see
Master
Connection
.
Consult the
MVP-9000i Modero ViewPoint Touch Panels Operation/Reference
Guide
for setting the wireless communication using a static IP address.
Wireless Communication Using a DHCP Address
In the
Protected
Setup
page:
1.
Select
Wireless Settings
. Wireless communication is set within the IP
Settings section of this page.
2.
Toggle the
DHCP/Static
field (from the IP Settings section) until the
choice cycles to
DHCP
. This action causes all fields in the IP Settings
section (other than Host Name) to be greyed-out.
Do not alter any of these remaining greyed-out fields in the IP Settings section.
Once the panel is rebooted, these values are obtained by the unit and
displayed in the
DNS
fields after power-up.
Consult the
MVP-9000i Operation/Reference Guide
for setting a Host Name.
Configuring the Card’s Wireless Settings
This section configures both the communication and security parameters from
the internal wireless card to the WAP.
Once you have set up the wireless card parameters, you must configure the
communication parameters for the target Master; see
Master Connection
.
Consult the
MVP-9000i Operation/Reference Guide
for configuring the wireless
card for unsecured access to the WAP.
Configuring The Wireless Card for Secured Access To the WAP
In the
Protected
Setup
page:
1.
Select
Wireless Settings
.
2.
Enter the SSID information automatically by pressing the
Site Survey
button.
3.
Select a
WEP
secured WAP from within the Site Survey page, and press
the
Connect
button.
4.
Write down the SSID name, Current Key string value, and panel MAC
Address information so you can later enter it into the appropriate WAP
dialog fields in order to "sync-up" the secure connection. These values
must be identically reproduced on the target WAP.
Consult the
MVP-9000i Operation/Reference Guide
for manually entering the
SSID information.
Master Connection
The panel requires you establish the type of connection you want made
between it and your master. In the
Protected Setup
page:
1.
Select
System Settings
2.
Select
Type
to toggle between
USB
and
Ethernet
.
3.
When using
Ethernet
, press the listed
Mode
to toggle through the
available connection modes:
4.
Select the
Master Port Number
to open the keypad and change this
value. The default setting for the port is
1319
.
5.
Set your Master Port and select
Done
.
If you have enabled password security on your master, you need to set the
username and password within the device.
6.
Select the blank field
Username
to open the keyboard.
7.
Set your Username and select
Done
.
8.
Select the blank field
Password
to open the keyboard.
9.
Set your Password and select
Done
.
10. Press the
X
button to return to the
Protected Setup
page.
11. Press the
Reboot
button to reboot device and confirm changes.
Touch Panel Calibration
In the
Protected Setup
page, follow these steps:
1.
Select the
Calibrate
icon.
2.
Touch each target on the screen as they appear. Once calibrated the
panel confirms and instructs you to touch the screen to continue.
Panel Intercom Configuration
Incorporating an intercom capable panel into your NetLinx
system
Download the module for the intercom panel from
www.amx.com
, and include
it in your NetLinx project file. For searching purposes, the module
manufacturer
is
AMX
and the
model
is
Intercom
.
Note
:
The intercom module will only work with AMX intercom capable panels.
Cleaning the Touch Overlay and Case
Always use a clean cotton cloth and a spray bottle containing water or a
vinegar-based cleaner when cleaning the MVP-9000i, as alcohol-based
cleaners can damage the device.
Do not directly spray the device
: instead,
spray the cloth to clean the touch screen overlay. Do
NOT
use an abrasive of
any type to clean the MVP-9000i, as this may permanently damage or remove
the device’s finish.
Battery Life and Replacement
The battery powering the MVP-9000i is designed for upwards of 300 deep
discharge rechargings. Regular shallow rechargings will extensively increase
expected battery life, and the device should be stored in either a Table
Charging Station or Wall Charging Station when not in use to keep it at an
optimum charge. The battery has reached its effective end of life after it can no
longer hold more than a 70 percent charge.
Proper Battery Maintenance
NOTE: To insure maximum performance and reliability of your AMX
Wireless Touch Panel, please insure that a full charge is performed every
3 months if not used regularly. If a battery is left uncharged beyond this
time frame, it may result in premature battery lifespan degradation and
will require replacement.
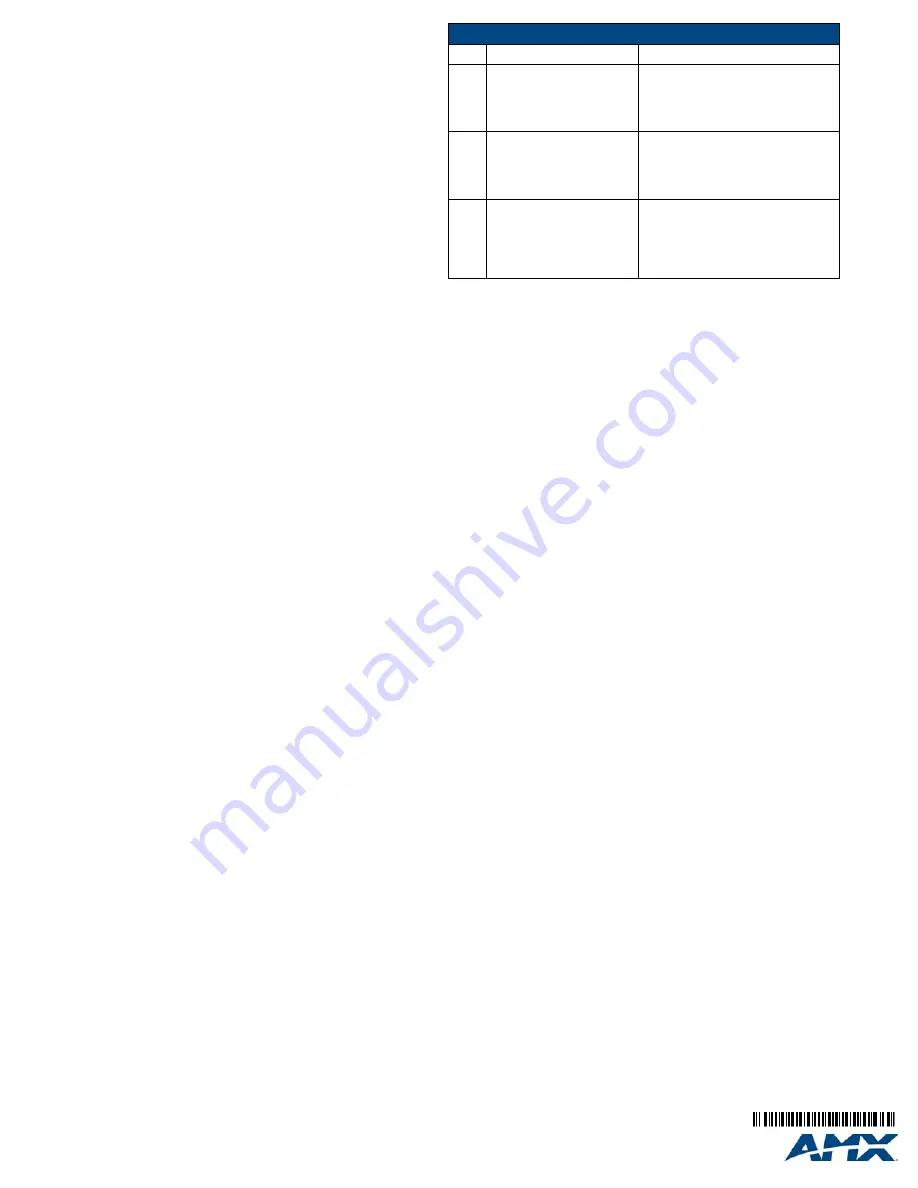
Connection Modes
Mode Description
Procedures
Auto
The device connects to the first
master that responds. This
setting requires that you set
the System Number.
Setting the System Number:
1. Select the System Number to open the
keypad.
2. Set your System Number and select
Done
.
URL
The device connects to the
specific IP of a master via a
TCP connection. This setting
requires that you set the Mas-
ter’s IP.
Setting the Master IP:
1. Select the Master IP number to the
keyboard.
2. Set your Master IP and select
Done
.
Listen The device "listens" for the
master to initiate contact. This
setting requires you provide
the master with the device’s IP.
Confirm device IP is on the Master URL
list. You can set the Host Name on the
device and use it to locate the device on
the master. Host Name is particularly
useful in the DHCP scenario where the IP
address can change.


