USER MANUAL
DUX-12F
Flexible Modular Matrix SwitcherSupport up to 4K@60Hz 4:4:4 8bitTop Speed Seamless Switching
Page 1: ...USER MANUAL DUX 12F Flexible Modular Matrix Switcher Support up to 4K 60Hz 4 4 4 8bit Top Speed Seamless Switching...
Page 2: ...Control through Front Panel 16 6 2 Control through IR Remote 17 6 3 LAN Control via Web UI 18 6 3 1 Matrix Control 20 1 Switch 20 2 Preset 21 6 3 2 Admin Setting 22 1 CEC Setting 24 2 EDID Setting 24...
Page 3: ...ventilation openings with newspapers tablecloths curtains and similar items Do not install near any heat sources such as radiators heat registers stoves or other apparatus including amplifiers that p...
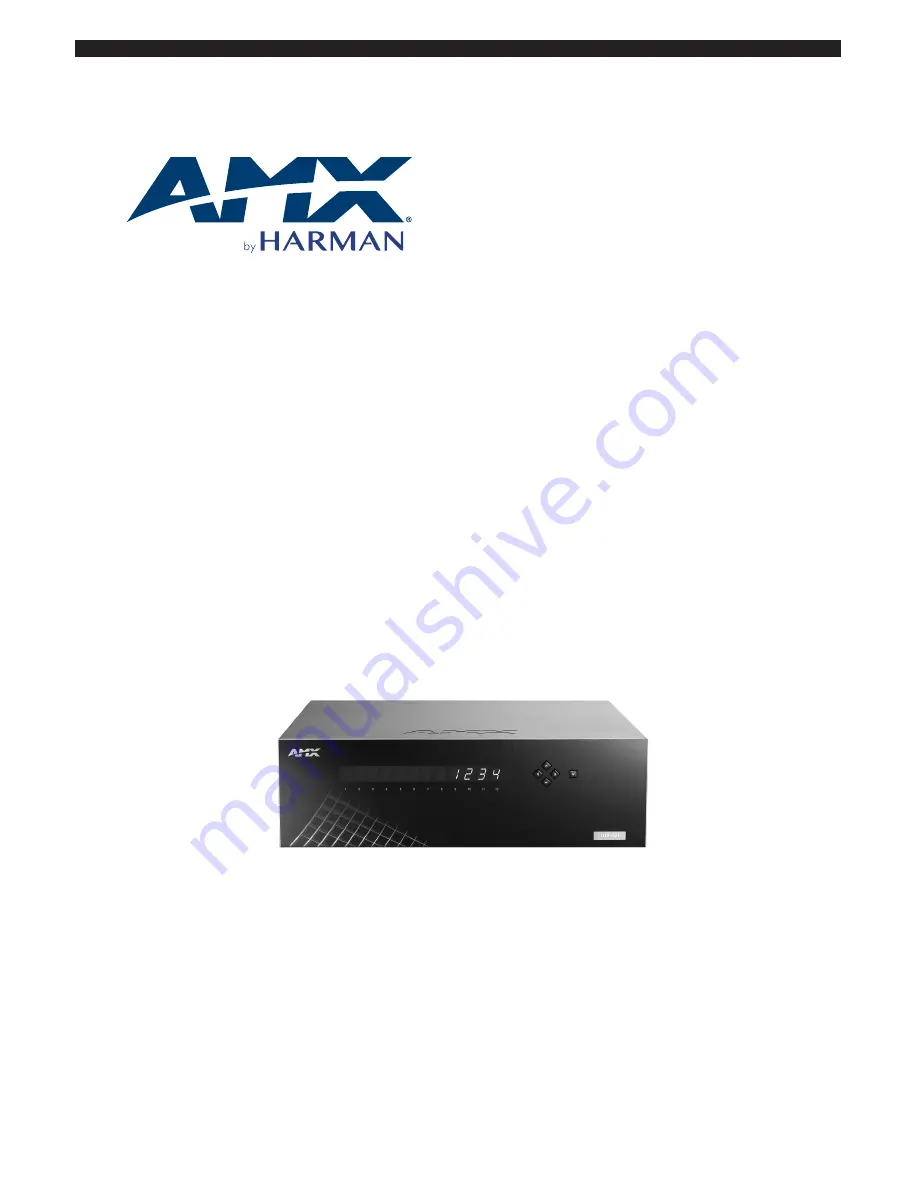
Page 4: ...cts Designed for 3U rackmount and stand alone installation DUX 12F offers all the convenience connectivity and versatility expected for a commercial or residential AV environment Features 12 board slo...
Page 5: ...5 DUX 12F USER MANUAL 2 PACKING LIST 1 x DUX 12F 1 x IR Remote Handset 1 x AC Power Cord 1 x IR Receiver 38KHz 1 x USB to UART Cable 2 x Mounting Brackets 1 x User Manual...
Page 6: ...IO OUT including digital and analog audio ports 1 x LAN 1 x RS232 1 x IR EXT 1 x EDID DIP Switch 1 x AC IN Input Output Video Type HDMI HDBaseT Input Resolution Support ed VESA 800x6008 1024x7688 1280...
Page 7: ...neral Operating Temperature RH 32 F 113 F 0 C 45 C 10 90 non condens ing Storage Temperature RH 4 F 140 F 20 C 70 C 10 90 non con densing ESD Protection Human body model 8kV air gap discharge 4kV cont...
Page 8: ...these HDMI and HDBaseT input and output boards please refer to their respective technical document 4 1 Front Panel 1 2 3 4 5 No Name Description 1 Input Channel Indica tors 1 8 Reserved 2 Output Chann...
Page 9: ...ector to an HDBaseT receiver via a CatX cable 7 IR IN Connect this 2 pin Phoenix female connector to an IR Receiver 8 RS232 Connect this 3 pin Phoenix female connector to a control system for RS232 ou...
Page 10: ...IR extension port Plug in an IR Receiver to control the device 15 Power Switch Press to power on or off the device 16 Power Input Connect this input to power supply using the power cord provided Powe...
Page 11: ...ack Screw fix the front panel of DUX 12F to the rack 1U space 1U space Brackets attach at the side toward the front of the Matrix 3 Install the Matrix in the mounting rack by using the mounting screws...
Page 12: ...you install it in a rack 5 3 Installing Input and Output Boards With a DUX 12F you may build up a switching system of up to 11 inputs x 1 output or 1 input x 11 outputs by a combined use of the DUX Se...
Page 13: ...ard NOTE Please use cables provided by the manufacturer and high quality cables recommended by the manufacturer WARNING Please ensure all the devices are DISCONNECTED from power before setting up and...
Page 14: ...to RS232 port of the Matrix 8 Power on Connect the AC power cord provided and switch on the Matrix by pressing the power button on the front panel The front panel LEDs will display the model name of D...
Page 15: ...K Media Player Laptop Blu ray Player Laptop Apple TV Control PC HDBaseT Receiver e g DUX RX 70 Projector In ceiling Speaker Amplifier DUX 12F WIRING CHART IR RS232 Ethernet Audio HDMI HDBT Microphone...
Page 16: ...with 6 x DUX F I HDMIs HDMI input board 2 x DUX F I HDBTs HDBaseT input board 2 x DUX F O HDMIs HDMI output board and 2 x DUX F O HDBTs HDBaseT output board 6 1 Control through Front Panel Basic swit...
Page 17: ...IR Remote directly to the Matrix s IR receiving window 3 Front Panel on page 8 you can select input source for each output If IR extension is required connect the IR Receiver to the IR EXT 14 Rear Pa...
Page 18: ...mote s IR signal interferes with other IR devices e g TV DVD player the Remote can be switched to 4E code by short pressing the System Code Switch button At the same time you may redefine the IR syste...
Page 19: ...xxx 5 Enter the Matrix s IP address 192 168 10 254 in your browser and press enter The following window will pop up Login Window 6 Choose the language you wish to use English or Chinese 7 Enter passwo...
Page 20: ...ng is designed for advanced controls e g CEC Setting EDID Setting Resolution Setting Audio Input Setting Port Naming Preset Name ect 6 3 1 MATRIX CONTROL The Matrix Control page is used to perform the...
Page 21: ...ned off Switch Section 2 PRESET The Presets section saves or loads the input output switch settings to or from the Matrix Save Input output settings in the Switch section are saved Load Preset already...
Page 22: ...ol of the following functions CEC Setting EDID Setting Resolution Setting Audio Input Setting Port Naming Preset Name Network Change Password Update Web UI Log Custom Web UI Logo Reset All Settings to...
Page 23: ...23 DUX 12F USER MANUAL Admin Setting Page...
Page 24: ...For example if the time is set to 2 minutes the output display will power off automatically when there s no signal at the display for 2 minutes ON OFF click to enable or disable the CEC Auto Control...
Page 25: ...HDMI input channels the Matrix provides six EDID setting options 4K 60Hz 5 1CH Audio 4K 60Hz 2 0CH Audio 4K 30Hz 5 1CH Audio 4K 30Hz 2 0CH Audio 1080P 60Hz 5 1CH Audio and 1080P 60Hz 2 0CH Audio 3 For...
Page 26: ...If the display connected to the output fails to support the selected resolution the output will show Display doesn t support current resolution like Output 3 4 If the output is set to Auto the output...
Page 27: ...s you to change a preset name to one that is easy to identify or remember and to apply or reset any preset selected Save click to save the preset name change Reset click to reset the preset changes NO...
Page 28: ...lick to enable the network setting NOTE 1 When Static is selected please ensure your PC is in the same network segment as the Matrix i e the IP address of your PC should be set as 192 168 10 xxx 2 Ple...
Page 29: ...latest version For latest version of Web UI please contact the product manufacturer or your local dealer To update Web UI 3 Click to Browse for the bin file 4 Click the Update button to start upgradi...
Page 30: ...ogo Custom Web UI Logo allows you to create your own logo for the Web UI you are using To customize a Web UI Logo 3 Click to Browse for the new logo file then click to Apply 4 The following window wil...
Page 31: ...ttings click to load a setting file to the Matrix To reset the Matrix to dafault settings 6 Click Reset to Defaults highlighted in RED 7 Click OK to proceed NOTE When the reset is successful all the M...
Page 32: ...onfigured correctly Parameters Value Baud Rate 9600 bps Data bits 8 bits Parity None Stop bits 1 bit Flow control None Command String Response Examples The following examples are based on a 8x4 DUX 12...
Page 33: ...HDBT IN to HDBaseT transmitters Connect HDBT IN ports of the Matrix to HDBaseT transmitters e g DUX TX 3 Connect HDBT OUT to HDBaseT receivers Connect HDBT OUT ports of the Matrix to HDBaseT receiver...
Page 34: ...seT Receiver e g DUX RX HDBaseT Transmitter e g DUX TX HDBaseT Transmitter e g DUX TX 70 Control System e g NX 2200 4K Media Player Projector Projector Laptop HDBaseT Receiver e g DUX RX 70 IR HDMI HD...
Page 35: ...BT IN to HDBaseT transmitters Connect HDBT IN ports of the Matrix to HDBaseT transmitters e g DUX TX 3 Connect HDBT OUT to HDBaseT receivers Connect HDBT OUT ports of the Matrix to HDBaseT receivers e...
Page 36: ...Receiver e g DUX RX HDBaseT Transmitter e g DUX TX HDBaseT Transmitter e g DUX TX 70 Control System e g NX 2200 4K Media Player Projector Projector Laptop HDBaseT Receiver e g DUX RX 70 RS232 HDMI HD...
Page 37: ...red during installation please refer to the table below and set up the DIP switches manually DIP HDMI IN HDBT IN 0 0 0 0 EDID controlled by Web UI and API default 0 0 0 1 4K 60Hz 4 4 4 8bit 5 1ch audi...
Page 38: ...O4T Return CI2O4T Description Switch Input 2 to Output 4 on the default level normally Level 0 Command CL0I2O1 3T Return CL0I2O1 3T Description Switch Input 2 to Output 1 2 and 3 on Level 0 Command CL...
Page 39: ...ut 4 or switch none input to Output 4 Command CL O I T Return CL O I T Description L 0 1 or L is omitted I 0 8 O 1 4 ALL Command CO4I2T Return CO4I2T Description Switch Input 2 to Output 4 on Level 0...
Page 40: ...0 Command COALLI2T Return COALLI2T Description Switch Input 2 to all Outputs Command CO4I0T Return CO4I0T Description Disconnect Output 4 or switch none input to Output 4 2 To verify signal status Co...
Page 41: ...Return RR T Description R 1 8 Command RR1T Return RR1T Description Define the current system state as Global Preset 1 4 To execute a global preset Command R T Return SO1T x SO2T x SO3T x SO4T x Descr...
Page 42: ...I1AT Return SI1AT 1 Description Audio of Input 1 is from HDMI input 7 To set output resolution Command CL O R T Return CL O R T Description L 0 1 or L is omitted O 1 4 R 1 9 1 3840x2160 60 2 3840x2160...
Page 43: ...ve timing of the display Command SO1RT Return SO1RT 101 Description Resolution of Output 1 is Auto 3840x2160 60 9 To execute a sink power by cec Command CL O SP T Return CL SP T Description L 0 1 or L...
Page 44: ...o active signal 13 To verify Delay Time of powering off a sink when no active signal Command SL O DSPT Return SL O DSPT value Description L 0 1 or L is omitted O 1 4 value 1 30 Command SO3DSPT Return...
Page 45: ...1 16 To verify input EDID Command SL I ET Return SL I ET value Description L 0 1 or L is omitted I 1 8 ALL value 1 6 1 4K 60Hz 4 4 4 8bit 5 1ch audio 2 4K 60Hz 4 4 4 8bit 2 0ch audio 3 4K 30Hz 4 4 4 8...
Page 46: ...set system setting Command SYSR Return SYSR Description Reset system setting Command SYSR Return SYSR Description Reset system setting 20 To cause a warm reboot Command APP Return APP Description Caus...
Page 47: ...y cec automatically 11 SL O SPA T To verify a sink power controlled Status 12 CL O D SPT To define a Delay Time to execute a sink power off when on active signal 13 SL O DSPT To verify Delay Time to e...
Page 48: ...rks registered trademarks of their respective companies AMX does not assume responsibility for errors or omissions AMX also reserves the right to alter speci fications without prior notice at any time...