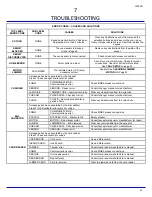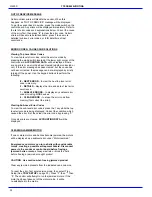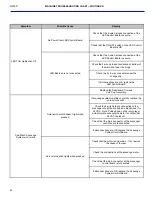
L0190D
25
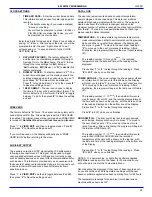
The user can save the programmed delay to the selection, the
entire tray, or all selections in the vendor. Linked selections will
use the delay programmed for the master selection.
5. Letter / Number
Allows use of either keyboard format. The control board/software
default is for the NUMERIC, 12-key keypad. This setting should
be changed to “Letter” if the vendor is equipped with 20
pushbutton keypads (with alphabetic characters). Depending on
the setting, the top tray is designated “1” or “A”, and downward
with numbers (2-8) or letters (B-H).
6. Configure Motors
Configure Motors moves each switched motor to the home
position (moving the motor only if it is not at home) in addition to
detecting connected motors. Since the vendor will not vend from
a given helix when the motor is missing, jammed or has home
switch problems
, this selection MUST BE RUN after any
change in the arrangement and/or the number of motors.
The configuration of connected motors is stored in memory. If a
configured motor is later found to be missing during a vend, an
error message will be generated in service mode to alert the
service person that the motor is disconnected. (Motors cannot be
auto-configured as in earlier Sensit 2 systems.)
7. Coupled Motors
Configurations to vend extra wide product can be made by using
the coupled-motors feature (See
MERCHANDISER
CONFIGURATIONS
on page 4). The coupled motor feature
works by coupling together a set of two motors. One motor turns
counter-clockwise, and the other motor must turn clockwise –
corresponding CW and CCW helices must be used as well. Both
motors turn for the same length of time. Trays may have multiple
coupled motors.
1. From the Tray Setup menu, press “7”, then enter
the first selection to couple (for example 24).
2. Press “9” to edit, then enter the
column
number of
the second motor to couple. For this example,
press 7 to couple selections 24 and 27. The second
column could also be 5 or 6 for this set. In this
example, the display will read COUPLE 24,27.
3. Press the “*” to save these selections and move to
the next selection. If the “*” button is pressed the
display will move to the next selection. Entering the
desired number will also take you to another
selection.
4. Press “0” to clear coupled motor sets from the
control board. The display will read “XX: COUPLE
OFF”.
5. To return to Tray Setup, press the “#” key at any
time.
The tray numbers on the front of the tray should be changed to
suit.
Note:
A coupled motor set will vend using the
price of the lowest
numbered column
selected, but for the above example the
customer can actually use any selection number 24, 25, 26, or 27
to purchase the product. Sales reporting in the Accounting Menu
or the DEX system will only list sales from the lowest numbered
column.
The Coupled Motor feature will not work with Sensit 2 motors.
MDB (MULTI-DROP BUS) SETTINGS
The user can select from many different operating features using
the following settings.
1. Force Vend
The factory default is “
N
” for no. If set to “
Y
”, the customer is
forced to make a selection before the control will allow a refund.
If the selected product cannot be dispensed, a full refund can be
returned to the customer. Note that if the CHANGE BILL feature
is ON, it will override Force Vend.
2. No Cheat
The factory default is “
Y
” for yes. If set to “
Y
”, the control will not
allow a vend to occur unless correct change can be returned to
the customer. If disabled, the control will allow the customer to be
short-changed up to $1.00.
3. Change Bill
The factory default is “
N
” for no. If set to “
Y
”, the customer can
insert a bill and receive a full refund in coins by pressing the coin
return button. Note that using CHANGE BILL will override Force
Vend.
4. Hold Lost Credit
The factory default is “
Y
” for yes. If set to “
Y
”, any remaining
credit after a vend that cannot be returned to the customer will be
maintained on the machine and be displayed for 15 minutes. The
customer can add to this credit to purchase additional items.
5. Multi-Vend
The factory default is “
N
” for no. If set to “
Y
”, the vendor will hold
and display any change due the customer following a vend. The
customer is thus encouraged to make additional purchases with
the remaining credit. The customer may push the coin return
button at any time to refund this credit.
6. Lev2 Coin Mech
The factory default is “
N
” for no. If set to “
Y
”, the vendor will treat
the coin changer as a level 2 device even if it reports itself as a
Level 3. There is a very specific and technical reason this could
be used, and AMS recommends that this option remain as “
N
” for
no.
The vendor must be powered down before change will take
effect.
7. Instant Revaluation
Certain Cashless Systems allow the vendor to add value to a
customer’s Cashless Account.
The Default setting is “
Y
” – With this setting, if a Card is inserted
(or swiped) in a Cashless device of this type then any cash is
inserted will be instantly credited to the Cashless account. This
will continue until the Cashless system’s limit is reached.
If the Instant Reval setting is “
N
” and a Card is inserted (or
swiped) in a Cashless device of this type, cash inputs will be
accumulated
until the customer presses the Coin Return or the
Reader’s Cancel Button or attempts a product selection
.
The
credit inserted will then
be added to the Cashless
account, and
the Display will show “CREDIT ADDED TO CARD”. This setting
is only necessary to accommodate a limited number of Cashless
systems and would not normally be used.
6
SERVICE
PROGRAMMING
Summary of Contents for EPIC SENSIT 3
Page 12: ...L0190D 6 THIS PAGE INTENTIONALY LEFT BLANK ...
Page 18: ...L0190D 12 THIS PAGE INTENTIONALLY LEFT BLANK ...
Page 26: ...L0190D 20 THIS PAGE INTENTIONALLY LEFT BLANK ...
Page 44: ...L0190D 38 THIS PAGE INTENTIONALLY LEFT BLANK ...
Page 46: ...L0190D 40 THIS PAGE INTENTIONALLY LEFT BLANK ...
Page 50: ...L0190D 44 THIS PAGE INTENTIONALLY LEFT BLANK ...
Page 52: ...L0190D 46 THIS PAGE INTENTIONALLY LEFT BLANK ...


