background image

IMPORTANT INSTRUCTIONS

Important Safety 

Instructions

When using your telephone 
equipment, basic safety precautions
should always be followed to
reduce the risk of fire, electric
shock and persons including the
following:

1.Read and understand all 

instructions.

2.Follow all warnings and 

instructions marked on the 
telephone.

3.Do not use this telephone 

near a bathtub, wash basin, 
kitchen sink or laundry tub, in
a wet basement, near a 
swimming pool or anywhere 
else there is water.

4.Avoid using a telephone 

(other than a cordless type) 
during a storm. There may be
a remote risk of electrical 
shock from lightning.

5.Do not use the telephone to 

report a gas leak in the 
vicinity of the leak.

6.Unplug this telephone from 

the wall outlets before 
cleaning. Do not use liquid 
cleaners or aerosol cleaners 
on the telephone. Use a damp
cloth for cleaning.

7.Place this telephone on a 

stable surface. Serious damage
and/or injury may result if the
telephone falls.

8.Do not cover the slots and 

openings on this telephone.  
This telephone should never 
be placed near or over a 
radiator or heat register. This 
telephone should not be 
placed in a built-in installation
unless proper ventilation is 
provided.

9.Operate this telephone using 

the electrical voltage as 
stated on the base unit or the 
owner’s manual. If you are 
not sure of the voltage in your
home, consult your dealer or 
local power company.

10. Do not place anything on 

the power cord. Install the 
telephone where no one will 
step or trip on the cord.

11. Do not overload wall outlets 

or extension cords as this 
can increase the risk of fire or
electrical shock.

12. Never push any objects 

through the slots in the 
telephone. They can touch 
dangerous voltage points or 
short out parts that could 
result in a risk of fire or 
electrical shock. Never spill 
liquid of any kind on the 
telephone.

13. To reduce the risk of electrical

shock, do not take this phone 

Summary of Contents for AMPLIFIED TELEPHONE

Page 1: ...Garden Grove CA 92841 800 874 3005 VOICE 800 772 2889 TTY TDD 714 897 4703 FAX email ameriphonecs plantronics com website www ameriphone com 2003 Plantronics Inc All rights reserved Ameriphone Amplify...

Page 2: ...E N G L I S H E S P A O L F R A N A I S Operating Instructions 2003 XL 40 5270 4023 C 10 03 M46802 XL XL 40 AMPLIFIED TELEPHONE The Extra Loud Clear with lighted keypad...

Page 3: ...lace this telephone on a stable surface Serious damage and or injury may result if the telephone falls 8 Do not cover the slots and openings on this telephone This telephone should never be placed nea...

Page 4: ...If the telephone has been dropped or the case has been damaged F If the telephone exhibits a distinct change in performance 15 Never install telephone wiring during a lightning storm 16 Never install...

Page 5: ...ied equipment should be made by an authorized Canadian maintenance facility designated by the supplier Any repairs or alterations made by the user to this equipment or equipment malfunctions may give...

Page 6: ...ll Mount 5 Desktop Use 5 For Wall Mounting 5 Using Your XL 40 Incoming Voice Volume 7 Incoming Voice Tone 8 Ringer Volume and Tone 8 Hold 8 Last Number Redial 9 Flash 9 Special Features Unanswered Cal...

Page 7: ...g Guide provide you with the information you need to use your XL 40 effectively easily and safely Read this manual thoroughly before using your telephone Keep the manual near the telephone for easy re...

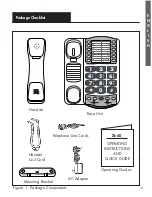
Page 8: ...E F 2 3 4 5 6 7 8 9 0 HOLD PROG TONE LO HI FLASH REDIAL VOL AMPLIFY M1 M2 M3 M4 M5 M6 M7 M8 M9 M11 M10 OPERATING INSTRUCTIONS AND QUICK GUIDE XL 40 Handset Base Unit Telephone Line Cords Handset Coil...

Page 9: ...e slider LOW BATTERY indicator RING flasher AMPLIFY button AMPLIFY MISSED CALLS VOICE MAIL EXTENSION IN USE indicator PROG program button RINGER RING TONE DIAL AUDIO OUTPUT Lo Med Hi T P Lo Hi 1 A B C...

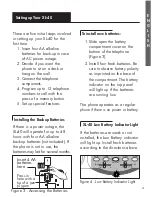
Page 10: ...ine backup batteries not included If the phone is not in use the batteries may last for several months To install new batteries 1 Slide open the battery compartment cover on the bottom of the telephon...

Page 11: ...AC jack on the telephone as shown in Figure 5 5 Setting up Your XL 40 continued 3 Lift the handset and listen for a dial tone The phone is ready to use For Wall Mounting 1 Slide the handset hook out...

Page 12: ...ACK S nail head into the LOWER part of the phone s mounting bracket 6 Once the lower nail head has been inserted insert the UPPER nail head into the phone s bracket and slide the phone down until it i...

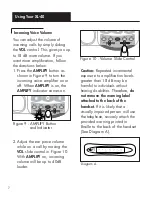
Page 13: ...incoming calls by simply sliding the VOL control This gives you up to 18 dB more volume If you want more amplification follow the directions below 1 Press the AMPLIFY button as shown in Figure 9 to tu...

Page 14: ...a voice on the line press the AMPLIFY button shown in Figure 9 2 Adjust the TONE slide control in Figure 12 to suit your hearing Figure 11 Volume Reset Override On Off MANUAL AUTO OFF ON Volume Reset...

Page 15: ...DIAL VOL AMPLIFY Figure 15 Redial Button Note If you pick up an extension phone on the same line when the XL 40 is on HOLD the XL 40 will release the HOLD and you can continue your conversation on the...

Page 16: ...t time while expecting a call If you don t want any notification set the switch on OFF Unanswered Call Voice Mail Message Light If you subscribe to voice mail messaging with your telephone company thi...

Page 17: ...number on the keypad Figure 21 just as you would dial it normally Note Press REDIAL if you want to insert a brief pause between two numbers To program a button follow these steps 1 Lift the handset a...

Page 18: ...ging any cord into your speech processor you must consult your implant manufacturer Plug the mono end of the plug into the speech processor Plug the stereo end of the plug into the Audio Output socket...

Page 19: ...connected to a telephone line Excessive RENs on a telephone line may result in the devices not ringing in response to an incoming call In most but not all areas the sum of RENs should not exceed five...

Page 20: ...parts Opening the equipment or any attempt to perform repairs will void the warranty For service or repairs call 1 800 874 3005 Connection to party line service is subject to state tariffs Contact the...

Page 21: ...rsuant to Part 15 of FCC rules These limits are designed to provide reasonable protection against harmful interference in residential installation This equipment generates uses and can radiate radio f...

Page 22: ...CA 92841 Telephone 800 874 3005 Industry Canada Technical Specifications This product meets the applicable Industry Canada technical specifications Before installing this equipment users should ensure...

Page 23: ...l areas Caution Users should not attempt to make such connections themselves but should contact the appropriate electric inspection authority or electrician as appropriate The Ringer Equivalence Numbe...

Page 24: ...E N G L I S H 18...

Page 25: ...eplacement will be warranted for either 90 days or the remaining time on the original warranty period whichever is longer Implied warranties including those of fitness for a particular purpose and mer...

Page 26: ...ada CANADIAN RESIDENTS call Ameriphone at 800 874 3005 800 772 2889 TTY for instructions This warranty does not cover defects resulting from accidents damage while in transit to our service location a...

Page 27: ...e difficulty continue contact Ameriphone or your authorized dealer for assistance CAUSE AND CORRECTIVE ACTION Check all phone cord connections No number stored in that memory button See Programming th...

Page 28: ...12 Direct Audio Output 12 Features 3 Flash 9 Help from Ameriphone 1 Hold 8 Incoming Voice Tone 8 Incoming Voice Volume 7 Installing the Backup Batteries 4 Last Number Redial 9 Package Checklist 2 Prog...

Page 29: ...23...

Page 30: ...24 E S P A O L Instrucciones de Operaci n XL TEL FONO AMPLIFICADO XL 40 Extra Alto y Claro Con teclado iluminado...

Page 31: ...i n de mesa 34 Instalaci n de pared 34 Usando su XL 40 Volumen de Voz de Recepci n 37 Tono de Voz de Recepci n 38 Volumen y Tono de Timbrado 38 Llamada en espera 39 Re discado del ltimo N mero 39 Flas...

Page 32: ...el tel fono para informar de un escape de gas en un lugar pr ximo al escape 6 Desconecte su tel fono antes de limpiarlo No utilice limpiadores l quidos o en aerosol Limpie el aparato con un pa o h me...

Page 33: ...ver a usar el tel fono 14 Desconecte el tel fono y solicite servicio t cnico si se presenta alguno de los siguientes problemas A El cable de alimentaci n o el enchufe est quemado o da ado B Se ha derr...

Page 34: ...cificaciones t cnicas de aplicaci n de Industria Canad NOTA La etiqueta del Departamento de Comunicaciones de Canad permite reconocer que se trata de un equipo certificado Esta certificaci n asegura q...

Page 35: ...la red sanitaria interna si la hubiere est n todas conectadas Esta precauci n es particularmente importante en zonas rurales PRECAUCI N Los usuarios no deben intentar realizar estas conexiones por s...

Page 36: ...est dise ado para brindarle a os de servicio de calidad Pero en el caso de que el tel fono no funcione correctamente y el Cuadro de Localizaci n de Fallas de la p gina 12 no resuelva el problema siga...

Page 37: ...9 0 HOLD PROG TONE LO HI FLASH REDIAL VOL AMPLIFY M1 M2 M3 M4 M5 M6 M7 M8 M9 M11 M10 INSTRUCCIONES DE MANEJO Y GU A R PIDA XL 40 Auricular Unidad Base Cables Telef nicos Cable Enrollado del Auricular...

Page 38: ...de volumen VOL Indicador de BATER A BAJA Luz intermitente de TIMBRADO Tecla de AMPLIFICAR Indicador de AMPLIFICACI N LLAMADAS PERDIDAS MENSAJES DE VOZ EXTENSI N IOCUPADA RINGER RING TONE DIAL AUDIO OU...

Page 39: ...calinas AA de respaldo no incluidas Si el tel fono no se usa las pilas pueden llegar a durar por varios meses Para instalar bater as nuevas 1 Deslice la tapa del compartimiento de la bater a en la par...

Page 40: ...remo del cable telef nico al enchufe Line en la parte de atr s del XL 40 y el otro extremo al enchufe telef nico en la pared Conecte el cable del auricular al tel fono como se indica en la Figura 5 2...

Page 41: ...debajo de la base tal como se indi ca en la Figura 7 Presione el soporte de instalaci n hacia adentro y hacia abajo hasta que encaje en su lugar 3 Localice el enchufe telef nico de pared deseado cerc...

Page 42: ...illo inferior ha sido insertada inserte la cabeza del tornillo SUPERIOR en el soporte del tel fono y desl celo hacia abajo hasta que quede firmemente sujetado en la pared 7 Una vez instalado firmement...

Page 43: ...VOL de la Figura 10 Con AMPLIFY encendido el volumen de recepci n ser hasta 40 dB m s alto Precauci n La exposici n repetitiva e incremental a niveles de amplificaci n mayores que 18 dB puede causar d...

Page 44: ...rango que se adapta mejor a sus necesidades siga estos pasos 1 Cuando escuche una voz en la l nea presione la tecla de AMPLIFY como se indica en la Figura 9 2 Ajuste el control deslizante TONE de la...

Page 45: ...Re discado del ltimo N mero Para volver a llamar al ltimo n mero discado levante el auricular y presione REDIAL El tel fono discar nuevamente hasta 31 d gitos Flash Presione el bot n FLASH indicado e...

Page 46: ...si una llamada no es atendida por una persona o un contestador autom tico despu s del primer timbrado siempre y cuando el interrptor debajo del tel fono est en la posici n Llamadas Perdidas El indicad...

Page 47: ...21 de la misma forma en que lo har a para discarlo Nota Presione REDIAL si quiere insertar una peque a pausa entre dos n meros 3 Presione una de las teclas de memoria Figura 19 para grabar el n mero...

Page 48: ...te a un procesador de voz Conexi n del procesador de voz Precauci n Antes de conectar cualquier cable a su procesador de voz debe consultar con el fabricante de su implante Enchufe el extremo monof ni...

Page 49: ...este producto un cable de tel fono y un enchufe modular RJ11 USOC que cumple con las normas vigentes Est dise ado para ser conectado a un tomacorriente modular que tambi n cumple con las normas vigent...

Page 50: ...procedimientos que podr an afectar la operaci n de los equipos Si esto ocurriera la compa a de tel fonos se lo informar por anticipado de modo que usted pueda hacer las modificaciones que resulten nec...

Page 51: ...compa as telef nicas informan que sobrecargas el ctricas t picamente descargas de rayos son muy destructivas para equipos de clientes conectados a la red de CA Tel fonos en que las llamadas se pagan...

Page 52: ...cias pueda evitarse en todas las instalaciones Por lo tanto si este equipo causa interferencias da inas a la recepci n de radio o televisi n algo que se puede determinar encendiendo y apagando el equi...

Page 53: ...lecomunicaciones de su zona Asimismo se debe instalar el equipo usando un m todo de conexi n aceptado En algunos casos la instalaci n interna que hace la compa a en el caso de un servicio individual d...

Page 54: ...el ctrica o a un electricista seg n corresponda El N mero de Equivalencia de Dispositivo de Llamadas Ringer Equivalent Number indica el n mero m ximo de terminales al que est permitido conectar a una...

Page 55: ...49...

Page 56: ...ar por un producto nuevo o reacondicionado igual o similar La reparaci n o reemplazo tendr una garant a de 90 d as o del tiempo restante de su garant a original el que sea m s largo de los dos Garant...

Page 57: ...i n autorizado se lo enviaremos de regreso sin costo dentro de los Estados Unidos y Canad RESIDENTES CANADIENSES llame a Ameriphone al 800 874 3005 voz o 800 772 2889 TTY por instrucciones Esta garant...

Page 58: ...dB Banda ancha 300 a 3000Hz 30dB Rango de control de tono Rango completo 300 a 3000Hz usando un control deslizante Dimensiones Tama o 91 2 x 7 x 31 4 Peso 2 52 lbs Alimentaci n Fuente de Alimentaci n...

Page 59: ...ero Vea Programaci n de las Teclas de Memoria P g 10 Vea Ajustando su Tel fono para reconfigurar el interruptor de modo de discado P g 5 6 1 Verifique que el cable no est flojo 2 Verifique que la fuen...

Page 60: ...nes 32 Flash 39 Ayuda de Ameriphone 30 Llamada en espera 39 Tono de Voz de Recepci n 38 Volumen de Voz de Recepci n 37 Instalaci n de la Bater a de Respaldo 33 Re discado del ltimo N mero 39 Control d...

Page 61: ...55...

Page 62: ...56 F R A N A I S XL XL 40 AMPLIFIED TELEPHONE Le t l phone Amplification tr s forte et tr s claire Manuel d utilisation...

Page 63: ...on 65 C S lecteur de tonalit 66 D Volume et tonalit de la sonnerie 66 E Indicateur visuel de la sonnerie 67 F Appel en garde 67 G Recomposition du dernier num ro 67 H Programmation des num ros fr quem...

Page 64: ...ttoyeurs liquides ou en a rosol Si un liquide quelconque est renvers sur l appareil d branchez la prise t l phonique et le cordon d alimentation imm diatement Ne pas le brancher de nouveau avant qu il...

Page 65: ...itions nonc es ci dessus il se peut qu il y ait d gradation du service dans certaines situations Le mat riel homologu doit tre r par par un centre d entretien canadien autoris d sign par le fournisseu...

Page 66: ...s ann es Service de Grantie Lisez attentivement les instructions sui vantes avant d utiliser votre t l phone Conservez ce manuel pour r f rence ult rieure Re u de Caisse Conservez votre re u de caisse...

Page 67: ...5 6 7 8 9 0 HOLD PROG TONE LO HI FLASH REDIAL VOL AMPLIFY M1 M2 M3 M4 M5 M6 M7 M8 M9 M11 M10 CONSIGNES D UTILISATION ET GUIDE RAPIDE XL 40 Combin Unit centrale Cordons modulaires Cordon spiral du comb...

Page 68: ...on Commutateur FLASH Contr le du Volume Indicateur de pile us e Voyant de la sonnerie Touche d Amplification Voyant d Amplification Bo te vocale Appels manqu s Autre poste en ligne Touche de programma...

Page 69: ...e cordon du combin dans l appareil Voir fig 3 4 D crochez et v rifiez si vous avez la tonalit 5 Vous tes maintenant pr t utiliser votre t l phone XL 40 B Installation au mur 1 Glissez le crochet du co...

Page 70: ...t de la lampe de la sonnerie Pour installer la pile et afin d viter tout choc lectrique d branchez le cordon t l phonique avant d installer la pile puis connectez la pile Fig 7 Enfin reconnectez le co...

Page 71: ...alvoyante est susceptible d utiliser le t l phone fixez de mani re s re l avertissement 65 Utilisation De XL 40 Le t l phone XL 40 a t con u pour vous faciliter les communications Il comprend de nombr...

Page 72: ...cteur de tonalit Avec le s lecteur de tonalit vous entendez des sons forts clairs et faciles comprendre Cela vous permet d accentuer les fr quences des sons que vous entendez le mieux 1 Lorsque vous a...

Page 73: ...rde Pour mettre un appel en garde appuyez simplement sur HOLD et raccrochez Le voyant rouge s allumera Si vous reprenez la conversation un autre poste sur la m me ligne le XL 40 raccrochera de lui m m...

Page 74: ...l phone comme si vous le composiez 3 Appuyez sur une des touches de m morisation Fig 16 lorsque vous tes pr t enregistrer le num ro d sir et raccrochez imm diatement 4 Le num ro est maintenant enregi...

Page 75: ...prise audio directe K Commutateur La touche commutateur FLASH est utilis e pour avoir acc s certains services ou fonctions offerts par votre compagnie de t l phone locale par exemple la mise en attent...

Page 76: ...rdon pour implant cochl aire Ameriphone peut fournir un cordon servant brancher directement le XL 40 sur un processeur de parole DANGER Pendant un orage vitez d utiliser le t l phone la foudre peut ca...

Page 77: ...71 Utilisation De XL 40 Compatible with Compatible avec appareils XL 30 XL 40 XL 50 VCO JV 35 et CL 40 Ameriphone Speech Processor Processeur de parole...

Page 78: ...ibilit de composer le num ro ou difficult le composer Pas de sonnerie Le t l phone se bloque aucune fonction ne fonctionne CAUSES ET SOLUTIONS V rifiez tous les cordons de raccordement Aucun num ro n...

Page 79: ...e Voir les instructions d installation pour des d tails Le REN est employ pour d terminer le nombre de dispositifs qui peuvent tre reli s une ligne t l phonique RENs excessif sur une ligne t l phoniqu...

Page 80: ...st prouv avec cet quipement de t l phone pour la r paration ou l information de garantie entrez en contact avec svp le marcheur Ameriphone 1 800 874 3005 Si l quipement cause le mal au r seau t l phon...

Page 81: ...ation Ce dispositif est conforme la partie 15 des r gles de FCC L op ration est sujette aux deux conditions suivantes 1 ce dis positif peut ne pas causer l interf rence nocive et 2 ce dispositif doit...

Page 82: ...n la radio ou tout autre r cepteur est reli e 4 Consultez le revendeur ou un technicien exp riment de radio TV pour l aide ATTENTION Les changements ou les modifications pas express ment approuv es pa...

Page 83: ...oniques et du syst me m tallique interne de conduite d eau si pr sent sont reli es ensemble Cette pr caution peut tre particuli rement importante dans des secteurs ruraux ATTENTION Les utilisateurs ne...

Page 84: ...78 E S P A O L F R A N A I S...

Page 85: ...ent sera garanti pour une p riode de 90 jours ou pour la p riode non coul e de la garantie originale si celle ci d passe 90 jours Les garanties implicites y compris celles touchant des appareils con u...

Page 86: ...u Canada PERSONNES R SIDANT AU CANADA Veuillez appeler Ameriphone au 800 874 3005 ou au 800 772 2889 TTY pour conna tre la marche suivre Cette garantie ne couvre pas les domages attribuables aux accid...

Page 87: ...81 Description De L appareil DIMENSIONS Taille 9 1 2 x 7 x 3 1 4 24 1 x 17 7 x 8 2 cm Poids 2 52 lb 1 Kg PILE 4 Piles Alkalines de type AA non incluse Adapteur 9V 300 mA...

Page 88: ...sition des num ros m moris s 69 Cordons modulaires 61 En cas de difficult s 72 Garantie 79 Installation au mur 63 Installation 63 Installation sur bureau 64 Lampe de la sonnerie 67 Liste des pi ces 61...

Reviews: