background image

13592 Desmond St., Pacoima, CA 91331   818.897.0808 tel  888.753.9898 toll free   www.americanrange.com

10

Medallion Dual Fuel Ranges

   Use & Care Manual

INSTALLATION INSTRUCTIONS


It is the owner’s responsibility to ensure 

that the electrical connection of this 

appliance is performed by a qualified 

electrician.  The electrical installation 

must be in accordance with the latest 

version of the National Electrical code 

ANSI/NFPA 70 and local codes and 

ordinances.

Check your local building codes for the 

proper method of installation.  In the 

absence of local codes, this appliance 

should be installed in accordance with 

the National Fuel Gas Code ANSI Z223.1.  

Be certain that the appliance being 

installed is correct for the gas service 

being provided.

Within the Commonwealth of 

Massachusetts, this appliance must be 

installed by a licensed plumber or gas 

fitter.

Do not attempt to disengage the hinge 

catch with the door removed from the 

oven.  The hinge spring could release 

causing personal injury. 

Do not lift or carry the oven door by 

the door handle.

ELECTRICAL SERVICE

A 240VAC, 60Hz separately grounded circuit that is protected by a 30A circuit 

breaker or time delay fuse must be supplied to the appliance.

A four-wire connection (not provided) is required to connect the appliance to the 

electrical supply junction box.  Consult local building codes for the type and minimum 

wire gauge to use.  The wiring to the appliance from the electrical supply junction box 

needs to be long enough to allow the appliance to be pulled out from the wall for 

service, while remaining connected.

GAS SUPPLY

Be certain that the appliance being installed is correct for the gas service being 

provided.  Refer to the appliance data plate for the gas supply requirements.

Minimum Natural Gas Supply Required – 6" water column

Minimum Liquid Propane (LP) Gas Supply Required – 11" water column

A manual gas shut-off valve must be remotely installed and easily accessible in the 

adjacent cabinet.

The regulator inlet is for a 1/2" gas line.  

PREPARING FOR INSTALLATION

UNPACKING THE APPLIANCE

Unpack all parts boxes and verify that all of the required components have been 

provided.  If any items are missing or damaged, please contact your dealer immediately.  

Do not install a damaged or incomplete appliance.

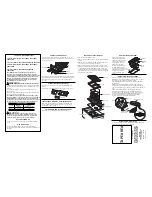
REMOVING THE OVEN DOOR

To make the appliance easier to move, remove the door to reduce weight.  

1. Open the door to its fully opened position.

2. Place hinge pin in the hole located in hinge arm.

3. Remove left and right hinge locks.

4. Move door upward to engage pin.

5. Lift door out.

CONNECTING THE ELECTRICAL SERVICE

1. Make sure that the conduit or appliance wire is long enough to allow the range  

  to be pulled out for service without disconnecting it.

2. Connect the wires on the appliance wall electrical box.

CONNECTING THE GAS SUPPLY

1. Make sure the gas supply valve is in the OFF position.

2. Make sure all surface burner knobs are in OFF position.

3. Connect the gas line to the appliance.

4. Connect the gas line to the supply line.

5. Turn on the gas supply and check for leaks.

Summary of Contents for ARR-304DF

Page 1: ... 486GDDF ARR 4842GRDF ARR 486GDGRDF ARR 4842GDDF ARR 486GRDF ARR 606GDGRDF ARR 6062GDDF ARR 602GRDF PROFESSIONAL QUALITY COOKING EQUIPMENT 13592 Desmond St Pacoima CA 91331 818 897 0808 tel 888 753 9898 toll free www americanrange com RETAIN THIS MANUAL FOR FUTURE REFERENCE 2016 American Range All Rights Reserved ...

Page 2: ...___ Serial Number ___________________________________________ Purchase Date ___________________________________________ Installed By __________________________ Install Date __________ Gas Type _______________________________________________ Electrical Information ______________________________________ This equipment is design engineered for commercial use only IMPORTANT SERVICE NOTICE Using any pa...

Page 3: ...ns and how to maintain that just like brand new appearance and performance over years of day to day and special holiday use If you should encounter any sort of problem turn to the section of the manual entitled Troubleshooting for a quick solution or guidance regarding the next step required to get back to tip top condition Thank you for choosing an American Range product for your home As you can ...

Page 4: ...l Service 10 Gas Supply 10 Preparation for Installation 10 Model and Parts Identification 11 Final Installation 12 Before Using the Appliance 12 Installation Checklist 13 Performance Checklist 14 Start up Procedure 14 OPERATE 15 21 CookTop 15 Cookware 16 Suggested Burner Settings 16 Control Panel Keys 17 Ovens 18 Control Panel 19 Sabbath Mode 19 Grill 20 Griddle 21 MAINTAIN 22 24 Self Cleaning 22 ...

Page 5: ... use The included Anti Tip Device must be installed prior to operation WHATTO DO IFYOU SMELL GAS º Do not try to light any appliance º Do not touch any electrical switch do not use any phone in your building º Immediately call your gas company Follow the gas supplier instructions º If you cannot reach your gas supplier call the Fire Department WARRANTY REQUIREMENT For reliable operation and for yo...

Page 6: ...w to identify what might be going wrong with the unit and how to communicate your observations with authorized field service technicians Before using your appliance please read this manual paying special attention to the important safety instructions located in the next several pages ABOUT THIS MANUAL This is the SAFETY ALERT SYMBOL This symbol alerts you to hazards which will result in severe inj...

Page 7: ... 9 millibar from the propane gas tank to the pressure regulator For personal safety this appliance must be connected to a properly grounded and polarized electrical power supply If only a two prong outlet is available it is the customer s responsibility to have it replaced with a dedicated grounded three prong electrical outlet by a licensed technician The gas surface burner re ignition system whe...

Page 8: ...ors in the room where the appliance is located This appliance should not be operated without a properly sized and functional ventilation hood To reduce the risk of appliance tipping it must be secured to the wall with a properly installed anti tip bracket To make sure the bracket has been installed properly inspect behind the range using a flashlight Anti tip devices are only necessary for range p...

Page 9: ...e push to turn gas valve knobs on the appliance are designed to be child safe however they are not a guarantee of operation Children should not be left alone or unattended in the kitchen while the appliance is in use Never leave the appliance unattended during use Boil overs may occur causing spills which may ignite Never wear loose fitting or long sleeved apparel while cooking Never wear garments...

Page 10: ...tilation air to the unit ELECTRICAL CONNECTION 0 The Range must be electrically grounded in compliance with local codes or in the absence of local codes with the National Electrical Code ANSI NFPA70 0 The electrical service in the building must be equipped with a properly grounded NEMA 14 30 receptacle POWER REQUIREMENTS FORTHIS RANGE 0 240VAC 60 Hz single phase 30 AMP Max GAS CONNECTION Be certai...

Page 11: ...kick plate on the front of the appliance MODELS ELECTRICAL CURRENT ARR 304DF 30A ARR 364GDDF 30A ARR 366DF 30A ARR 364GRDF 40A ARR 486GDDF 40A ARR 4842GRDF 40A ARR 486GDGRDF 40A ARR 4842GDDF 40A ARR 486GRDF 40A ARR 606GDGRDF 60A ARR 6062GDDF 60A ARR 602GRDF 60A RATING PLATE The location of the rating plate is shown above The information on the rating plate defines the model serial number gas type ...

Page 12: ...LLATION INSTRUCTIONS GENERAL These instructions are provided to assist the qualified installer It is the owner s responsibility to ensure that all governing codes and ordinances are observed during the planning and installation of this appliance OVERALL RANGE DIMENSIONS Failure to follow these installation guidelines will affect warranty coverage ...

Page 13: ...e beyond the edge of the front face of the adjacent cabinet The gas and electrical supplies should be located in adjacent right cabinet Any openings in the wall behind the Range and in the floor under the range must be sealed Always keep the appliance clear and free from combustible materials gasoline or other flammable vapors and liquids Do not obstruct the flow of combustion and ventilation air ...

Page 14: ...m the electrical supply junction box needs to be long enough to allow the appliance to be pulled out from the wall for service while remaining connected GAS SUPPLY Be certain that the appliance being installed is correct for the gas service being provided Refer to the appliance data plate for the gas supply requirements Minimum Natural Gas Supply Required 6 water column Minimum Liquid Propane LP G...

Page 15: ...oil the burner on indicator will glow It is normal for the indicator light to cycle off and on during baking or broiling showing that the requested temperature has been achieved or that more heat is required Door Gasket The door gasket is made from high temperature materials and creates a seal between the hot oven and the cool kitchen Convection Fan and Switch Operated by the front panel switch th...

Page 16: ...ely to ensure that it is properly reinstalled INSTALLING THE BURNER COMPONENTS Install the burner components as shown to the right BEFORE USING THE APPLIANCE Prior to operating this appliance please read the operation and maintenance sections of this manual Before beginning the test procedure verify that all cook top control knobs are in the OFF position Turn on the gas supply at the manual shut o...

Page 17: ...rrect voltage 0 Grounded outlet 0 Polarized outlet 0 No GFCI Gas Connection 0 Verify fuel 0 Natural or 0 LP 0 Gas shut off present and accessible 0 Gas Supply line properly sized 0 Gas Supply pressure checked 0 Operating pressure checked 0 All connections checked for leaks INSTALLATION CHECKLIST This checklist has been developed to assure proper installation of your oven To validate warranty you m...

Page 18: ...In any case these materials are safe for the environment but it is best they not contribute to the taste or odor of your first oven cooking experience OVEN BURN OFF PROCEDURE Turn on the kitchen ventilating hood Light the oven according to the instructions in the manual Set the oven thermostat temperature to 350ºF Let the oven run for one hour Turn on the convection fan Set the oven thermostat to ...

Page 19: ...de to side If it is correctly seated it will nest in detents in the case of the sealed burners or on the corresponding pin hole for open burners If this does not correct the problem turn to theTroubleshooting section of this manual AUTO RE IGNITION The surface burners are equipped with a special ignition and re ignition system that senses the presence of flame and re ignites the burner should the ...

Page 20: ... pan boil dry and if it occurs remember it can be extremely hot and very dangerous If this should occur turn off the burner immediately Wait a while until the pot cools down enough to handle this could be several minutes but could save you from burns or other serious injury The pan bottom should be flat the heavier the better and well balanced on the cook top grate sitting flat without rocking pre...

Page 21: ...oven Use this key to time an event You can use the timer without oven on Pressing this key for six seconds will lock or unlock the control panel Use this key to turn on or off the oven lights Activates the oven self cleaning feature This mode is for single and double rack baking Uses only a heat source from below the food Uses a top heat source Is used to warm food Selects the type of cooking you ...

Page 22: ...r input to be accepted After that the controller goes to work For standard baking recipes press the BAKE key using theTEMP pyramids to enter the recipe temperature Wait three seconds for the input to be accepted Preheat icons will illuminate on the display when the oven has reached the desired temperature an audio alert tone will sound Press the BROIL key and use theTEMP pyramids to select HI or a...

Page 23: ...ng less time and using less energy Use the same recommended temperatures for meats and poultry dishes but keep watch of the time Convection cooking technology was first developed in Europe and has been used for many years recently taking hold in US residential kitchens and cookbooks In convection cooking not only is the cook time faster but also the oven temperature is more even top to bottom and ...

Page 24: ...the grill vaporizes the surface of your food locking in flavor Add any barbecue sauces during the last few minutes of cooking long enough to caramelize the sauce For best results turn food with tongs or a flat spatula to avoid piercing meat or poultry Turn meat once when juices rise to the surface Turning meat more than once results in the loss of meat juices Never squeeze juices out of meat Befor...

Page 25: ...our 1 tablespoon of vegetable oil not corn or olive oil and rub on the entire surface of the griddle using a rough towel 3 Push the griddle control knob in and turn to a medium setting 350 F 4 Heat until griddle begins to smoke Turn off griddle and allow it to cool 5 Returning to step 2 repeat the process When you are done griddling and while the griddle surface is still warm remove any left on fo...

Page 26: ...rm water Rinse and dry completely with a soft lint free cloth CLEANING GLASS INTERIOR AND EXTERIOR Use a mild glass cleaner i e Simple Green to remove finger prints on glass surfaces You can also clean glass surfaces with Cook top Cleaning Cream Use according to manufacturer s directions The control panel automatically locks the oven door during self cleaning The latch prevents the door from being...

Page 27: ...ain 0 Do not use abrasives on Stainless Steel Use towels sponges or soft plastic scrubbers RUB ONLY WITH THE GRAIN 0 Do not use steel wool pads or green rough Scrubbies 0 Wash all cooking surfaces with hot water and dish detergent such as Simple Green Ivory Liquid or Joy 0 Rub stubborn spots with baking soda or liquid cleaner such as Windex All Surface Cleaner or 409 0 Grates and burner caps can b...

Page 28: ...es and could be dangerous Control Knobs Power Paint Use dry hands to pull off the knobs hot sudsy water works best here with a sponge to avoid scratching Chrome Knob Bezels Hot soapy water works well here with a sponge or soft cloth As with any round feature that meets the stainless steel grain be careful to clean the bezels in a circular motion and not contact the S Steel control panel Exterior F...

Page 29: ...n the off position Light is burned out Try switching the light on Locate and test a new replacement light unscrew glass lens remove bad light replace Broiler will not light No electrical power to the range Gas service is turned off Look for red glow of hot surface igniter Check circuit breakers in house Try to light a surface burner If no glow call for service Burner lights but clicking won t stop...

Page 30: ...service during the standard warranty period the receipt proving certified installation must be made available to American Range for verification If installation was not performed by a certified licensed contractor be prepared to submit a major credit card for payment for proper installation prior to service 13592 Desmond Street Pacoima CA 91331 818 897 0808 tel 888 753 9898 toll free 818 897 1670 ...

Reviews: