


SENSORRAIL IIIE ADRL3TRK SERIES
8200-0593-02, REV. A
INSTALLATION GUIDE
33 of 34
Appendix C:
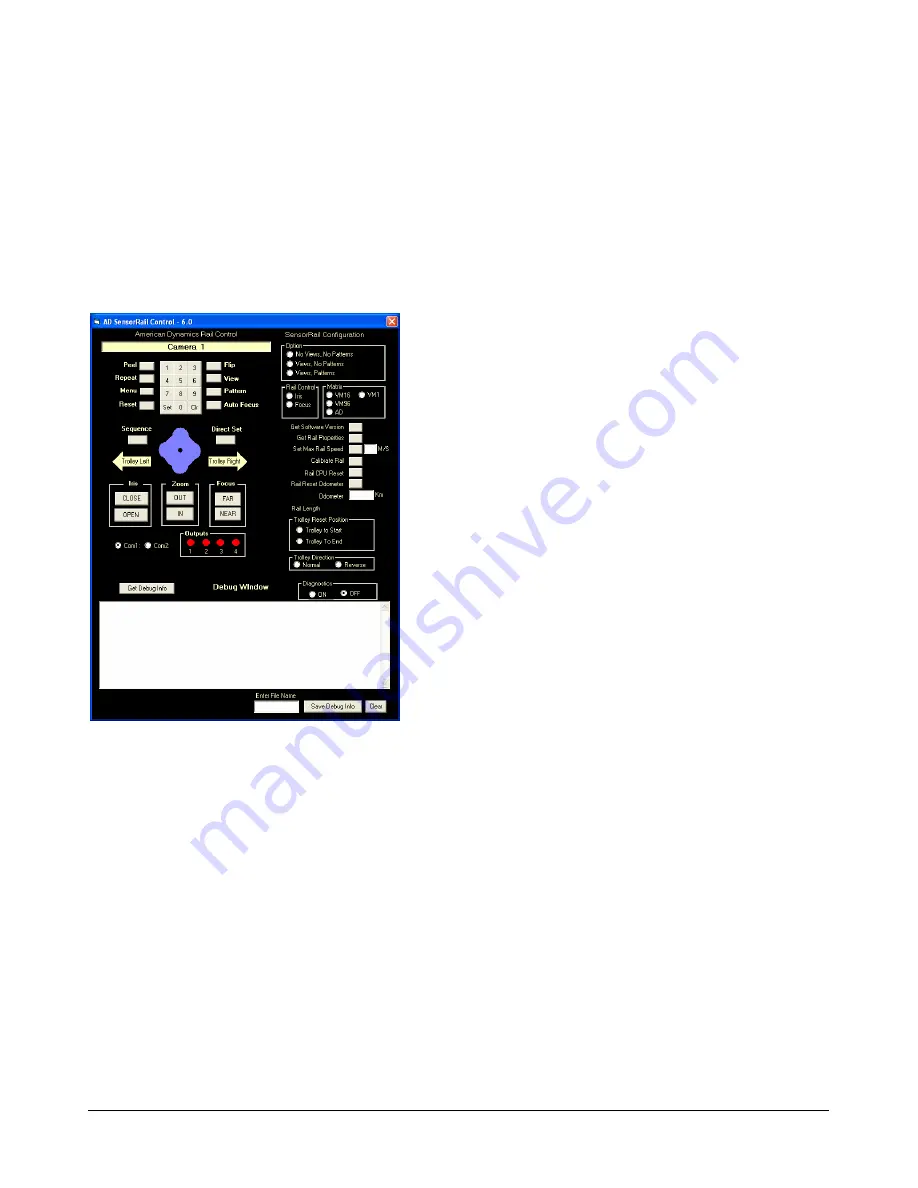
AD SensorRail Control
Utility
Camera Control, SensorRail,
and PC Functions
Camera Control Functions
Dome camera and rail functions
Select Dome Camera.
To select the camera dome, click
0-9 keys on the numeric keypad and then SET. The
display indicates the currently selected camera. To erase
an incorrect number, click CLR before SET.
Peel.
Click to have the dome perform the Apple Peel
pattern. Initiate any PTZ function to cancel this pattern.
Reset.
Doubleclick to reset the dome camera.
Flip.
Click to move the pan axis of the dome 180°.
View (also known as Target, Preset).
To go to a stored
view, use the numeric keypad to enter the view number
and click VIEW. To store a view, click SET, enter the
number, and then click VIEW. The latest software
supports 16 views.
Pattern (also known as Tour).
To run a stored pattern,
enter the pattern number (1-3) using the numeric keypad
and then click PATTERN.
- To repeat a pattern continuously, click REPEAT,
enter the pattern number (1-3) using the numeric
keypad, and then click PATTERN.
- To define a pattern, click SET, enter the pattern
number (1-3) using the numeric keypad and click
PATTERN. Pan, tilt, and zoom the dome until the
pattern has run. To end the pattern, click PATTERN.
- To review the pattern just defined, click PATTERN. If
the pattern is acceptable, click SET and then
PATTERN to replace the pattern designated at the
beginning of the definition sequence.
Auto Focus.
Click to return iris and focus functions to
automatic.
Sequence.
The software is capable of creating 16
different sequences, each with 16 steps. You can setup
sequences by following these procedures. To program a
sequence:
1. Click SET, then the keypad number of the sequence
and then click SEQUENCE. The sequence edit
information is displayed in message window. The
current field to edit starts blinking.
2. Enter the step number using the numeric keypad,
and then click SET.
3. Enter the preset using the numeric keypad, and then
click SET.
4. Enter the dwell using the numeric keypad, and then
click SET.
5. Repeat steps 3–5 for each step.
6. Click SEQUENCE to finish programming.
To run a sequence, enter the sequence number using
the numeric keypad and then click SEQUENCE. The
message window indicates the sequence running and
the current step number. To stop the sequence, click
SEQUENCE.
Pan and Tilt Joystick.
Click and drag the black dot at
the center of the joystick in the direction that the dome is
to go. The farther the drag, the faster the dome goes.
Release the mouse button to release the dot and stop
the dome.
Iris (Close, Open).
Click CLOSE or OPEN to manually
adjust the iris level of the dome.
Zoom (Out, In).
Click OUT or IN to change the dome’s
field of view (FOV).
Focus (Far, Near).
Click FAR or NEAR to manually
focus the dome.


