


Auto Spot 150™
System Menu
On-Board System Menu.
The Auto Spot 150™ comes with an easy
to navigate system menu. This next section will detail the function of
each command in the system menu.
©
American DJ
®
- www.americandj.com - Auto Spot 150™ Instruction Manual Page 14
Auto Spot 150™
System Menu
©
American DJ
®
- www.americandj.com - Auto Spot 150™ Instruction Manual Page 13
Menu Button -
To access the system commands located the
MENU
BUTTON (10)
on the side of the unit. Tapping this button in any mode
will activate the system menu. Continue to tap the
MENU BUTTON
(10)
until you reach function you wish to change. When you reach the
function you wish to change tap the
ENTER BUTTON (13).
When a
function is selected the menu will begin to flash, use the
UP (12)
and
DOWN (11) BUTTON
to change the function. Once your changes are
made tap the
ENTER BUTTON (13)
again to lock the change in the
system, if the
ENTER BUTTON (13)
is not selected within eight sec-
onds the system will automatically return to menu section. To exit
without making any changes tap the
MENU BUTTON (10)
again. When
all your changes have been made the system menu will automatically
display the mode after eight seconds. The next section will define the
menu selections.
MENU
Focus Adjust
Self-Test
Reset
Fixture Hours
Display Inversion
Display Normal
Tilt Inversion
Tilt Normal
Pan Inversion
Pan Normal
Split Color
Normal Color
Slave mode " 2 Light Show 2 "
Slave Mode " Normal "
Show Mode " Show 2 "
Show Mode " Show 1 "
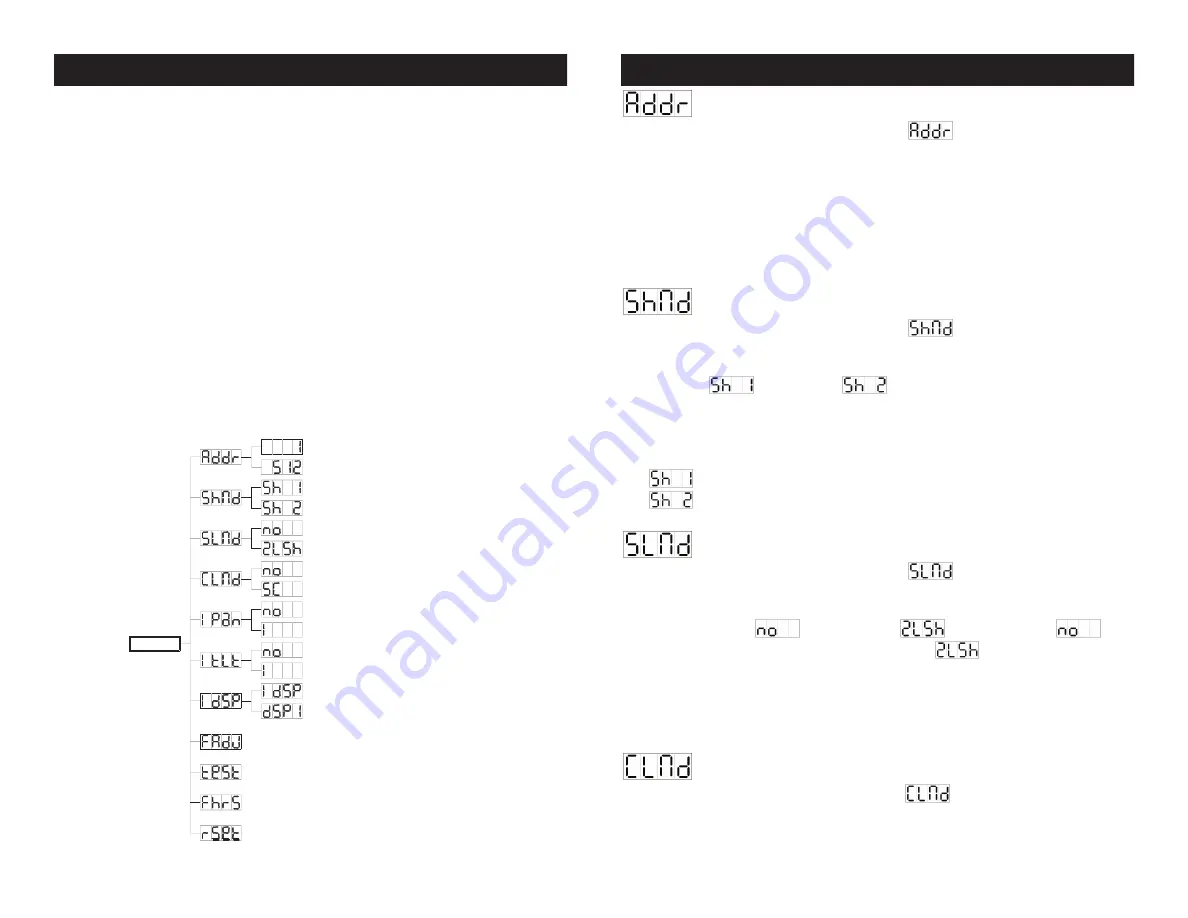
DMX512 Address Setting
DMX-512 Address Setting
Tap the
MENU BUTTON (10)
until
is shown in the display.
Pressing the
ENTER BUTTON (13)
will cause the display to blink and allow
the DMX address to be changed. Use the
DOWN (11)
and
UP (12)
buttons
to change the DMX address. Once the address has been selected, press the
ENTER BUTTON (13)
to continue the setup functions or after 8 seconds to
automatically return to the main menu. To return to the main menu without
making any adjustments to the DMX address press the
MENU BUTTON (10)
again.
Show Mode
Tap the
MENU BUTTON (10)
until
is shown in the display.
Pressing the
ENTER BUTTON (13)
will cause the display to blink and allow
the show mode to be changed. Use the
DOWN (11)
and
UP (12)
buttons to
select either
(show 1) or
(show 2). Once the mode has been
changed, press the
ENTER BUTTON (13)
to continue the setup functions or
after 8 seconds to automatically return to the main menu. To return to the
main menu without changing the show modes press the
MENU BUTTON
(10)
again.
Show 1 mode - Larger rooms, Tilt movement angle 210.°
Show 2 mode - Smaller rooms, Tilt movement angle 90.°
Slave Mode -
This function allows the unit to operate as a slave.
Tap the
MENU BUTTON (10)
until
is shown in the display.
Pressing the
ENTER BUTTON (13)
will cause the display to blink and allow
the slave mode to be activated. Use the
DOWN (11)
and
UP (12)
buttons
to toggle between
(normal) and
(slave) mode.
will
cause the unit to operate as a “master” and
will cause the unit to
function as a “slave.” Once the mode has been selected, press the
ENTER
BUTTON (13)
to continue the setup functions or after 8 seconds to automati-
cally return to the main menu. To return to the main menu without making any
adjustments press the
MENU BUTTON (10)
again.
Color Mode -
This item turn the split color function on or off.
Tap the
MENU BUTTON (10)
until
is shown on the display.
Pressing the
ENTER BUTTON (13)
will cause the display to blink and allow
the color mode to be changed. Use the
DOWN (11)
and
UP (12)
buttons to