background image

©

American Audio

®

   -   www.AmericanAudio.us   -   DCD-PRO240™ Instruction Manual Page 17

 BASIC OPERATIONS (CONT)

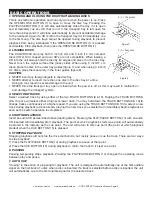
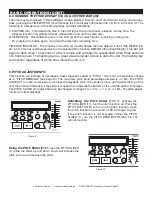
1)  Be sure a disc is inserted in the drive and press the PROG     
     Button (5).  Pressing the PROG Button (5) from any function 
     will immediately pause the disc and enter the program  
     mode.
2)  After activating the program mode the PROGRAM INDICA- 
     TOR LED will begin to glow indicating Program Mode has  
     been activated. 

11. PROGRAM PLAY


This operation allows you to customize your disc playback. You may select specific tracks to played and the 
order they will be played in. You may program a maximum of 20 tracks at once and program a single track to 
played more than once. To create a program:

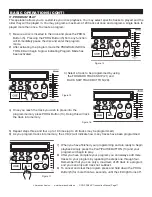
3) Select a track to be programmed by using  
    the FORWARD TRACK SKIP (21) and    
    BACK SKIP TRACK BUTTON (20). 

4)  Once you reach the track you wish to place into the 
     program memory press PROG Button (13). Doing this will lock 
     the track into memory. 

Figure 16

Figure 15

5)  Repeat steps three and four up to 19 times (up to 20 tracks may be programmed).
6)  As you program tracks into memory, the LCD (2) will indicate how many tracks have been programmed.  
       

7)   When you have finished your programming and are ready to begin  
      playback simply press the PLAY/PAUSE BUTTON (14) and your  
      program will begin to play.
8)   After you have complete your program you can always add more  
      tracks to your program by repeating the steps one through four.  
      Remember that you can only a maximum of 20 track in a program  
      and you can only add track not subtract.
9)   To cancel and clear the program press and hold down the PROG  
      Button(5) for more than two seconds, until the LED light turns off. 

Figure 17

Figure 14

Summary of Contents for DCD-PRO240

Page 1: ...DCD PRO240 Professional Dual CD Player Operating Instructions 4295 Charter Street Los Angeles Ca 90058 www americandj com 6 03 FLIPFLOP ...

Page 2: ...C 14 SELECTING TRACKS 14 STARTING STOPPING PLAYBACK 14 ADJUSTING TIME DISPLAY 15 PITCH ADJUSTMENTS 15 PITCH BENDING 16 PROGRAMMING AND PROGRAM PLAY 17 FLIP FLOP 18 SHUT DOWN PROCEDURES 18 HANDLING COMPACT DISC 19 WARRANTY 20 SPECIFICATIONS 21 CONTENTS Please Note All specifications and improvements to and in the design of this unit and this manuals are subject to change at any time without any pri...

Page 3: ...NEL This equipment has been tested and found to comply with the limits for a Class B digital device pursuant to Part 15 of the FCC Rules These limits are designed to provide reason able protection against harmful interference in a residential installation This equipment generates uses and can radiate radio fre quency energy and if not installed and used in accordance with the instructions may caus...

Page 4: ...r pinched by items placed upon or against them paying particular attention to cords at plugs conveniencereceptacles andthepointwhere they exit from the product OUTDOOR ANTENNA GROUNDING If an outside antennaorcablesystemisconnectedtotheproduct be sure the antenna or cable system is grounded so astoprovidesomeprotectionagainstvoltagesurges andbuilt upstaticcharges Article810oftheNational Electrical...

Page 5: ...ers American Audio www AmericanAudio us DCD PRO240 Instruction Manual Page 5 This unit has been thoroughly tested and has been shipped in perfect operating condition Carefully check the shipping carton for damage that may have occurred during shipping If the carton appears to be damaged carefully inspect your unit for any damage Be sure all accessories needed to operate the unit has arrived intact...

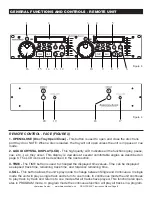
Page 6: ...the vertical plane If the unit is tilted excessively discs may not be loaded or unloaded properly Figure 1 CAUTION The LCD is designed to be clearly visible within the angles shown in Figure 2 Mount the control unit so that the visual angle is within this range Figure 2 Figure 1 1 Checking the Contents Be sure your DCD PRO240 was shipped with the following 1 DCD PRO240 Dual CD player unit 1 DCD PR...

Page 7: ... Example if your mixer s crossfader is all the way to the left player one is playing player two is in cue or pause mode If slice the fader at least 20 to the right player one will continue to play and player two will begin to play mixing both sides together When the crossfader is slid all the way to the right player two will is playing and player one will go into cue or pause mode You can create g...

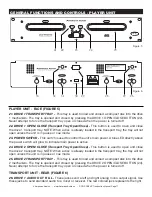
Page 8: ...les as described on page 6 The LCD icons will be described in the next section 3 TIME The TIME button is used to changed the displayed time values Time can be displayed as elapsed track time remaining track time and total disc remaining time 4 SGL This button allows the unit s play mode to change between Single and Continuous In single mode the unit will play a single track and return to cue mode ...

Page 9: ...nit That is to say if you set a 2 pitch on one disc remove that disc and insert another that disc will also have a 2 pitch The amount of pitch being applied will be dis played in the LCD 2 Use this slider to match the BPM s of this unit to that of another music source By changing the pitch of one disc with respect to the other in this way the beats can be matched 12 PITCH BEND The pitch bend funct...

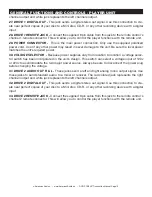
Page 10: ...the wheel REMOTE CONTROL REAR FIGURE 4 17 CHANNEL 1 CONTROLLER JACK Connect the supplied mini plug from the CUE jack on the rear of your CD unit to the CONTROL out jack of a compatible American Audio or American DJ mixer This will enable the CD Q Start function This feature is only available on American Audio or American DJ Q series mixers 18 CHANNEL 1 REMOTE JACK Connect the supplied 8 pin din ca...

Page 11: ...se or cue mode 23 POWER SWITCH This switch is used to control the unit s main power A blue LED directly above the power switch will glow to indicate main power is active 24 DRIVE 2 OPEN CLOSE Transport Tray Open Close This button is used to open and close the drive 2 transport tray NOTE When a disc is already loaded in the transport tray the tray will not open unless the unit is in pause or cue mo...

Page 12: ...s required power 30 VOLTAGE SELECTOR Because power supplies vary from location to location a voltage selec tor switch has been incorporated in the unit s design This switch can select a voltage input of 120v or 220v to accommodate the two major power source Always be sure to disconnect the power plug before changing the voltage 31 DRIVE 2 AUDIO OUT R L These jacks send a left and right analog mono...

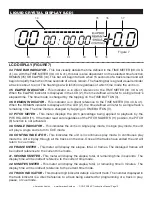
Page 13: ...apping on TIME BUTTON 3 37 PITCH METER This meter displays the pitch percentage being applied to playback by the PITCH SLIDER 11 If the meter read zero regardless of the PITCH SLIDER S 11 position the PITCH 6 function is not activated 38 SINGLE INDICATOR This indicates the unit is in single play mode In single play mode the unit will play a single and return to CUE mode 39 CONTINU INDICATOR This i...

Page 14: ...ransport tray open or closed when the power is off as this may result in malfunction and damage the transport system 3 SELECTING TRACKS Select a desired track by using either of the two TRACK BUTTONS 8 10 Tapping the TRACK BUTTONS 8 10 once will select either a higher or lower track You may hold down the TRACK BUTTONS 8 10 to change tracks continuously at a higher speed If you are using the TRACK ...

Page 15: ...conds of a track remain The flashing bar is a great visual reminder a track is about to end The flashing bar will function regardless of which time mode the unit is in BASIC OPERATIONS CONT Activating the Pitch Slider 11 To activate the PITCH SLIDER 11 turn the pitch function on Press the PITCH BUTTON 6 to turn on the pitch function when the pitch function is activated a LED will begin to glow If ...

Page 16: ...pro vide a slow down The extent to which the speed changes is proportionate to the amount of time the button is pressed For example if the PITCH BEND BUTTON 12 is held down continuously the disc speed will increases and will continue to increase until reaches a maximum of 100 speed gain When you release the PITCH BEND BUTTON 12 the disc speed will automatically return to it s previous speed Holdin...

Page 17: ...g the FORWARD TRACK SKIP 21 and BACK SKIP TRACK BUTTON 20 4 Once you reach the track you wish to place into the program memory press PROG Button 13 Doing this will lock the track into memory Figure 16 Figure 15 5 Repeat steps three and four up to 19 times up to 20 tracks may be programmed 6 As you program tracks into memory the LCD 2 will indicate how many tracks have been programmed 7 When you ha...

Page 18: ...ode has been activated Figure 18 5 After they have both cued press the PLAY PAUSE BUTTON 14 on one of your drives to begin playback 6 After the first cds single track has ended the second cds track will immediately begin play back 7 FLIP FLOP will continue until you stop it or power is interrupted 8 To deactivate Flip Flop mode repeat step 4 American Audio www AmericanAudio us DCD PRO240 Instructi...

Page 19: ...revent damaging the surface in particular when removing a disc from the jewel case Do not bend the disc Do not apply heat Do not enlarge the hole in the center of the disc Do not write on the label printed side with a hard tipped implement such as a pencil or ball point pen Condensation will form if a disc is brought into a warm area from a colder one such as outdoors in winter Do not attempt to d...

Page 20: ...anual D This is not a service contract and this warranty does not include maintenance cleaning or periodic check up During the period specified above American Audio will replace defec tive parts at its expense and will absorb all expenses for warranty service and repair labor by reason of defects in material or workmanship The sole responsibility of American Audio under this warranty shall be limi...

Page 21: ... 8 times over sampling 1 bit D A converter D A conversion 16 bit Frequency response 1 dB 20 Hz to 20 KHz Output level 2 0V 1dB Load impedance 47k ohm or more AUDIO CHARACTERISTICS TEST DISC TCD 782 LOAD 47Kohm ITEM NOMINAL LIMIT CONDITION Output level 2 0Vrms 2 0V 1dB 1KHz 0dB Channel balance 0 5dB 1 0dB 1KHz 0dB Frequency response 0 5dB 1 0dB 20Hz 20KHz 0dB De emphasis response 0 5dB 1dB 20Hz 16K...

Page 22: ... A Division of the American DJ Group of Companies American Audio World Headquarters 4295 Charter Street Los Angeles CA 90058 USA Tel 323 582 2650 Fax 323 582 2610 Web www AmericanAudio us E mail info AmericanAudio us ...

Reviews: