background image

8

U

SE


REFRIGERANT


CERTIFIED


TO

 AHRI 

STANDARDS

. U

SED


REFRIGERANT


MAY


CAUSE


COMPRESSOR


DAMAGE

AND


THE


WARRANTY

. M

OST


PORTABLE


MACHINES


CANNOT


CLEAN


USED


REFRIGERANT


TO


MEET

 AHRI 

STANDARDS

.

IS


NOT


COVERED


UNDER

CAUTION

Start-up Procedure Detail

Liquid and suction valves on condensing unit are closed to 

contain the charge within the unit.  The unit is shipped with 

the valve stems closed and caps installed.  Do not open 

valves until the indoor coil and line set is evacuated. 

CAUTION

Prolonged operation at suction pressures less than 20 PSIG 

for more than 5 seconds will result in overheating of the 

compressor and permanent damage to it.

1.  Connect the vacuum pump with 

500

 micron capability 

to the service valves.

2.  Evacuate the system to 

500

 microns or less using 

gas and liquid service valves. Using both valves is 

necessary.

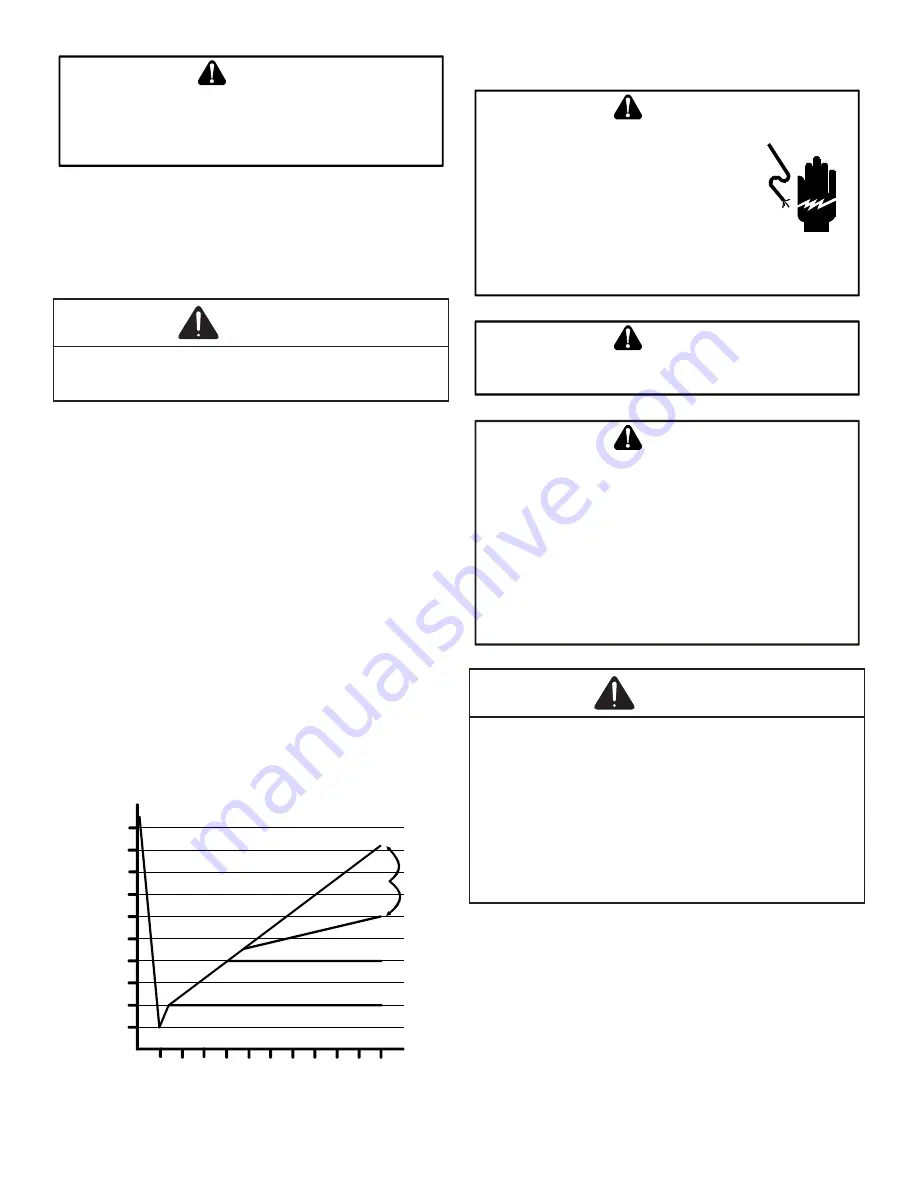
3.  Close pump valve and hold vacuum for 10 minutes.  

Typically pressure will rise during this period. 

•    If the pressure rises to 1000 microns or less and 

remains steady the system is considered leak-

free; proceed to start-up.

•    If pressure rises above 1000 microns but holds 

steady below 2000 microns, moisture and/or 

noncondensibles may be present or the system 

may have a small leak.  Return to step 2: If the 

same result is encountered check for leaks as 

previously indicated and repair as necessary then 

repeat evacuation.

•    If pressure rises above 2000 microns, a leak is 

present.  Check for leaks as previously indicated 

and repair as necessary then repeat evacuation.

5000

4500

4000

3500

3000

2500

2000

1500

1000

500

0      1      2      3      4       5      6      7      8       9 10

LEAK(S)

PRESENT

MINUTES

V

ACU

UM


IN


MI

CR

O

NS

CONDENSIBLES OR SMALL

LEAK PRESENT

NO 

LEAKS

NO 

CONDENSIBLES

ELECTRICAL CONNECTIONS

HIGH VOLTAGE!

D

ISCONNECT

 ALL 

POWER


BEFORE


SERVICING

M

ULTIPLE


POWER


SOURCES


MAY


BE


PRESENT

. F

AILURE


TO


DO


SO


MAY


CAUSE


PROPERTY


DAMAGE

PERSONAL


INJURY


OR


DEATH


DUE


TO


ELECTRIC


SHOCK

. W

IRING


MUST


CONFORM


WITH

 NEC 

OR

 CEC 

AND


ALL


LOCAL


CODES

. U

NDERSIZED


WIRES


COULD


CAUSE


POOR


EQUIPMENT


PERFORMANCE

EQUIPMENT


DAMAGE


OR


FIRE

.

WARNING

T

O


AVOID


THE


RISK


OF


FIRE


OR


EQUIPMENT


DAMAGE

USE


COPPER


CONDUCTORS

.

WARNING

GROUNDING REQUIRED!

A

LWAYS


INSPECT


AND


USE


PROPER


SERVICE


TOOLS

.  L

ACK


OF


INSPECTION


OR


IMPROPER


TOOLS


MAY


CAUSE


EQUIPMENT


DAMAGE


OR


PERSONAL


INJURY

.  A

LL


DISCONNECTED


GROUNDING


DEVICES

 MUST 

BE


RECONNECTED


BEFORE


INSTALLING


OR


SERVICING

.  M

ULTIPLE


COMPONENTS


OF


THIS


UNIT


MAY


CONDUCT


ELECTRICAL


CURRENT

;  

THESE


ARE


GROUNDED

.  I

F


SERVICING


THE


UNIT

ANY


DISCONNECTION


OF


GROUNDING


WIRES

SCREWS

STRAPS

CLIPS

NUTS


OR


WASHERS


USED


TO


COMPLETE


THE


GROUND

 MUST 

BE


RETURNED


TO


THEIR


ORIGINAL


POSITION


AND


PROPERLY


FASTENED

.

CAUTION

NOTICE

• 

Never install a phase-advancing capacitor. As this 

unit is equipped with an inverter, installing a phase-

advancing capacitor will not only deteriorate power 

factor improvement effect, but also may cause capacitor 

abnormal heating accident due to high-frequency waves. 

• 

Do not change the setting of the protection devices. If 

the pressure switch, thermal switch, or other protection 

device is shorted and operated forcibly, or parts other 

than those specified by Goodman are used, fire or 

explosion could result. 

• 

Do not connect the ground wire to gas pipes, sewage 

pipes, lightning rods, or telephone ground wires.

The condensing unit rating plate lists pertinent electrical 

data necessary for proper electrical service and 

overcurrent protection.  Wires should be sized to limit 

voltage drop to 2% (max.) from the main breaker or fuse 

panel to the condensing unit.  Consult the NEC, CEC, and 

all local codes to determine the correct wire gauge and 

length.

Summary of Contents for VXC20 Series

Page 1: ...ual to indicate immediate or potential safety hazards It is the owner s and installer s responsibility to read and comply with all safety information and instructions accompanying these symbols Failur...

Page 2: ...Refrigerant Lines 5 Leak Testing Nitrogen Or Nitrogen Traced 7 System Start Up Procedure 7 Electrical Connections 8 Coolcloud Hvac Phone Application 11 Comfortbridge System 14 Air Conditioner Advanced...

Page 3: ...system must be manufacturer approved and Air Conditioning Heating and Refrigeration Institute AHRI matched NOTE The installation of an inverter condensing unit with unmatched system units will not all...

Page 4: ...nting assembly to reduce noise vibration Electrical Noise The unit should be well grounded so that potential effects of electrical noise from the inverter to surrounding equipment can be minimized Whe...

Page 5: ...and vibration absorbing material to be placed or installed between tubing and foundation Any gap between foundation or wall and refrigerant lines should be filled with a pliable silicon based caulk R...

Page 6: ...6...

Page 7: ...h a rust preventative The recommended location of the filter drier is before the expansion device at the indoor unit NOTE Be careful not to kink or dent refrigerant lines Kinked or dented lines will c...

Page 8: ...NNECTIONS HIGH VOLTAGE DISCONNECT ALL POWER BEFORE SERVICING MULTIPLE POWER SOURCES MAY BE PRESENT FAILURE TO DO SO MAY CAUSE PROPERTY DAMAGE PERSONAL INJURY OR DEATH DUE TO ELECTRIC SHOCK WIRING MUST...

Page 9: ...electrical noise external noise and malfunction or fail Make sure the wirings will not be pinched by the front panel and close the panel firmly Route the conduit along the unit and so on to prevent wi...

Page 10: ...60 179 181 273 273 65 182 184 276 276 70 185 187 279 279 75 188 190 282 282 80 191 193 285 285 85 194 196 288 288 90 197 199 291 291 95 200 202 294 294 100 203 205 297 297 105 206 208 300 300 110 209...

Page 11: ...ists the eqivalent length gained from adding bends to the suction line Properly size the suction line to minimize capacity loss Step 3 System Start up Test NOTICE On initial power start up the outdoor...

Page 12: ...o the following procedure a If subcooling is low add charge to adjust the subcooling as specified in the following table b If subcooling is high remove chargee to lower the subcooling to 8 1 F SUBCOOL...

Page 13: ...rant for any length over 15 feet Or Charge by Sub cooling Sub cooling should be 8 F 1 F after adjusting charge please allow at least 20 minutes for the system to stabilize before making further charge...

Page 14: ...STEM Overview The ComfortBridge based inverter heating and air conditioning system uses an indoor unit and outdoor unit digitally communicating with one another via a two way communications path Comfo...

Page 15: ...ables 1 1 At Cool and Heat Hi speed trim VXC200601 with VC960804C VM970804C and MVC800804C combination trim more than 5 settings are invalid Trimmed up CFM makes miss matching error 2 At Cool Hi speed...

Page 16: ...rough the control board seven segment displays or the CoolCloud mobile app Max compressor speed can be changed to get the required capacity or efficiency Once the maximum speed is set the system opera...

Page 17: ...unning DEHUMIDIFICATION REQUEST Request for dehumidification 0 means dehumidification is not being requested All other values mean dehumidification is being requested OUTDOOR FAN SPEED RPM Current spe...

Page 18: ...nter PUMP DOWN Mode This procedure runs the equipment for approximately 15 minutes and allows accumulation of refrigerant at the outdoor unit for purposes of removing replacing the indoor unit or outd...

Page 19: ...17A HPS E1 HR1 HR3 BR WH HR2 HR4 X32A X851A POWER CONDITIONER X12A LIQUID LINE DISCHARGE LINE GR RD Z3C RD BK PU GROUND LUG V W U NOTE 1 1 OFF ON SEE NOTE 3 SEE NOTE 3 2 X52A SHARE DATA Z4C BS1 BS2 BS...

Page 20: ...K RD L1C L2C TERMINAL BLOCK FIELD WIRING H LPT GND INVERTER BOARD COMPRESSOR TERMINAL ORIENTATION X32A X108A GR Z1C Z2C Z3C X12A COIL INLET LIQUID LINE DISCHARGE LINE U V W 1 OFF ON DS2 2 NOTE 1 BS1 B...

Page 21: ...1 OFF ON DS2 2 1 THE POSITION OF THE SELECTOR SWITCHES DS1 INDICATE FACTORY SETTING 2 MOTOR OVERLOAD PROTECTION PROVIDED BY INVERTER SEE TABLE 3 USE COPPER CONDUCTORS ONLY 4 CLASS 2 WIRE NOTES BS1 BS2...

Page 22: ...CITY FROM YOUR BODY TO PREVENT FAILURE OF THE PC BOARD 3 MEASURE THE RESIDUAL VOLTAGE IN THE SPECIFIED MEASUREMENT POSITION USING A VOM WHILE PAYING ATTENTION NOT TO TOUCH THE CHARGED AREA 4 IMMEDIATE...

Page 23: ...ICITY FROM YOUR BODY TO PREVENT FAILURE OF THE PC BOARD 3 MEASURE THE RESIDUAL VOLTAGE IN THE SPECIFIED MEASUREMENT POSITION USING A VOM WHILE PAYING ATTENTION NOT TO TOUCH THE CHARGED AREA 4 IMMEDIAT...

Page 24: ...ICITY FROM YOUR BODY TO PREVENT FAILURE OF THE PC BOARD 3 MEASURE THE RESIDUAL VOLTAGE IN THE SPECIFIED MEASUREMENT POSITION USING A VOM WHILE PAYING ATTENTION NOT TO TOUCH THE CHARGED AREA 4 IMMEDIAT...

Page 25: ...AILURE OF THE PC BOARD 3 MEASURE THE RESIDUAL VOLTAGE IN THE SPECIFIED MEASUREMENT POSITION USING A VOM WHILE PAYING ATTENTION NOT TO TOUCH THE CHARGED AREA 4 IMMEDIATELY AFTER MEASURING THE RESIDUAL...

Page 26: ...26 Troubleshooting 1 This message is displayed when using the CTK04 thermostat...

Page 27: ...27 Troubleshooting 1 This message is displayed when using the CTK04 thermostat...

Page 28: ...28 Troubleshooting 1 This message is displayed when using the CTK04 thermostat 2 Network communication error Refer to NETWORK TROUBLESHOOTING...

Page 29: ...29 Troubleshooting 1 This message is displayed when using the CTK04 thermostat...

Page 30: ...he LED status and the corresponding potential problem Green receive LED Indicates network traffic The table below indicates the LED status and the corresponding potential problem Learn button Used to...

Page 31: ...corresponding Screen within the display itself which allows the user to navigate and use the features Example The Fault Code is accessed and displayed from Screen 0 of the 7 segment display The Fault...

Page 32: ...shows the most recent fault To access hold the RECALL button for 5 seconds at screen 0 To access hold the RECALL button for 5 seconds at screen 1 To access hold the RECALL button To access hold the RE...

Page 33: ...w the user to see the six most recent system faults For a list of the fault codes please see the TROUBLESHOOTING tables in this document 1 SCREEN 0 SCREEN 1 The display will change to SCREEN 1 Display...

Page 34: ...etting Press RECALL Press RECALL Item number Display flickers at 1 second intervals Value MONITORING MODE NAVIGATION SCR This screen allows the user to monitor system variables as shown in the tables...

Page 35: ...tem settings as shown in the tables at the end of this section SCREEN 0 Press RECALL Press RECALL to increase the value Press TEST to change setting Press RECALL Press TEST to complete setting and ret...

Page 36: ...the number Press RECALL Press TEST to change setting Press RECALL Press TEST to complete setting and return to setting mode Press RECALL Press RECALL Press RECALL SCREEN 0 OFF ON Blink interval 0 4 s...

Page 37: ...0 Stop 1 Cooling Start up 2 Heating Start up 3 Oil Return Operation 4 Heating Operation 5 Defrost Operation 6 Cooling Operation 3 Compressor Reduction Mode 0 OFF 1 ON 4 demand unit Cut off the decima...

Page 38: ...System Test 0 ON 1 OFF 8 Pump Down 0 ON 1 OFF 9 Charge Mode 0 ON 1 OFF 10 Maximum Compressor RPS for Cooling 12 BOOST MODE Selection 0 ON 1 OFF 13 BOOST MODE Temperature 0 105F 1 100F 2 95F 3 90F 4 8...

Page 39: ...39...

Page 40: ...40...

Page 41: ...41...

Page 42: ...rity sensitive Only the data lines 1 and 2 are required between the indoor and outdoor units Data line terminal 1 from outdoor unit must connect to terminal 1 on indoor unit and data line terminal 2 f...

Page 43: ...section Before starting the SYSTEM TEST turn off the electric heater or gas furnace NOTICE Before starting the SYSTEM TEST turn off the electric heater or gas furnace 1 Ensure the thermostat is insta...

Page 44: ...password is the Date Code located on the thermostat and is available by entering the EQUIPMENT STATUS menu and scrolling to the bottom 6 Select YES to continue 7 From the ComfortNet USER MENU select A...

Page 45: ...to run for its duration 5 15 minutes EQUIP TEST SCREEN will show the system test is ON once selected System test will operate the outdoor unit and the indoor unit through a series of startup tests Pl...

Page 46: ...th codes to clear Set Thermostat to CHARGE MODE Please follow the following sequence to enter CHARGE MODE CHARGE mode allows for charging of the system System operates for a duration of approximately...

Page 47: ...password The password is the Date Code located on the thermostat and is available by entering the EQUIPMENT STATUS menu and scrolling to the bottom 4 Select YES to continue 5 Select Air Conditioner 6...

Page 48: ...ing is not complete after 1 hour repeat 7 and 8 Refer to Adjust Refrigerant Level and Measure Subcooling to Verify Proper Charge for refrigerant charge level adjustment 9 To terminate CHARGE MODE sele...

Page 49: ...ssor speed in CHARGE MODE Compressor speed is displayed under STATUS menu in the thermostat 8 For TXV Indoor Unit The system subcooling should be 8 F 1 F If not in that range adjust subcooling and sup...

Page 50: ...tisfy unusual high loads BOOST MODE is BOOST MODE is initiated by an outdoor tempera ture sensor located in the outdoor unit Please note that out door equipment operational sound levels may increase w...

Page 51: ...ancel button and selecting the Dealer information button Once recorded click the green OK button and return to the previous step 4 Select YES to continue 5 Select AIR CONDITIONER 6 Select SYS SETUP Me...

Page 52: ...ON option is also available to perma nently engage BOOST MODE Factory default is 105 F Help Previous Menu VERTICAL RISE SET MAX CURRENT OFF BOOST MD ON BOOST TEMP Always On Outdoor Lower Help Previou...

Page 53: ...enable and disable dehumidification 1 On the CTK04 HOME screen select MENU 2 From the MENU screen scroll down and select Installer Options 3 Enter installer password if known a The password is the the...

Page 54: ...eak in the system low refrigerant charge or an incompletely open stop valve can cause the unit to flash error code E15 This error code sug gests that the unit is experiencing operation at low pressure...

Page 55: ...flow and operates there for approximately 7 1 2 minutes The motor then steps up to the full demand airflow Profile C also has a one 1 minute 100 OFF delay 100 CFM OFF OFF Profile D default ramps up to...

Page 56: ...cessary adjustments to the maximum compressor RPS are made through the following sub menus Maximum Compressor RPS Range for Cooling Select the range that your maximum compressor RPS falls within Maxim...

Page 57: ...57...

Page 58: ...58...

Page 59: ...59 THIS PAGE IS INTENTIONALLY LEFT BLANK...

Page 60: ...d Quebec residents to register their product does not diminish their warranty rights For Product Registration please register as follows Goodman Brand products https www goodmanmfg com product registr...

Reviews: