background image

Operation

Screen Information

Once the connection to the KN9000 has been accomplished, a window opens
on the Client’s monitor that exactly replicates the remote system’s video output
display captured by the KN9000. Local keystroke and mouse input is captured
and sent to the remote system.

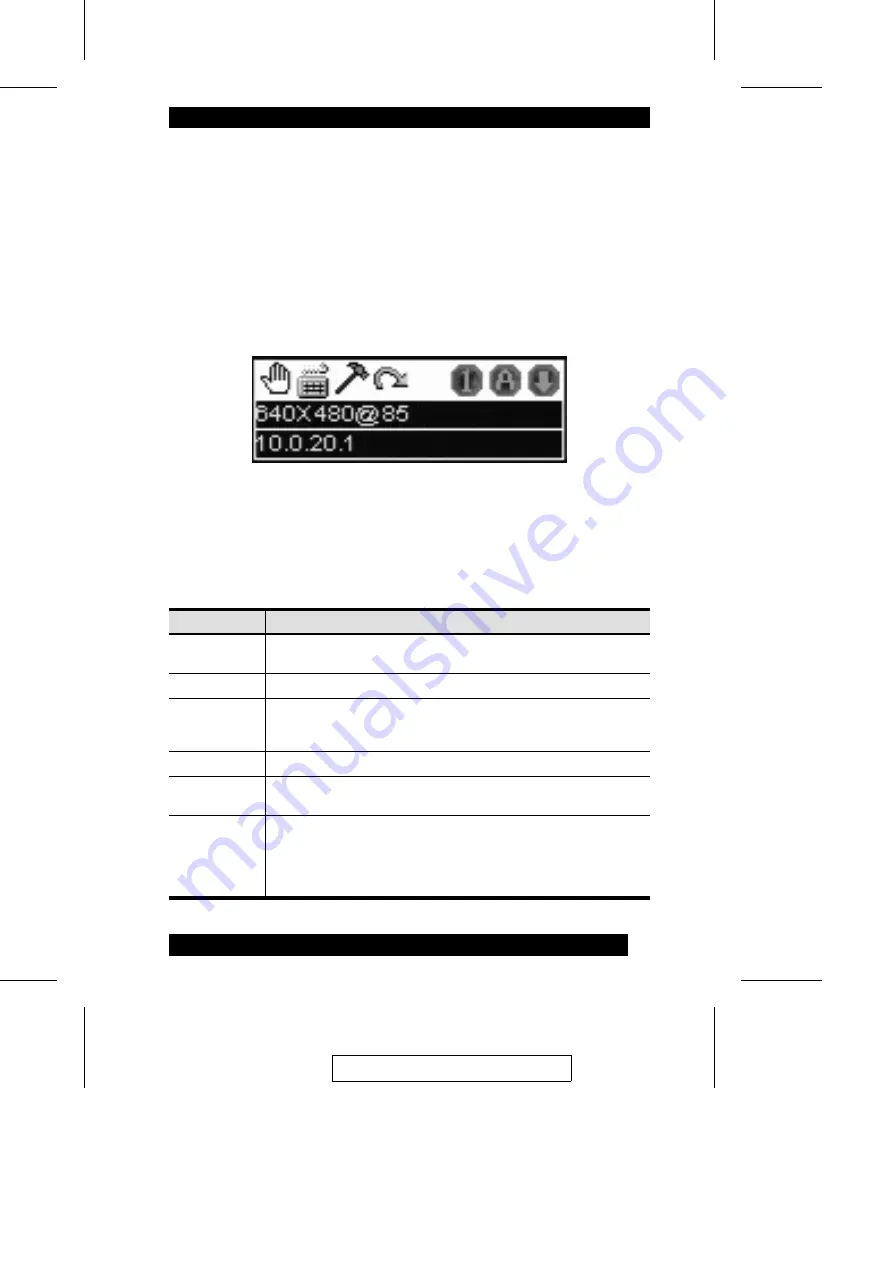
A small OSD control panel opens at the lower right hand corner of the screen:

The panel consists of an icon bar at the top, with two text bars below it.
Initially, the text bars display the video resolution and IP address of the device
at the remote location. As the mouse pointer moves over the icons, the
information in the text bars changes to describe the icon’s function.

Icon

Function

Hand

Drag the OSD display to another position on the screen by clicking
and holding on the hand while you move the mouse.

Keyboard

Click to bring up the Hotkey Setup dialog box (see p. 30 for details).

Hammer

Click to bring up the Video Adjustment dialog box (see p. 38 for
details). Right click to perform a fast Auto Sync without first having to
bring up the Video Adjustment dialog box.

Arrow

Click to exit the Windows Client control of the remote unit.

Space

Hover over the space to see the video resolution and IP address of
the device at the remote location.

Lock LEDs

These LEDs show the Num Lock, Caps Lock, and Scroll Lock status
of the remote computer. Click on the icon to toggle the status.

Note: When you first connect, the LED display may not be accurate.
To be sure, click on the LEDs to set them.

2004-05-04

35

Summary of Contents for KN9000

Page 1: ...User Manual KN9000 2004 05 04...

Page 2: ...harmful interference when the equipment is operated in a commercial environment This equipment generates uses and can radiate radio frequency energy and if not installed and used in accordance with t...

Page 3: ...Cord M 1 User Manual M 1 Quick Start Guide M 1 Warranty Registration Card Check to make sure that all the components are present and in good order If anything is missing or was damaged in shipping con...

Page 4: ...2004 05 04 iv...

Page 5: ...nistrator Utility Installation 9 Starting Up 9 Logging In 11 The Settings Notebook 13 Overview 13 Uploading Changes 14 General 15 Network 16 Security 18 User Management 21 Customization 23 Upgrading t...

Page 6: ...n 41 Starting Up 41 Operation 44 The Toolbar 45 6 The Log Server Installation 47 Starting Up 48 The Menu Bar 49 Configure 49 Events 50 Options 52 The KN9000 List Panel 53 Overview 53 The Event List Wi...

Page 7: ...Appendix B Specifications Appendix C Stacking and Mounting Stacking 61 Rack Mounting 62 Appendix D Technical Support ALTUSEN Technical Support 63 ALTUSEN Website 64 Limited Warranty 64 2004 05 04 vii...

Page 8: ...000 as an administrator and how to configure the KN9000 for User operation Chapter 4 The Windows Client explains how to run the Windows Client Software how to connect to the KN9000 and how to remotely...

Page 9: ...t Run means to open the Start menu and then select Run Indicates critical information Getting Help For additional help advice and information ALTUSEN provides several support options If you need to co...

Page 10: ...hem Online Documentation User Manuals are available electronically at the ALTUSEN support website http www altusen com support Software Updates Download the latest drivers and firmware for your produc...

Page 11: ...om any computer on the Net whether that computer is located down the hall down the street or half way around the world Operators at remote locations connect to the KN9000 via its IP address Once a con...

Page 12: ...Server records all the events that take place on selected KN9000 units for the administrator to analyze On the client side both a Windows GUI Client and a Java Client are provided for IP connection an...

Page 13: ...nection with default F W M Supports unlimited user accounts System Requirements M For best results we recommend that the computers used to access the the KN9000 control unit have at least a P III 1 GH...

Page 14: ...Notes 2004 05 04 4...

Page 15: ...thin object such as the end of a paper clip or a ballpoint pen 2 10 100 Mbps Data LED M Lights GREEN to indicate 100 Mbps data transmission speed M The LED is OFF when data speed is 10 Mbps 3 Link LE...

Page 16: ...2 OFF except for the times you make Administration Utility changes 4 RJ 45 Jack The cable that connects the KN9000 to the Internet server plugs in here 5 Local Console Port Section The local administr...

Page 17: ...e ports of the server or KVM switch that you are installing 3 Plug the LAN or WAN cable into the KN9000 s RJ 45 socket 4 Plug the power cord into the Power Socket and into an AC power source 5 Power u...

Page 18: ...Notes 2004 05 04 8...

Page 19: ...ogram icon placed on the desktop Starting Up Run the program either by double clicking DClick its icon or by keying in the full path to kn9kadmintool exe on the command line Note As a security feature...

Page 20: ...evices installed on the local LAN segment When it has finished searching it displays a device selection window similar to the one below KN9000 devices on the local LAN segment found by the Administrat...

Page 21: ...KN9000 devices if it finds them in different network segments one at 10 0 0 xxx and another at 216 0 0 xxx for example it will attempt to substitute a dynamic IP address 10 0 0 111 for example Logging...

Page 22: ...measure to confuse and discourage hackers from trying to discover a valid Username and Password If you see this message try logging in again being careful with the Username and Password If you success...

Page 23: ...logging in the Settings notebook appears There are five tabs each representing a different administrative activity A description of each of the five activities and how to configure their settings is p...

Page 24: ...updating procedure When updating has finished the following message displays 2 Click OK and you return to the Administration Utility device selection window see p 10 Note If you decide you want to ab...

Page 25: ...es the mainboard s current firmware version level Java Program Version Indicates the current version level of the KN9000 s Java Client access software I O Module Indicates whether the KN9000 is config...

Page 26: ...IP address Unless the correct Port number is given the KN9000 device will not be found An explanation of the fields is given in the table below Program This is the port number that must be specified w...

Page 27: ...fixed IP address select the Set IP address manually radio button and fill in the information required Log Server Important transactions that occur on the KN9000 such as logins internal status messages...

Page 28: ...at they use or else they will not be granted access For security purposes we recommend that you change the name of this page from time to time Only users who know the name of this page can access the...

Page 29: ...address filters the bottom is for MAC address filters M Specify the filter address in the dialog box then Click OK M Each filter can consist of a single IP or MAC address or a range of IP addresses F...

Page 30: ...ange are allowed access to the KN9000 all other addresses are denied access M If the exclude button is checked all the addresses within the filter range are denied access to the KN9000 all other addre...

Page 31: ...profiles can be established M To add a user profile Click Add and fill in the information asked for in the User Management dialog box that appears See p 22 M To delete a user profile select it and Cli...

Page 32: ...e two entries must match Description Additional information about the user that you may wish to include Permissions 1 Checking Configure defines an Administrator who is allowed to configure the system...

Page 33: ...ble for other users Login failure Login failures allowed sets the number of consecutive failed login attempts that are permitted from a remote computer Login failure timeout sets the amount of time a...

Page 34: ...nistration configuration notebook see p 23 and Click the Browse button for the component you want to upgrade A File Open dialog box appears 2 Navigate to the directory that the downloaded firmware upg...

Page 35: ...with the path to file and the Upload version number displayed Note If you select the wrong file type for the component you are upgrading an Invalid file type message appears when you click Open Go ba...

Page 36: ...ord feature is provided on the distribution disk for this purpose Updated Java Authentication Page versions will be made available for download from our website as they become available See Upgrading...

Page 37: ...ouble click the icon The Windows Client installation screen appears 3 Click Next and follow the on screen instructions to complete the installation and have the program icon placed on the desktop Star...

Page 38: ...know what it is contact the KN9000 administrator Key in the serial number 5 characters per box then Click OK Note You must have DirectX 7 0 or higher installed on your computer If not the Client progr...

Page 39: ...r contact the Administrator When the IP address and Port number for the KN9000 unit you wish to connect to has been specified Click Connect to start the connection When you have finished with your ses...

Page 40: ...follow Keyboard Various configuration actions related to the keyboard video and mouse can be performed via hotkey combinations The Hotkey Setup utility is accessed by opening the Tools menu and select...

Page 41: ...n the Function keys one at a time The key names appear in the Key field as you press them 3 When you have finished keying in your sequence Click Stop 4 Click Set 5 Repeat for any other actions you wis...

Page 42: ...r If Keep screen size is enabled there is a checkmark in the box the remote screen is not resized M If the remote resolution is smaller its display appears like a window centered on your screen M If t...

Page 43: ...you key in a valid Username and Password Click OK The program attempts to contact your selected KN9000 unit 3 Check the Message List window for status messages regarding the operation s progress 4 On...

Page 44: ...e ignored This function is a toggle use the hotkeys again to bring the mouse display back to its original configuration Adjust mouse This utility synchronizes the local and remote mouse movements foll...

Page 45: ...e icon s function Icon Function Hand Drag the OSD display to another position on the screen by clicking and holding on the hand while you move the mouse Keyboard Click to bring up the Hotkey Setup dia...

Page 46: ...for another action Mouse Synchronization Until you close the KN9000 connection mouse movements have no effect on your local system but are captured and sent to the remote system instead From time to...

Page 47: ...set the mouse acceleration to None Control Panel Mouse Mouse Properties Motion Windows XP Server 2003 Set the mouse speed to the middle position disable Enhance Pointer Precision Control Panel Printer...

Page 48: ...e mouse speed to the slowest position Video Adjustment You can adjust the placement and the picture quality of the remote screen as displayed on your local monitor with the Video Options function To d...

Page 49: ...function works best with a bright screen 3 If you are not satisfied with the results use the Screen Position arrows to position the remote display manually RGB Drag the slider bars to adjust the RGB...

Page 50: ...e current work file consists of the values that were in effect the last time the program was closed Users can use the Client program s File menu see p 28 to Create Save and Open Work files New Allows...

Page 51: ...pen the drive and folder where the Java Client jar file KN9Kmain jar is located and copy the file to your hard disk 3 To bring up the Java Client Main Screen run the Java Client jar file KN9Kmain jar...

Page 52: ...KN9000 s Java Client web page For example 168 10 95 001 kn9k html Note For security purposes the name of the page that you connect to must be specified correctly as part of the IP address The system a...

Page 53: ...appears 6 Provide a valid Username and Password and Click OK After a second or two an Authentication progress window appears Once the authentication procedure completes successfully the remote system...

Page 54: ...u can switch between your local and remote programs with Alt Tab 2 Due to net lag there might be a slight delay before your keystrokes show up You may also have to wait a bit for the remote mouse to c...

Page 55: ...ox This is similar to the Adjust Video feature of the Windows Client See p 38 for details about its use Note We recommend that you perform an Autosync right after you connect for improved mouse synchr...

Page 56: ...rea of the screen 2 Move your local mouse pointer directly over the remote mouse pointer and Click Lock LEDs These LEDs show the Num Lock Caps Lock and Scroll Lock status of the remote computer Click...

Page 57: ...llation 1 Insert the Altusen software CD into your CD ROM drive 2 Open the drive and folder where the Log Server Setup icon KN9KlogServer exe is located and double click the icon The Log Server instal...

Page 58: ...is divided into three components M A Menu Bar at the top M A panel containing a list of KN9000 units in the middle see p 53 for details M A panel containing an Events List at the bottom Note The MAC...

Page 59: ...contains three items Add Edit and Delete They are used to add new KN9000 units to the KN9000 List edit the information for units already on the list or delete KN9000s from the list To edit or delete a...

Page 60: ...hat you can put in a descriptive reference for the unit to help identify it Limit This specifies the number of days that an event should be kept in the Log Server s database before it expires and shou...

Page 61: ...f no units are selected the search is performed on all of them Priority Sets the level for how detailed the search results display should be 1 is the most general 3 is the most specific Start Date Sel...

Page 62: ...at was set with the Limit setting of the Edit function see p 50 Options Network Retry allows you to set the number of seconds that the Log Server should wait before attempting to connect if its previo...

Page 63: ...a KN9000 is not the currently selected one if its Recording checkbox is checked the Log Server will still record its ticks Address This is the IP Address or DNS name that was given to the KN9000 when...

Page 64: ...ick information for the currently selected KN9000 Note that even though any other KN9000s aren t currently selected if their Recording checkbox is checked the Log Server records their tick information...

Page 65: ...IP Switch segment 2 is set to the ON position see the Note regarding the DIP Switch on p 28 for details Forgot Corrupt Password Turn off the power short jumper labeled Password Default on the KN9000 s...

Page 66: ...eteriorates Exit the program and start again The Log Server Problem Resolution The Log Server program does not run The Log Server requires the Microsoft Jet OLEDB 4 0 driver in order to access the dat...

Page 67: ...all Under XWindow 1 Open a console and issue the following command m64config res 1024x768x60 2 Log out 3 Log in Video display problems with 13W3 interface systems e g Sun Ultra servers The display res...

Page 68: ...Notes 2004 05 04 58...

Page 69: ...pin mini DIN F Mouse 1 x HDB 15 M Video LAN 1 x RJ 45 Receptacle Power 1 x 3 Pronged Receptacle LEDs Power 1 Blue Link 1 Green 10 100 Mbps 1 Green Video Up to 1280 x 1024 70 Hz Protocols 10BaseT Ether...

Page 70: ...Notes 2004 05 04 60...

Page 71: ...that come already attached to the unit Note that there is a top and bottom half to each bracket The top half has a convex surface the bottom half has a concave surface Line up the four bottom brackets...

Page 72: ...rst remove the stacking brackets by unscrewing them from the unit as shown in the diagram below 2 Next screw the mounting brackets into the sides of the unit as shown in the diagram below 3 Slide the...

Page 73: ...he ALTUSEN Technical Phone Support Center can be reached at 888 999 ALTUSEN 888 999 2836 Outside of North America call the nearest ALTUSEN Technical Support Phone Center Note To ensure quality of serv...

Page 74: ...AMAGES RESULTING FROM THE USE OF THE PRODUCT DISK OR ITS DOCUMEN TATION The direct vendor makes no warranty or representation expressed implied or statutory with respect to the contents or use of this...

Page 75: ...9 default setting 6 F Fast auto sync 39 Features 3 Filtering 18 19 Firmware Upgrading 23 24 Front panel components 5 H Hardware Setup 5 Hotkeys Configuring 31 Windows Client 30 I Installation 7 Inval...

Page 76: ...s 14 Specifications 59 Stacking 61 Substitute keys 36 System Requirements 3 T Technical Support 63 Time out control 23 Troubleshooting Administration Utility 55 Java Client 56 Log Server 56 Windows Cl...

Reviews: