background image

5

Delay Interface

Click the delay value of the corresponding channel, 

drag the fader left and right in the pop-up window to adjust 

the delay, or click the "+" and "-" buttons to adjust it.

1.  Delay group: front sound field, back sound field, 

full sound field or no sound field;

2.  Delay unit: millisecond, centimeter, inch;

3.  Adjustment range: 0.000~8.000 ms, 0~277 cm, 

0~109 inches.

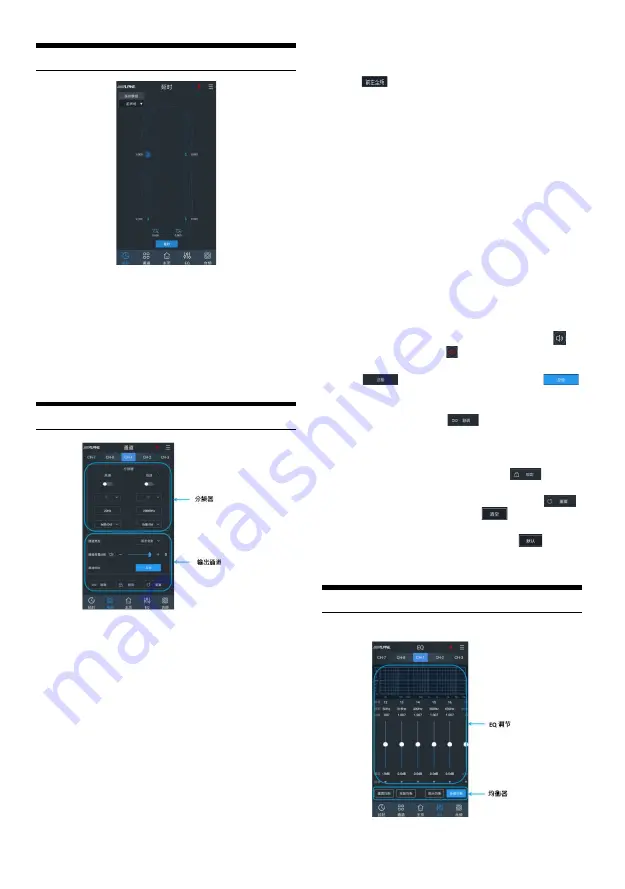
Channel Interface

Settings of Frequency Dividers

1.  Type: Linkwitz-Riley, Butterworth or Bessel.

2.  Frequency: Slide left and right or click the 

"+" or "-" buttons to set the frequency with an 

adjustment range of: 20Hz~20000Hz.

3.  Slope (gradient) : 6dB/Oct, 12dB/Oct, 18dB/Oct, 

24dB/Oct, 30dB/Oct, 36dB/Oct, 42dB/Oct or 

48dB/Oct.

*  When the slope is 6dB/Oct, the type indicates 

as "Empty".

Output Channel Settings

1.  Type: Click the Output Channel Type button 


[

] and select the channel type from the 

pull-down menu. High frequency, intermediate 

frequency, intermediate and low frequency, low 

frequency and full frequency are available for front 

speaker; High frequency, intermediate frequency, 

intermediate and low frequency, low frequency 

and full frequency are available for rear speaker; 

Front and center-channel high frequency, front 

and center-channel intermediate frequency, rear 

and center-channel high frequency and rear 

and center-channel intermediate frequency are 

available for center-channel speaker; Left ultra-

low frequency, right ultra-low frequency and ultra-

low frequency are available for ultra-low speaker; 

Left surround and right surround are available for 

surround speaker.

2.  Volume: Set the channel volume by dragging the 

fader, with an adjustment range of -60dB~6dB, 

and 0dB by default.

3.  Mute: Click the Volume Speaker button [ ] to 

mute the channel [ ].

4.  Phase position: Click the Positive Phase button  

[

] or the Opposed Phase button [

to switch between positive and opposed phases.

5. Combined adjusting: Click the Combined 

Adjusting button [

], and the modes of 

"Replicate EQ from left to right" or "Replicate EQ 

from right to left" are available for the combined 

adjusting.

6.  Lock: Click the Lock button [

] to lock 

the current channel type.

7.  Reset: Click the Reset button [

], 

click the Empty button [

] in the pop-up 

window, to set the current channel as null, 

and click the Default button [

] to set 

the current channel type as ex-factory 

state.

EQ Interface

Summary of Contents for PXE-R600

Page 1: ...se search the PXE R600 tuning APP in APPStore and download for installation Android mobile phone users can scan the QR code on the right to download for installation directly Built in 8 Channel Power Amplifier Audio Processor PXE R600 Tuning APP ...

Page 2: ...ency Combination Interface 6 Instructions for the Computer Software Notes for Software Installation 7 Main Interface 7 Function Menu 8 Sound Source Selection 9 Master Volume Settings 9 Sound Effect Setting 9 Settings of Output Channel Mute and Combined Adjusting 9 Settings of Channel Delay Phase Position and Volume 10 Settings of Frequency Dividers 10 Settings of Channel EQ 10 Introductions for Fr...

Page 3: ... objects can cause serious injury If it is swallowed by mistake consult a doctor at once This product shall be applied to a 12V type car Fire electric shock or other injuries may result from usage of another type of car Caution This sign indicates important indications Injuries to people or damage to equipment may be incurred if you don t pay attention to it Product cleaning Please clean this prod...

Page 4: ...2 Machine Introductions Machine Interface Diagram Bluetooth module wire controller sold separately On board CD DVD player On board CD DVD player External power amplifier ...

Page 5: ...wer interface Connect to the high level output of vehicle mounted CD or DVD host Input selector switch When the switch is set to the ACC terminal the device will be started by ACC When set to the HOST terminal the device will be started by the high level input signal H1 H1 Power display light High level output interface Connect thepower amplifier output of the device to the speaker RCA audio outpu...

Page 6: ...one key and restore the data to ex factory state 2 Select Shutdown Delay to set shutdown delay 0 255 seconds 3 Select Share Sound Effect and you can share a single set only or all sound effect 4 Select Save Sound Effect to enter the file name and remarks and you can save a single set only or all sound effect 5 Select Local Sound Effect to call the sound effect files saved on the mobile phone 6 Sel...

Page 7: ...e and low frequency low frequency and full frequency are available for rear speaker Front and center channel high frequency front and center channel intermediate frequency rear and center channel high frequency and rear and center channel intermediate frequency are available for center channel speaker Left ultra low frequency right ultra low frequency and ultra low frequency are available for ultr...

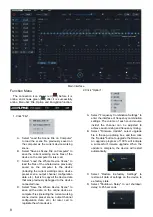
Page 8: ... all equalizers of the current channel inactive Click the Restore Equalization button to make all equalizers of the current channel return to the previous startup state Click the Reset Equalization button and the parameters of all equalizers of the current channel return to their initial state input Q value is 2 515 output Q value is 2 201 and gain is 0 0dB Click the PEQ button to switch GEQ to PE...

Page 9: ...Microsoft Windows operating system Operating system WindowsXP WindowsVista Windows7 Windows8 Windows10 CPU 1 6GHz or higher Memory card 1GB or higher Hard disk 512MB or more available space Computer screen resolution 1280 768 or higher Please install the PXE R600 computer software properly first before connecting the PXE R600 device to your computer Main Interface Open the PXE R600 computer softwa...

Page 10: ...vice connected now D Select Save the Whole Device Scene to save all the data on the online device as computer files including the current working scene device preset scene output channel configuration data etc for later call to replicate the whole device A Select Frequency Combination Settings to enter the interface of frequency combination settings The volume of each sound source insidef the chan...

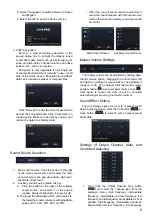
Page 11: ...h low level or off B The larger the attenuation of the main source is the lower the master volume is with adjustable values of 0 30 50 80 or 100 When the current sound source is selected it cannot be superimposed with this sound surce mode otherwise the auxiliary sound source will be invalid Master Volume Settings The master volume can be adjusted by holding down the left mouse button dragging the...

Page 12: ...ess the up and down keys on the keyboard directly drag the fader click or to adjust the delay A Delay group front sound field back sound field full sound field or no sound field B Delay unit millisecond centimeter inch C Adjustment range 0 000 8 000 ms 0 277 cm 0 109 inches 2 Volume The volume of the channel can be set by directly entering the value scrolling the mouse wheel and pressing the up an...

Page 13: ...ombination Settings and Functions of the current channel inactive Click the Restore Equalization button to restore parameters of all equalizers of the current channel to the previous startup state Click the Reset Equalization button to reset to the initial state the frequency is evenly distributed input Q value is 2 515 output Q value is 2 201 and gain is 0 0dB Click the PEQ button to switch GEQ t...

Page 14: ...quency Low frequency High frequency Intermedi ate and low frequency High frequency Intermedi ate and low frequency Example 2 High level active two divided frequency mixing input stereo full frequency output of the original car host Example 3 High level active three divided frequency mixing input stereo full frequency output of the original car host CH1 left full frequency output CH2 right full fre...

Page 15: ... VOLUME interface MIX SOURCE On the MAIN SOURCE interface short press the knob to enter the MIXSOURCE interface as shown in Figure 4 1 Turn the knob to select the auxilliary sound source high level Hi L Bluetooth BT low level AUX turn off After no operation for about 5 seconds it will automatically exit this interface and return to the main interface of the wire controller VOLUME interface SUBW On...

Page 16: ...re 40 85 Gross weight 1 53kg Size of host 92 5mmx48 1mmx24mm210mm 190mm 45mm Size of wire controller 92 5mmx48 1mmx24mm Input signal 6 channel high level 2 channel RCA audio HD Bluetooth Output signal 8 channel high level 8 channel RCA audio Output channel signal gain Range mute 60dB 6dB Output signal equalizer Type PEQ and GEQ Frequency 20Hz 20kHz resolution 1Hz Q value slope or gradient 0 404 28...

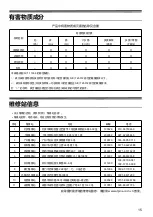
Page 17: ...6 栋 609 室 100024 010 65750660 2 上海维修站 上海市普陀区同普路 158 弄 12 号 1 楼 200062 021 62605645 3 广州维修站 广州市白云区京溪路善和街 3 号 510510 186 6505 9713 4 郑州维修站 郑州市人民路工三街 24 号楼 1 号 450000 0371 66222388 5 昆明维修站 昆明市龙泉路泰阳欣城铺面 407 408 号 650031 0871 65116201 6 南京维修站 南京市栖霞区经五路兴都晴轩中 1 幢 108 室 210003 025 86630368 7 杭州维修站 杭州市富阳区文教路 80 6 号 311400 138 5819 6041 189 5751 6008 8 厦门维修站 厦门市后埭溪路 248 号六 七 八号店面 361004 0592 5170118 9 乌鲁木齐维...

Reviews: