background image

18

-EN

01GB05IVE-W535ABT.fm

ALPINE IVE-W535ABT/IVE-W535EBT 68-21057Z56-A (EN)

User Registration

You can register up to two users. Configure the User 1 and User 2 
settings for each user.

1

Press the 

 (My Favorites) button.

The My Favorites screen is displayed.

2

Touch 

[Start]

.

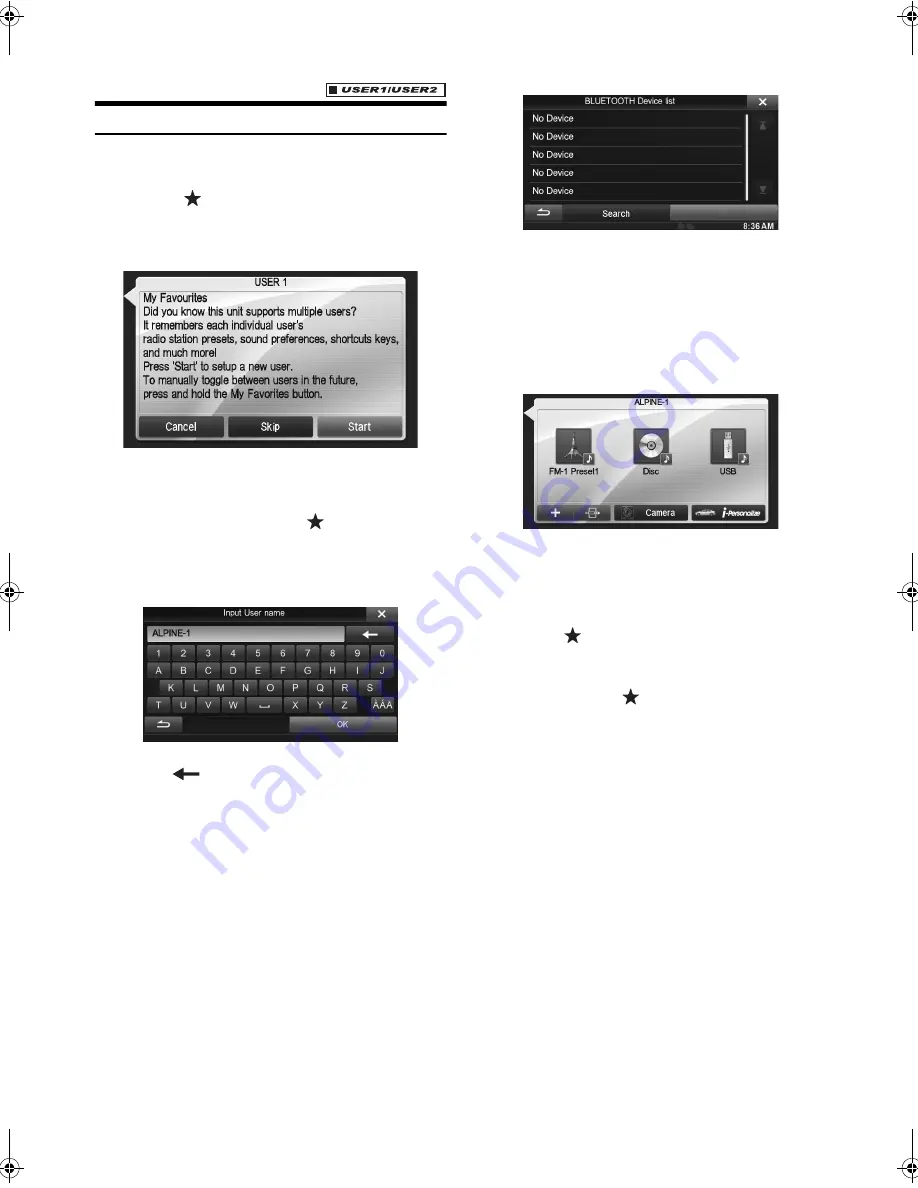
The user name input screen for the first user is displayed.

Touching [Skip] registers the user name as “USER 1” or 
“USER 2” and no BLUETOOTH device is registered. In this 
case, the users will not be switched automatically.

Touching [Cancel] or pressing the 

 (My Favorites) button 

returns to the original screen without registering a user.

3

Input the user name from the keypad and touch 

[OK]

.

The BLUETOOTH Device Setup screen is displayed.

Touch [

] to edit the name.

For details of how to input characters from the keypad, refer to 
“How to Input Characters and Numbers (Keypad)” (page 22).

4

Touch 

[Link]

, then touch 

[OK]

.

The BLUETOOTH Device List is displayed.

The BLUETOOTH devices registered here are used to 
automatically identify the user.
Also, a cellular phone can be used as a hands-free phone.
For details, see “BLUETOOTH Setting” (page 50).

Touching [Do not Link] exits user registration without 
registering a BLUETOOTH device.

5

Touch 

[Search]

.

The system starts searching for BLUETOOTH devices.
When the search is completed, the BLUETOOTH Device 
List is displayed.

Set the BLUETOOTH setting on the preregistered 
BLUETOOTH device side to [ON].

6

Touch a registered BLUETOOTH device and touch 

[OK]

.

My Favorites screen for USER1 is displayed.

You can edit My Favorites icons.
For details of how to add, edit, delete or set My Favorites icons, 
refer to “Adding My Favorites” (page 19).

Register User 2

7

Press the 

 (My Favorites) button.

The My Favorites screen is exited and the display returns to 
the original screen.

8

Press and hold the 

 (My Favorites) button for at 

least 3 seconds.

The My Favorites user guide is displayed. Repeat steps 2 
through 6 to register USER2.

01GB00IVE-W535ABT.book  Page 18  Wednesday, July 25, 2012  5:22 PM

Summary of Contents for IVE-W535ABT

Page 1: ...3 Xixian Road Meicun WND Wuxi Jiangsu Province China 214112 Designed by ALPINE Japan Printed in China 68 21057Z56 A Y_B5 EN MOBILE MEDIA STATION IVE W535ABT IVE W535EBT R R OWNER S MANUAL Please read before using this equipment ...

Page 2: ...oria 3803 Australia Phone 03 8787 1200 ALPINE ELECTRONICS GmbH Wilhelm Wagenfeld Str 1 3 80807 München Germany Phone 089 32 42 640 ALPINE ELECTRONICS OF U K LTD Alpine House Fletchamstead Highway Coventry CV4 9TW U K Phone 0870 33 33 763 ALPINE ELECTRONICS FRANCE S A R L RCS PONTOISE B 338 101 280 98 Rue de la Belle Etoile Z I Paris Nord Il B P 50016 95945 Roissy Charles de Gaulle Cedex France Pho...

Page 3: ... Off Function 23 About MX Media Xpander button 23 Touch Operation 23 Selecting an Item in a List 23 About the Indicator Display 24 Radio Listening to the Radio 25 Presetting Stations Manually 25 Presetting Stations Automatically 25 Tuning to Preset Stations 25 CD MP3 WMA AAC Playback 26 Repeat Play 26 M I X Random Play 26 Selecting Folders Concerning MP3 WMA AAC 26 Searching from CD Text 27 File F...

Page 4: ...ying the Product Information 38 Checking the DivX Registration 38 Initialising the System 38 Installation Setup 38 Sound Setup Sound Setup Operation 39 Setting the Balance Fader Subwoofer 39 Adjusting the Balance Fader 39 Rear Speaker Setting 39 Turning Subwoofer ON OFF 39 Adjusting the Subwoofer Level 39 Setting the Subwoofer Phase 40 Setting the MX Media Xpander 40 Equalizer Presets Bass Max EQ ...

Page 5: ... Conversation 58 Adjusting the Speech Volume 58 Changing the Voice Output 58 DTMF Touch Tone Function 58 Phone Book Function 58 Synchronising the Phone Book 58 Adding the Phone Book 59 Deleting the Phone Book Entries 59 Assigning as a Short Cut Dialling Number 59 BLUETOOTH Audio Playback 60 Repeat Play 60 M I X Random Play 61 Selecting Groups 61 Search Function 61 Auxiliary Device Optional Operati...

Page 6: ...yback 74 Searching for a Music File 74 Searching for a Desired Video File 74 Alphabet Skip Function 75 Direct Up Down Function 75 Search Position Memory 75 Repeat Play 75 Random Play Shuffle 75 Random Play Shuffle All 75 Information Product Software Update 76 About DVDs 76 List of Language Codes 77 List of Country Codes 78 In Case of Difficulty 80 If this Message Appears 81 Specifications 83 END U...

Page 7: ...ct the driver from looking ahead of the vehicle and cause an accident DO NOT DISASSEMBLE OR ALTER Doing so may result in an accident fire or electric shock USE ONLY IN CARS WITH A 12 VOLT NEGATIVE GROUND Check with your dealer if you are not sure Failure to do so may result in fire etc KEEP SMALL OBJECTS SUCH AS SCREWS OUT OF THE REACH OF CHILDREN Swallowing them may result in serious injury If sw...

Page 8: ...n Playing a disc while driving on a very bumpy road may result in skips but this will not scratch the disc or damage the player Irregular Shaped Discs Be sure to use round shaped discs only for this unit and never use any special shaped discs Use of special shaped discs may cause damage to the mechanism New Discs To prevent the disc from jamming Disc error is displayed if discs with irregular surf...

Page 9: ...he IVE W535ABT IVE W535EBT draws minimal current even when its power switch is turned off If the switched power ignition lead of the IVE W535ABT IVE W535EBT is connected directly to the positive post of the vehicle s battery the battery may be discharged An SPST Single Pole Single Throw switch sold separately can be added to simplify this procedure Then you can simply place it in the OFF position ...

Page 10: ...lays DVD Video DivX Audio CD and has a built in MP3 WMA AAC decoder The following information is designed to help you create your own music CDs either Audio CD or MP3 WMA AAC encoded CD R RW files What is the difference between an Audio and MP3 WMA AAC CD An Audio CD is the same format as the commercial CDs you buy in the store also known as CD DA MP3 MPEG Audio Layer 3 WMA Windows Media Audio AAC...

Page 11: ...at that can be played back on the unit is MP3 WMA AAC The video file format that can be played back on the unit is DivX Artist song name etc can be displayed Certain special characters may not be correctly displayed On Handling USB Memory This unit can control a memory storage device that supports the USB Mass Storage Class MSC protocol Playable audio file formats are MP3 WMA and AAC USB memory fu...

Page 12: ...use of this accessory with iPod or iPhone may affect wireless performance 2010 Nokia All rights reserved Nokia and Works with Nokia are trademarks or registered trademarks of Nokia Corporation DivX DivX Certified and associated logos are trademarks of Rovi Corporation or its subsidiaries and are used under license The BLUETOOTH word mark and logos are registered trademarks owned by the Bluetooth S...

Page 13: ... is displayed If no BLUETOOTH device has been registered or if you want to switch users manually users can be switched by pressing and holding the My Favorites button For details of which settings are affected by switching users refer to Settings When Switching Users page 21 My Favorites Up to eight My Favorites can be registered as shortcut keys for each registered user Frequently used functions ...

Page 14: ... the best audio environment for the environment in your car On the unit select and set the car category steering wheel position speaker type and size seat material For details of how to configure the settings refer to Car Specific Sound Setup page 20 Display example when setting is completed ...

Page 15: ...Up page 17 Turning Power On or Off Some of this unit s functions cannot be performed while the vehicle is in motion Be sure to stop your vehicle in a safe location and apply the parking brake before attempting these operations 1 Turn the ignition key to the ACC or ON position The system turns on When turned on the system displays the last mode screen that was displayed before the ignition key was ...

Page 16: ...e connector terminals on the back of the front panel This is not a malfunction Attaching 1 Insert the under side of the front panel into the main unit 2 Push the up side of the front panel until it locks firmly into the main unit Before attaching the front panel make sure that there is no dirt or dust on the connector terminals and no foreign object between the front panel and the main unit Attach...

Page 17: ...sc cannot be ejected by pressing press and hold again for at least 5 seconds Adjusting the Volume Rotate the Rotary encoder until the desired sound is obtained Volume 0 35 Lowering Volume Quickly Activating the Audio Mute function will instantly lower the volume level by 20 dB 1 Press Rotary encoder to activate the MUTE mode The audio level will decrease by about 20 dB 2 Pressing Rotary encoder ag...

Page 18: ...vice List is displayed The BLUETOOTH devices registered here are used to automatically identify the user Also a cellular phone can be used as a hands free phone For details see BLUETOOTH Setting page 50 Touching Do not Link exits user registration without registering a BLUETOOTH device 5 Touch Search The system starts searching for BLUETOOTH devices When the search is completed the BLUETOOTH Devic...

Page 19: ... 6 from FM1 presets FM2 presets AM presets Disc USB iPod Aux 1 Aux 2 Aux 3 BT audio You can switch directly to any of these audio sources You can delete names in My Favorites or change the layout Touch appears and the mode switches to the Edit mode Touching Cancel returns to the previous screen without executing any changes Changing the name 1 Touch the icon you want to change The Edit Text screen...

Page 20: ...ails of camera operations refer to Camera Operation Optional page 66 When the front camera direct camera and rear camera or side camera AUX camera are connected simultaneously the screen for selecting which camera image to display appears You can configure the audio settings by car type Touch i Personalize The i Personalize Setup screen is displayed Car Specific Sound Setup You can set and reprodu...

Page 21: ... values are set as the Time Correction X OVER Parametric EQ settings and at the same time saved as Preset3 respectively When no USB memory is connected the iPersonalize Setting function is not available If Preset3 was already saved for Time Correction X OVER Parametric EQ the data will be overwritten Settings When Switching Users The functions settings that are affected when switching users are as...

Page 22: ...nner on the Audio Visual Playback screen fade out after 5 seconds if no operation is performed To display the keys again touch the middle of the screen For details of how to set Top Bottom Banner Fade Out refer to Setting Top banner and Bottom banner Display page 36 Switching Sources During audio visual playback press the SOURCE button or touch a source button in the top banner to switch to the de...

Page 23: ...ed About MX Media Xpander button Touch MX on the Audio Visual Playback screen to change the screen to the Media Xpander setting screen Refer to Setting the MX Media Xpander page 40 Touch Operation You can operate the system by using the touch panel on the screen Be sure to touch the onscreen button lightly with the pad of your finger to protect the display If you touch a button and there is no rea...

Page 24: ...ce BLUETOOTH connection to Hands Free Phone Blinks while reconnecting Does not display when connection is set to OFF Indicates the battery level of the connected BLUETOOTH device This may not be displayed depending on the connected BLUETOOTH device Indicates the signal strength level of the connected BLUETOOTH compatible device Displayed when BLUETOOTH setting is ON The clock display You can switc...

Page 25: ...sired band and repeat the procedure A total of 18 stations can be stored in the preset memory 6 stations for each band FM1 FM2 or AM If a preset memory has already been set in the same preset number it will be cleared and the new station will be memorised Presetting Stations Automatically The tuner can automatically seek and store 6 strong stations in the selected band in order of signal strength ...

Page 26: ...both audio data and MP3 WMA AAC data this unit plays back only the audio data The track display for CD audio data playback shows the track numbers recorded on the disc If an MP3 WMA AAC disc with many files and folders is played it may take longer than normal to start playback The playback time may not be correctly displayed when a VBR Variable Bit Rate recorded file is played back Repeat Play Tou...

Page 27: ...pable of compressing audio data at extremely high ratios reducing the size of music files to as much as one tenth their original size This is achieved while still maintaining near CD quality The MP3 format realises such high compression ratios by eliminating the sounds that are either inaudible to the human ear or masked by other sounds What is AAC AAC is the abbreviation for Advanced Audio Coding...

Page 28: ... correctly play back discs recorded with Track At Once or packet writing Order of files Files are played back in the order that the writing software writes them to the disc Therefore the playback order may not be what s expected Verity the writing order in the software s documentation The playback order of the folders and files is as follows The following numbers may differ from actually displayed...

Page 29: ...d CD R CD RW DVD R DVD RW DVD R DVD RW discs that are recorded in the DivX mode can be used WARNING It is dangerous for the driver to watch the DVD TV Video while driving the vehicle The driver may be distracted from looking ahead and an accident could occur Install the IVE W535ABT IVE W535EBT correctly so that the driver cannot watch DVD TV Video unless the vehicle is stopped and the emergency br...

Page 30: ...ic Keypad Input Mode screen refer to Numeric Keypad Input Operations page 30 3 Touch Enter to confirm the selected item 1 Touch 10KEY of Bottom banner The numeric keypad input mode screen appears If 10KEY is not displayed touch in the bottom banner to display 10KEY 2 Touch a desired number Touch to delete an entered number Touch Delete All to delete all entered number 3 Touch Enter on the numeric ...

Page 31: ... fast forwarding fast reversing This operation may not be possible on certain discs Finding the Beginnings of Chapters Tracks Files During playback touch or The chapter track file switches each time the button is touched and playback of the selected chapter track file starts Some DVDs do not have chapters Playing Still Frames Pausing 1 During playback Touch of Bottom banner 2 Touch or in the middl...

Page 32: ...PRE STOP or while playback is paused 1 Touch 10Key of Bottom banner The numeric keypad input mode screen will appear If 10KEY is not displayed touch in the bottom banner to display 10KEY 2 Touch and enter the chapter number you want to play See page 30 for operation of the numeric keypad 3 Touch Enter to confirm your selection Playback will start from the selected chapter 4 Touch This function is ...

Page 33: ...l discs will allow changing the subtitles during playback In these cases select subtitles from the DVDs menu The subtitle language selected becomes the default setting every time the power is turned on or the disc is replaced If the disc does not include that language the disc s default language is selected instead However the subtitle language may differ depending on the disc For some discs the s...

Page 34: ...Off On Initial setting The character code to be used for tag text information displayed on the screen can be selected from 6 character codes Setting item Format Sel Setting contents EU1 EU2 Initial setting RUS CHI THA ARA The Setup menu feedback information etc for this unit can be changed to appear in the selected language Setting item Language Sel Setting contents English German French Spanish P...

Page 35: ...urn this setting to On and set a password password input is required when the system is connected to a battery and turned on for the first time Setting item Security Code Setting contents Off Initial setting On Setting the password 1 Touch or of Security Code to set to On 2 After the confirmation message appears touch OK The password setting screen is displayed 3 Enter a password then touch OK Ent...

Page 36: ...rom 5 different display colours Setting item Screen Colour Setting contents Blue Initial setting Red Green Amber Black Adjustment becomes necessary when the display position on the LCD and the touch position on the touch panel do not match Setting item Screen Alignment 1 Touch Screen Alignment in the Screen LED Customize screen The adjustment screen appears 2 Accurately touch the mark provided in ...

Page 37: ...ight or too dark and corrects them to natural brightness Setting item Live Contrast Setting contents OFF Initial setting LOW HIGH You can select a mode suitable for the subject image Setting item Visual EQ Setting contents OFF Initial setting NIGHT M SOFT SHARP CONTRAST To return to the default video settings set this function to OFF Any Visual EQ selection or changes made are reset their initial ...

Page 38: ...ranty Copyright Info 2 Touch DivX R VOD 3 Touch Registration The registration code is displayed on the screen 4 Touch OK Displaying the Deregistration Code 1 Touch Warranty Copyright Info 2 Touch DivX R VOD 3 Touch Deregistration The confirmation dialog screen appears 4 Touch OK The deregistration code is displayed on the screen When you have finished touch Cancel If you want to continue and displ...

Page 39: ... set the rear speaker output to Off Setting item Rear Speaker Setting contents On Initial setting Off Note that if you select Off when the Rear Speaker Position in Car Specific Sound Setup is set to Rear Deck or Rear Door Panel the setting in Car Specific Sound Setup will be cancelled If an optional subwoofer is connected to the unit make the following setting Setting item SubW Setting contents On...

Page 40: ...produce the sound accurately MX CD CD mode processes a large quantity of data This data is used to reproduce the sound cleanly by making use of the data quantity MX Compress Media This corrects information that was omitted at the time of compression This reproduces a well balanced sound close to the original MX AUX AUX3 Choose the MX mode Compress Media Movie or Music that corresponds to the media...

Page 41: ...t all bands 3 To store the adjusted setting value touch and hold Preset1 Preset2 or Preset3 for at least 2 seconds Settings exceeding the frequency of adjacent bands are not available While adjusting the Parametric EQ you should consider the frequency response of the connected speakers When the parametric EQ is adjusted the adjustment for Bass Max EQ becomes ineffective When Bass Max EQ is set the...

Page 42: ...set will be recalled Adjusting the Crossover Settings X OVER X OVER is selected on the Sound setup menu in step 3 Refer to Sound Setup Operation page 39 Before performing the following procedures refer to About the Crossover page 45 Setting item X OVER 1 Touch Channel to select the channel Each time you touch the channel switches The channel being adjusted is displayed in red 2 Adjust the crossove...

Page 43: ...s caused by the time delay between the sound reaching the listener s right versus the left ear To correct this this unit is able to delay the audio signal to the speakers closest to the listener This effectively creates a perception of increased distance for those speakers The listener can be placed at an equal distance between the left and right speakers for optimum staging The adjustment will be...

Page 44: ... 1 0 34 0 13 4 6 1 207 4 81 7 1 1 37 4 14 7 6 2 210 8 83 1 1 2 40 8 16 1 6 3 214 2 84 4 1 3 44 2 17 4 6 4 217 6 85 8 1 4 47 6 18 8 6 5 221 0 87 1 1 5 51 0 20 1 6 6 224 4 88 4 1 6 54 4 21 4 6 7 227 8 89 8 1 7 57 8 22 8 6 8 231 2 91 1 1 8 61 2 24 1 6 9 234 6 92 5 1 9 64 6 25 5 7 0 238 0 93 8 2 0 68 0 26 8 7 1 241 4 95 1 2 1 71 4 28 1 7 2 244 8 96 5 2 2 74 8 29 5 7 3 248 2 97 8 2 3 78 2 30 8 7 4 251 ...

Page 45: ... to bypass the HP or LP filters Do not use a tweeter without the HPF on or set to a low frequency as it may cause damage to the speaker due to the low frequency content You cannot adjust the crossover frequency higher than the HPF or lower than the LPF Adjustment should be made according to the recommended crossover frequency of the connected speakers Determine the recommended crossover frequency ...

Page 46: ...ore making changes To temporarily change the language of the current disc either do so from the DVD menu or by using the operation described in the section Switching the Audio Tracks page 33 If the disc does not include the selected language the disc s default language is set To play in a language other than those displayed 1 Touch Menu Language Code Audio Language Code or SUBT Language Code The n...

Page 47: ...TAL 4 Touch Parental 5 Touch on to turn On Select Off to cancel parental lock or if you do not want to set a rating level 6 Touch to return to the previous screen 7 Touch Parental Level 8 Touch or to select the rating level 1 to 8 The smaller the number the higher the restriction 9 Touch to return to the previous screen Changing the password 1 Touch Password Change The numeric keypad screen is dis...

Page 48: ...nnect one more External Input device Setting the Secondary name can change the mode name display of this device Setting the Secondary AUX Name Secondary name can be set only when Primary name is set to DVB T Setting item Secondary Name Setting contents Off Initial setting AUX2 DVD GAME EXT DVD DVD CHG DVB T 1 TV The selected source name is displayed instead of AUX mode name 1 If the Primary Name i...

Page 49: ...l this setting can be carried out The video input type can be changed Setting item AUX3 Signal Setting contents Auto Initial setting NTSC PAL RSE Setting RSE is selected on the Source setup menu in step 3 Refer to Source Setup Operation page 46 Video and audio can be output to the rear monitor Setting item RSE Setting contents Off Initial setting On If you selected the On setting set the Remote Se...

Page 50: ...e is searched and connected from this unit or a new BLUETOOTH compatible device is registered 1 Touch Set BLUETOOTH Device 2 Touch Search of No Device The Device list displays up to 10 items 3 Touch Audio Hands free or Both of the device you want to connect from the list You can connect pair up to 5 BLUETOOTH compatible mobile phones 4 When the device registration is complete a message appears and...

Page 51: ...d refer to Numeric Keypad Input Operations page 30 Changing the Character Code of the Phone Book Default Phonebook Encoding is selected on the BLUETOOTH setup menu in step 3 Refer to BLUETOOTH Setup Operation page 50 You can select the character code that is used when transferring the phone book or history from a mobile phone If unreadable characters appear in the transferred data select the corre...

Page 52: ...ll Setting item Receive Volume Setting contents 1 to 11 Initial setting 5 Adjusting the Transmit Volume Transmit Volume is selected on the BLUETOOTH setup menu in step 3 Refer to BLUETOOTH Setup Operation page 50 You can adjust the transmit volume during the call Setting item Transmit Volume Setting contents 1 to 11 Initial setting 5 Adjusting the Calling Volume Calling Volume is selected on the B...

Page 53: ...set in Direct Camera Setting Switching video patterns for Rear camera Front camera The video pattern can be changed when connected to HCE C200R HCE C200F HCE C210RD HCE C212F Setting item Guide Adjustment 1 Touch Guide Adjustment The camera guide adjustment screen is displayed 2 Touch Back Panorama Corner or Top The view will change to the selected view Back will not appear for the Front camera 3 ...

Page 54: ...3 Setting item Camera Select Camera Signal 1 Guide Adjustment 1 Setting contents Off Initial setting Rear 2 OTHER 1 If Camera Select is set to Off this option is not available 2 If Camera Select in Direct Camera Setting is set to Rear Rear cannot be set in AUX Camera Setting Setting the AUX Camera Signal Input When the AUX camera is connected the video input signal type can be chosen Further setti...

Page 55: ...stable Returning guides to default 1 Touch Default A message window will appear 2 Touch OK Adjusted values will return to default settings Camera Interrupt Setting Power OFF Mode Camera Interrupt is selected on the Camera setup menu in step 3 Refer to Camera Setup Operation page 53 You can set whether to display the rear camera image when the gear lever is moved to the reverse R position while the...

Page 56: ...n mobile phone features are dependent on the capabilities and settings of your service provider s network Additionally certain features may not be activated by your service provider and or the provider s network settings may limit the feature s functionality Always contact your service provider about feature availability and functionality All features functionality and other product specifications...

Page 57: ...ake a phone call You can assign up to 4 phone numbers for one touch dialing to make a call easily For how to assign one touch dialling refer to Assigning as a Short Cut Dialling Number page 59 1 Press the PHONE button The phone menu screen is displayed 2 Touch Favorites 3 Touch Dial1 Dial2 Dial3 or Dial4 The phone call is sent to the stored number Pressing and holding Dial1 Dial2 Dial3 or Dial4 di...

Page 58: ...h Depending on the mobile phone this operation may not be possible Transmits a DTMF Touch Tone during a call 1 Touch TONE The number input screen appears 2 Input number You can transmit a Touch Tone signal during a call Touching and holding 0 initiates tone transmission Phone Book Function Display example for Phone Book screen An icon is displayed to indicate that multiple phone numbers are regist...

Page 59: ... Call History 1 Press the PHONE button The Phone menu screen is displayed 2 Touch Dialled Received or Missed The last four histories are displayed 3 Touch the person name you intend to assign as the Short Cut dialling number The details screen of the Phone book is displayed To display all the histories touch All Touching Delete deletes the selected histories 4 Touch Preset The details screen for t...

Page 60: ...trol Profile is required Not all functions work with all devices During a call sound on the BLUETOOTH audio source is muted Compatible AVRCP versions 1 0 1 3 1 4 Available functions may differ depending on the AVRCP version Playback 1 Press the SOURCE button 2 Touch BLUETOOTH AUDIO of Top banner 3 Touch or to select the desired track file Returning to the beginning of the current file Touch Fast b...

Page 61: ...onnected BLUETOOTH compatible device Selecting Groups Available for AVRCP Ver 1 3 and 1 4 only Touch Group or Group to select the group Search Function Available for AVRCP Ver 1 4 only The displayed list differs with the connected BLUETOOTH device Touch Search of Bottom banner during playback Select the track etc you want to listen to from the displayed list GROUP ALL OFF ...

Page 62: ...eration screen touch the video display area Touch the display panel to display the operation screen again Setting the AUX name for EXT DVD DVD CHG DVB T and TV mode displays their individual operation switches and enables operation Refer to Setting the Primary AUX Name AUX Setup page 48 and Setting the Secondary AUX Name page 48 Operating an External DVD Player To operate an External DVD player Op...

Page 63: ...play Top Menu Calls up the Top Menu screen Menu Calls up the Menu screen Menu Control Calls up the menu operation mode Switches the programme playlist folder down Switches the programme playlist folder up Angle Switches angle Audio Switches audio Sub Title Switches sub titles Menu operation mode screen display example Key The menu operation mode will be displayed Moves key panel location Closes me...

Page 64: ...e DVB T mode the operation screen is displayed For details on how to operate refer to the Owner s Manual of the connected Digital TV Receiver DVB T Menu operation mode screen display example Switches the Channel number Favorite channel number down Switches the Channel number Favorite channel number up TUNE Channel or FAV Switches between the Channel mode and the Favorite channel mode EPG Call up t...

Page 65: ...er s Manual of the connected TV Switches the Channel number Preset channel frequency down Switches the Channel number Preset channel frequency up TUNE Channel or PRESET or MANUAL Switches amongst Channel mode Preset mode and Manual mode Band Switches the band A Memo The tuner automatically seeks and stores stations About the TV Operation Screen Touch ...

Page 66: ...en the reverse wire is properly connected If the camera has a view switch function the Direct Change switch is displayed 1 Touch the screen when the image from the rear camera is displayed The operation screen is displayed on the screen After a 5 second time out the operation screen returns to the camera display screen 2 Touch Back Panorama Corner or Top The image pattern changes Back Rear View Pa...

Page 67: ...ngs Depending on the car the guidance may deviate to the right or left This is not a malfunction Distance guidance mark The distance guides represent the ground level distance from the rear bumper It is difficult to accurately estimate the distance to objects above ground level Screen Positions of A B and C In the screen according to the distance guidance marks the truck seems to be parked about 1...

Page 68: ...of the car on the road surface When there is a steep downward slope behind the car example Screen Situation of the car In the case of a downward slope behind the car the distance guides are displayed farther from the rear bumper than the actual distance If there is an obstacle on the downward slope it seems closer than its actual position Also an error may occur between the guidance and the actual...

Page 69: ...page 66 and Adjusting the Caution Display Location page 66 for the operations Other Camera Operation Set OTHER for AUX Camera Setting page 54 1 Press the My Favorites button The Favorites screen is displayed 2 Touch Camera When the front camera direct camera and rear camera or side camera AUX camera are connected simultaneously the screen for selecting which camera image to display appears As with...

Page 70: ...ss the SOURCE button 2 Touch USB of Top banner The USB mode is activated and the display changes to the USB screen 3 Touch or or to select the desired track file Returning to the beginning of the current track file Touch Fast reverse Touch and hold Advancing to the beginning of the next track file Touch Fast forward Touch and hold 4 To pause playback touch is displayed in the middle of the screen ...

Page 71: ...tom banner during playback 2 Touch Music The search mode is activated 3 Touch Folders The folder name list screen is displayed Folder Name Search Mode 4 Touch of the desired folder The first file in the selected folder is played back File Name Search Mode 4 Touch the desired folder name The file name of the selected folder is displayed 5 Touch the desired file name The selected file is played back...

Page 72: ... an Item in a List page 23 After selecting a file via a Tag search touch on the main screen to display the search screen The hierarchy level you selected last in the search mode is displayed Direct Up Down Function This operation is available only if the most recent song search was a Tag Search Playlist Artist Album Genre Composer can be easily changed For example if you listen to a song from a se...

Page 73: ... The following devices have been tested and shown to work with this unit Correct function of earlier versions cannot be guaranteed iPhone 4 16GB 32GB Ver 4 3 1 iPhone 3GS 8GB 16GB 32GB Ver 4 3 1 iPhone 3G 8GB 16GB Ver 4 2 1 iPhone 4GB 8GB 16GB Ver 3 1 3 For clarity in identifying your model of iPod please see Apple s own document Identifying iPod models at http support apple com kb HT1353 Display ...

Page 74: ... Directly 1 Touch of the artist s name All songs of the selected artist are played back To Search for the Album of the Artist 1 Touch the selected artist name The Albums search screen of the selected artist is displayed 2 Touch of the desired album s name All songs of the selected album are played back To Search for a Song in the Album of the Artist 1 Touch the desired artist s name All albums of ...

Page 75: ...ou selected last in the search mode is displayed Repeated touches return to each previous level up to the highest Repeat Play Touch to repeatedly play back the currently track The tracks files will be played repeatedly Touch again to deactivate Repeat play Random Play Shuffle Touch during playback The files will be played back in a random sequence The Shuffle mode switches every time is touched Sh...

Page 76: ...compared to less than 300 for VHS tape In addition DVDs offer a variety of functions Multiple audio page 33 Movies can be recorded in up to eight languages The desired language can be selected from the unit Subtitles function page 33 Movies can include subtitles in up to 32 languages The desired subtitle language can be selected from the unit Multi angle function page 33 When the DVD contains a mo...

Page 77: ...979 6983 6984 6985 7065 7073 7074 7079 7082 7089 7165 7168 7176 7178 7185 7265 7273 7282 7285 7289 7365 Abbreviation IE IK IN IS IT IW JP JI JW KA KK KL KM KN KO KS KU KY LA LN LO LT LV MG MI MK ML MN MO MR MS MT MY NA NE NL NO OC OM OR PA PL PS PT QU RM Code 7369 7375 7378 7383 7384 7387 7465 7473 7487 7565 7575 7576 7577 7578 7579 7583 7585 7589 7665 7678 7679 7684 7686 7771 7773 7775 7776 7778 ...

Page 78: ... IS IT JM JO JP KE KG KH 6877 6879 6890 6967 6969 6971 6972 6982 6983 6984 7073 7074 7075 7077 7079 7082 7165 7166 7168 7169 7170 7172 7173 7176 7177 7178 7180 7181 7182 7183 7184 7185 7187 7189 7275 7277 7278 7282 7284 7285 7368 7369 7376 7378 7379 7381 7382 7383 7384 7477 7479 7480 7569 7571 7572 Dominica Dominican Republic Algeria Ecuador Estonia Egypt Western Sahara Eritrea Spain Ethiopia Finl...

Page 79: ... 8371 8372 8373 8374 8375 8376 8377 8378 8379 8382 8384 8386 8389 8390 8467 8468 8470 8471 8472 8474 8475 8477 8478 8479 8480 8482 8484 8486 8487 8490 8565 8571 8577 8583 8589 8590 8665 8667 8669 8671 8673 8678 8685 8770 8783 8969 8984 8985 9065 9077 9087 PE PF PG PH PK PL PM PN PR PT PW PY QA RE RO RU RW SA SB SC SD SE SG SH SI SJ SK SL SM SN SO SR ST SV SY SZ TC TD TF TG TH TJ TK TM TN TO TP TR ...

Page 80: ...ully extended if broken replace the antenna with a new one Broadcast is noisy The antenna is not the proper length Extend the antenna fully replace it if it is broken The antenna is poorly grounded Make sure the antenna is grounded properly at its mounting location The station signal is weak and noisy If above solution does not work tune in another station Disc Disc playback sound is wavering Mois...

Page 81: ...ive Please inquire details from the service center An access error to DVD drive occurred for some reasons Please ask Service Centre for help Audio Visual Read error Please check the Disc Scratched disc contaminated disc poor recording disc incompatible with this unit Press Change the disc USB device error An iPod iPhone that is not supported by the unit is connected Connect an iPod iPhone that is ...

Page 82: ...omatically be played back This DivX rental has used XX out of YY views Continue If the total number of viewings for this file has not been exceeded the views remaining is displayed To play back select OK If the next file is to be played back select Cancel Do you wish to stop playing rental file While playing back a rental file Do you wish to stop playing rental file is displayed when the following...

Page 83: ...O Layer 3 WMA Decoding Windows Media Audio AAC Decoding AAC LC format m4a file Number of Channels 2 Channel Stereo Frequency Response 5 20 000 Hz 1 dB Total Harmonic Distortion 0 008 at 1 kHz Dynamic Range 95 dB at 1 kHz Signal to Noise Ratio 100 dB Channel Separation 85 dB at 1 kHz Frequency response may differ depending on the encoder software bit rate Frequency Response 5 20 000 Hz 1 dB Wow Flu...

Page 84: ...NDRED FIFTY DOLLARS U S 250 00 LIMITATIONS ON REVERSE ENGINEERING DECOMPILATION AND DISASSEMBLY You may not reverse engineer decompile or disassemble the SOFTWARE except and only to the extent that such activity is expressly permitted by applicable law notwithstanding this limitation ADDITIONAL SOFTWARE SERVICES The SOFTWARE may permit ALPINE MS Microsoft Corporation or their affiliates to provide...

Page 85: ... of such electronic documentation TRADEMARKS This EULA does not grant you any rights in connection with any trademarks or service marks of ALPINE MS Microsoft Corporation their affiliates or suppliers PRODUCT SUPPORT Product support for the SOFTWARE is not provided by MS its parent corporation Microsoft Corporation or their affiliates or subsidiaries For product support please refer to ALPINE supp...

Page 86: ...re to use only the specified accessory parts Use of other than designated parts may damage this unit internally or may not securely install the unit in place This may cause parts to become loose resulting in hazards or product failure ARRANGE THE WIRING SO IT IS NOT CRIMPED OR PINCHED BY A SHARP METAL EDGE Route the cables and wiring away from moving parts like the seat rails or sharp or pointed e...

Page 87: ...e main unit see Removal on page 88 Slide the unit into the mounting sleeve and secure it 1 If the installed mounting sleeve is loose in the dashboard the pressure plates may be bent slightly to remedy the problem 2 The supplied face plate may be mounted 4 Reinforce the head unit with the metal mounting strap not supplied Secure the ground lead of the unit to a clean metal spot using a screw 1 alre...

Page 88: ...emoved from the mounting sleeve 2 Pull the unit out keeping it unlocked as you do so JAPANESE CAR Take the face plate off and secure the ground lead of the unit to a clean metal spot using a screw already attached to the car s chassis Attach the Original Mounting Bracket to each side of the IVE W535ABT IVE W535EBT using the screws supplied with IVE W535ABT IVE W535EBT This unit Bracket keys Includ...

Page 89: ...ced in the OFF position and the battery may be discharged IVE W535ABT IVE W535EBT Red Yellow SPST SW Optional FUSE 5A Optional FUSE 20A Optional Battery ACC BATTERY To prevent external noise from entering the audio system Locate the unit and route the leads at least 10 cm away from the car harness Keep the battery power leads as far away from other leads as possible Connect the ground lead securel...

Page 90: ...attery Green Black Ignition key Yellow Red White Yellow Red White Amplifier Amplifier Amplifier Rear Left Rear Right Front Left Front Right Subwoofers To Front Rear camera To Audio Input terminals R L To Audio Output terminals R L To Video Input terminal To Video Output terminal Brown REMOTE OUT CAMERA2 CAMERA SW To Rear Other camera TOPVIEW Camera Switch connector 1 Microphone Included Green Fron...

Page 91: ...hicle Display Interface Connector Outputs Vehicle Display Interface control signals Connect this to the optional Vehicle Display Interface box For details about connections consult your nearest Alpine dealer MIC Input Connector To Microphone Included USB Connector To USB Memory or iPod iPhone Power Supply Connector Remote Turn On Lead Blue White Connect this lead to the remote turn on lead of your...

Page 92: ... 461iV is required Do not leave a iPod iPhone in a vehicle for a long time Heat and humidity may damage the iPod iPhone and you may not be able to play it again USB Memory Sold separately USB extension cable Included USB connector or Nokia Phone connection kit KCU 230NK Sold separatery Nokia Phone Sold separately USB connector USB extension cable Included iPod VIDEO AV extension cable 1 Sold separ...

Page 93: ...e Control Output Lead Brown Connect this lead to the remote control input lead This lead outputs the controlling signals from the remote control You can change the name of an external device Refer to Setting the AUX Mode page 48 Camera Connector AUX PRE OUT Connector AUX PRE OUT cable Yellow Red White Yellow Red White To Video Output terminal To Audio Output terminal DVD Changer Sold separately To...

Page 94: ... only when the Primary Name is set to DVB T Refer to Setting the Primary AUX Name AUX Setup page 48 To connect an external input device to the iPod VIDEO connector set AUX3 In Sel to AUX3 Refer to Setting the AUX3 page 49 Camera Connector AUX PRE OUT Connector AUX PRE OUT cable Yellow Red White iPod VIDEO input connector To Audio Input Terminal Mobile Digital TV Receiver Sold separately Camera cab...

Page 95: ... 3 Subwoofer RCA Connector 4 RCA Extension Cable Sold separately AUX PRE OUT Connector Power Supply Connector AUX PRE OUT cable Red White Amplifier 4 ch Sold separately Input Input Front speaker Rear speaker REMOTE TURN ON Blue White Power cable Amplifier for subwoofer Sold separately Input Subwoofer Red White REMOTE ON Blue White REMOTE ON Blue White Red White ...

Page 96: ...mera extension cable Included with direct rearview camera 3 CAMERA Input RCA Connector 4 RCA Extension Cable sold separately Camera Connector CAMERA 1 CAMERA 2 Camera cable Direct rearview camera sold separately Camera with RCA video output sold separately To Video Output terminal HCE C117D etc ...

Page 97: ...ely When the screen switches from the front view camera image to the Navigation screen the location of your vehicle may not be displayed correctly AUX PRE OUT Connector REVERSE To plus side of the back lamp signal lead of the car Yellow Red Control Unit To Video Output Terminal AUX PRE OUT Cable White Orange White Camera Control Lead Orange Black ...

Page 98: ...About the Rules of Bluetooth Electromagnetic Radiation Regulation Country Rules of Electromagnetic Radiation Regulation Thailand This telecommunication equipment conforms to NTC technical requirement ...

Page 99: ......

Page 100: ......

Reviews: