background image

16

2.  Installing the product

2.1  Installing the front camera (main unit)

Follow the instructions to properly install the product.

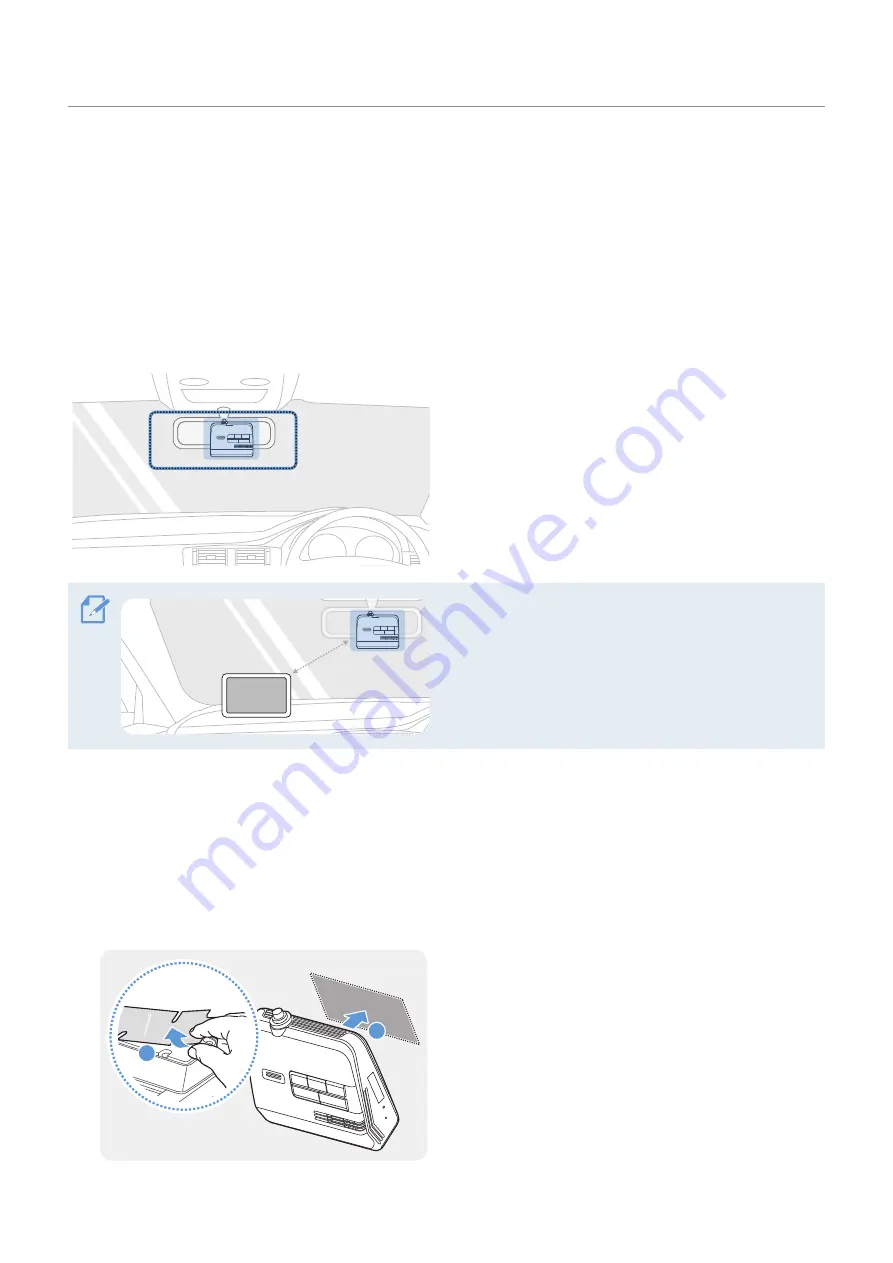
2.1.1  Selecting an installation location

Select an installation location that can record the 
entire view in front of the vehicle without obstructing 
the driver’s vision. Ensure that the front camera lens 
is located in around the center of the windshield.

Should not be installed on vehicle equipped with 
front radar or front camera ADAS systems.

20 cm

If a GPS navigating device is installed on the dashboard, 
its GPS reception may be affected depending on the 
dashboard camera’s installation location.
Adjust the installation location of the GPS navigating 
device to ensure that the two devices are separated by 
at least 20 centimeters (approximately 8 inches).

2.1.2  Securing the product

Follow the instructions to secure the product at the installation location.

1


After determining the installation location, wipe the installation location on the windshield with a dry 
cloth. 

2


2

1

Remove the protective film from the bottom of 
the product, and then attach the product to the 
installation location.

Summary of Contents for DVR-C320R

Page 1: ...BEDIENUNGSANLEITUNG Lesen Sie diese Bedienungsanleitung bitte vor Gebrauch des Ger tes MANUAL DE OPERACI N L alo antes de utilizar este equipo ISTRUZIONI PER L USO Si prega di leggere prima di utilizz...

Page 2: ...to which the receiver is connected Consult the dealer or an experienced radio TV technician for help This appliance and its antenna must not be co located or operation in conjunction with any other a...

Page 3: ...file storage locations 20 3 3 Using the continuous recording feature 21 3 4 Recording manually 21 3 5 Using parking mode 22 3 6 Using the Super Night Vision 23 3 7 Using the road safety features 23 4...

Page 4: ...to use this manual and the system properly Safety symbols in this guide Warning This symbol means Important Instructions Failure to heed them can result in serious injury or death Caution This symbol...

Page 5: ...extremely hazardous DO NOT SPLICE INTO ELECTRICAL CABLES Never cut away cable insulation to supply power to other equipment Doing so will exceed the current carrying capacity of the wire and result i...

Page 6: ...HE WIRING SO IT IS NOT CRIMPED OR PINCHED BY A SHARP METAL EDGE Route the cables and wiring away from moving parts like the seat rails or sharp or pointed edges This will prevent crimping and damage t...

Page 7: ...r national laws to secure this device to a dash board or windshield It is the user s responsibility to know and follow the applicable laws in the jurisdictions where this device is used Do not use thi...

Page 8: ...hout prior notice 1 1 1 DVR C320R 2 camera USA Canada only Front camera main unit Hardwiring cable Cable clamp holder microSD card with adapter consumable Quick start guide User guide Warranty Registr...

Page 9: ...ng cable Cable clamp holder microSD card with adapter consumable Quick start guide User guide stored in the microSD card Dash cam recording warning sticker Car charger 1 1 3 RVC C320 Rear view only Re...

Page 10: ...button Press to enable or disable voice recording Manual recording button Press to start manual recording Power button Press and hold to turn off the product Press to turn on the product Wi Fi LED Ind...

Page 11: ...video is being recorded Adhesive mount Used to fix the front camera in the vehicle Front camera lens Records the front view 1 2 3 Rear camera RVC C320 Adhesive mount Used to fix the rear camera in th...

Page 12: ...oward the product s buttons and insert it into the slot until you hear a click Ensure that the product is turned off before removing the memory card The recorded video files may be corrupted or lost i...

Page 13: ...nly required if the cable length is insufficient 1 BAT Connect the cord that supplies battery power 12V 2 ACC Connect the cord that supplies accessory power 12V 3 GND ground cord Connect this securely...

Page 14: ...ther accessories which need a REMOTE IN OUT connection cannot connect to the Alpine navigation display audio system at the same time R CAM DVR C320R Rear camera Car charger cable Hardwiring cable Rear...

Page 15: ...mware must be installed 1 4 4 ADAS warning message When the Front Vehicle Departure Warning or Back Collision Warning System features are enabled the ADAS warning message will be displayed on the navi...

Page 16: ...AS systems 20 cm If a GPS navigating device is installed on the dashboard its GPS reception may be affected depending on the dashboard camera s installation location Adjust the installation location o...

Page 17: ...n 2 2 Installing the rear camera Refer to the following instructions to properly install the rear camera 2 2 1 Selecting an installation location Select a location on the rear windshield where there i...

Page 18: ...uring the rear camera to the windshield it is hard to remove the camera or change the installation location due to the strong adhesive 2 1 2 Remove the protective film from the adhesive mount and came...

Page 19: ...ection port For safe driving arrange the cables to prevent the driver s vision from being obstructed or interfering with driving 2 Connect the rear camera cable to the power cable s R CAM terminal 3 T...

Page 20: ...cations Videos are stored in the following folders according to their recording mode The Alpine navigation display audio system Continuous Continuous Incident Manual Recording Motion Detection Parking...

Page 21: ...inuous recording incident continuous recording starts with a double beep sound The video recording does not begin until the product is completely booted up and the GPS signal is received After the boo...

Page 22: ...timelapse_rec folder Impact detected When an impact is detected while parking a video is recorded for 20 seconds from the moment 10 seconds before detection to 10 seconds after detection and stored in...

Page 23: ...cle is moving at 30 km h or above Low Speed FCWS Detects threats ahead and warns the driver Beep when the vehicle is moving between 10 30 km h BCW Back Collision Warning Detects rear collision threats...

Page 24: ...operate the product by tapping on the Alpine navigation display audio system display The Live view screen is displayed when you turn on the ACC and start the engine Displays the video that the rear c...

Page 25: ...s on page 29 Move to the Live view screen Configure the memory card Displays the GPS icon Displays the current volume setting Stop your vehicle in a safe location before operating the product While op...

Page 26: ...ly by tapping the manual recording button on the dash cam or the Live view screen Videos that were recorded when an impact was detected while the vehicle was parked Videos that were recorded when an i...

Page 27: ...Viewer app on a PC or smartphone If you attempt to play videos by inserting the memory card into a device such as a smartphone or a tablet PC the video files may be lost During playback it may not be...

Page 28: ...rdings Select from Cont Rec Priority Incident Rec Priority Parking Rec Priority Manual Rec Priority Driving Rec Only for the memory partition type Formatting Memory You can format the memory card that...

Page 29: ...Live view screen tap the Home button Settings Move to the Home screen Configure the recording features Configure the system settings Configure the camera Configure the road safety features The produc...

Page 30: ...max 2min 3min max 4min for the privacy recording setting This feature is only available in Europe Parking Mode You can set the operating mode of the product while the vehicle is parked Select from OFF...

Page 31: ...to the vehicle type Select from Sedan SUV Truck Bus for the vehicle type ADAS Settings Adjust the product to align the blue line displayed on the ADAS settings screen with the center of the hood and...

Page 32: ...essively rely on the safe driving warning features The driver bears responsibility for always being aware of the vehicle s surroundings and must strive for safe driving The safe driving warning featur...

Page 33: ...tap System Settings and then tap Reset to initialize the settings 2 Tap the confirmation button on the confirmation window All system settings will be initialized 3 When initialization is complete a c...

Page 34: ...oise may occur or the audio may cut out 6 1 Connect the product to a smartphone 1 On your smartphone open the Google Play Store or Apple App Store and download and install ALPINE Recording Viewer 2 Ru...

Page 35: ...rating system other than those listed in the system requirements 7 2 Learning about the PC viewer 7 2 1 Installing the PC viewer You can download the latest PC viewer software from the Alpine website...

Page 36: ...n to the previous screen Switch between the front and rear videos Minimize expand or close the software Displays the rear camera video file name Displays the recorded rear camera video Display the map...

Page 37: ...will be automatically added to the playlist in the bottom right corner of the PC viewer screen The playlist section layout is as follows Select a folder Displays a list of videos in the selected folde...

Page 38: ...scene Displays the current rear video Displays the map screen Open a file or save a video with a different name Displays the playlist Displays the GPS information at the time of recording Indicates th...

Page 39: ...r provided 3 Open the PC viewer 4 Click and locate the memory card The video files in the memory card will be automatically added to the playlist in the bottom right corner of the PC viewer screen The...

Page 40: ...d remove the memory card 5 Open the memory card on a PC and copy the firmware upgrade file to the root folder of the memory card 6 While the power is disconnected from the product insert the memory ca...

Page 41: ...ward the lens of the product Turn off the power remove the memory card and then check to ensure that the contacts in the memory card slot are not damaged Ensure that the memory card is an authentic pr...

Page 42: ...tarting the recording total 1 minute Parking Rec parking mode Motion Detection Time Lapse Energy Saving Camera sensor 2 1 M Pixels CMOS 1080p 2 1 M Pixels 1920x1080 Angle of view Lens Large angle 144...

Page 43: ...ox 38 min 32 GB Approx 188 min Approx 100 min Approx 25 min Approx 181 min Approx 75 min 64 GB Approx 376 min Approx 200 min Approx 50 min Approx 362 min Approx 150 min 128 GB Approx 752 min Approx 40...

Page 44: ...ox 75 min Approx 75 min 64 GB Approx 210 min Approx 250 min Approx 240 min Approx 150 min Approx 150 min 128 GB Approx 420 min Approx 500 min Approx 480 min Approx 300 min Approx 300 min Timelapse 16...

Page 45: ...em for used electronic products in accordance with legislation that requires proper treatment recovery and recycling Contact your local authority for details in locating a recycle facility nearest to...

Page 46: ...A INC 1500 Atlantic Boulevard Auburn Hills Michigan 48326 USA Phone 1 800 ALPINE 1 1 800 257 4631 ALPS ALPINE EUROPE GmbH Ohmstrasse 4 85716 Unterschleissheim Germany For contact information on your r...

Reviews: