Alpine CDA-9830 Owner'S Manual Download Page 28

26

-EN

XM Radio (Optional)

Receiving XM Channels with the XM
Receiver (Optional)

XM Satellite Radio* is the next generation of audio entertainment,
with up to 100 brand-new digital channels. For a small monthly fee,
subscribers can hear crystal-clear music, sports, news and talk, coast-
to-coast via satellite. For more information, visit XM’s website at
www.xmradio.com or call 1-800-852-9696.

An optional XM Satellite Radio Receiver (TUA-T020XM) and an
optional XM antenna may be connected to the CDA-9831/CDA-9830.
With an XM Receiver connected to the Ai-NET input of the CDA-
9831/CDA-9830, the XM Receiver will be controllable from the
CDA-9831/CDA-9830.

* XM and its corresponding logos are trademarks of XM Satellite

Radio Inc.

• The controls on the CDA-9831/CDA-9830 for XM Receiver

operation are operative only when an XM Receiver is connected.

• The XM1, XM2 or XM3 band illuminates when in XM mode.

1

Press 

SOURCE/POWER

 to select XM mode.

2

Press 

BAND/TEL.

 to select XM1, XM2 or XM3.

Each press changes the band:

 XM1 

 XM2 

 XM3 

 XM1

3

Press 

8

 or 

9

 to select desired category.

Holding down 

8

 or 

9

 will change categories

continuously.

4

Press 

g

 or 

f

 to select the desired channel.

Holding down 

g

 or 

f

 will change channels

continuously.

• When using the optional remote control (RUE-4190), an XM

Channel can be directly called up with the numeric keypad of the
remote control.

1 While in XM Radio mode, enter the Channel number you

want to call up with the numeric keypad on the remote
control.

2 Press ENTER or + 10/OK on the remote control within 5

seconds to receive the XM Channel.
If the channel number is 3 digits, the XM Channel is
automatically received after the channel number is input.

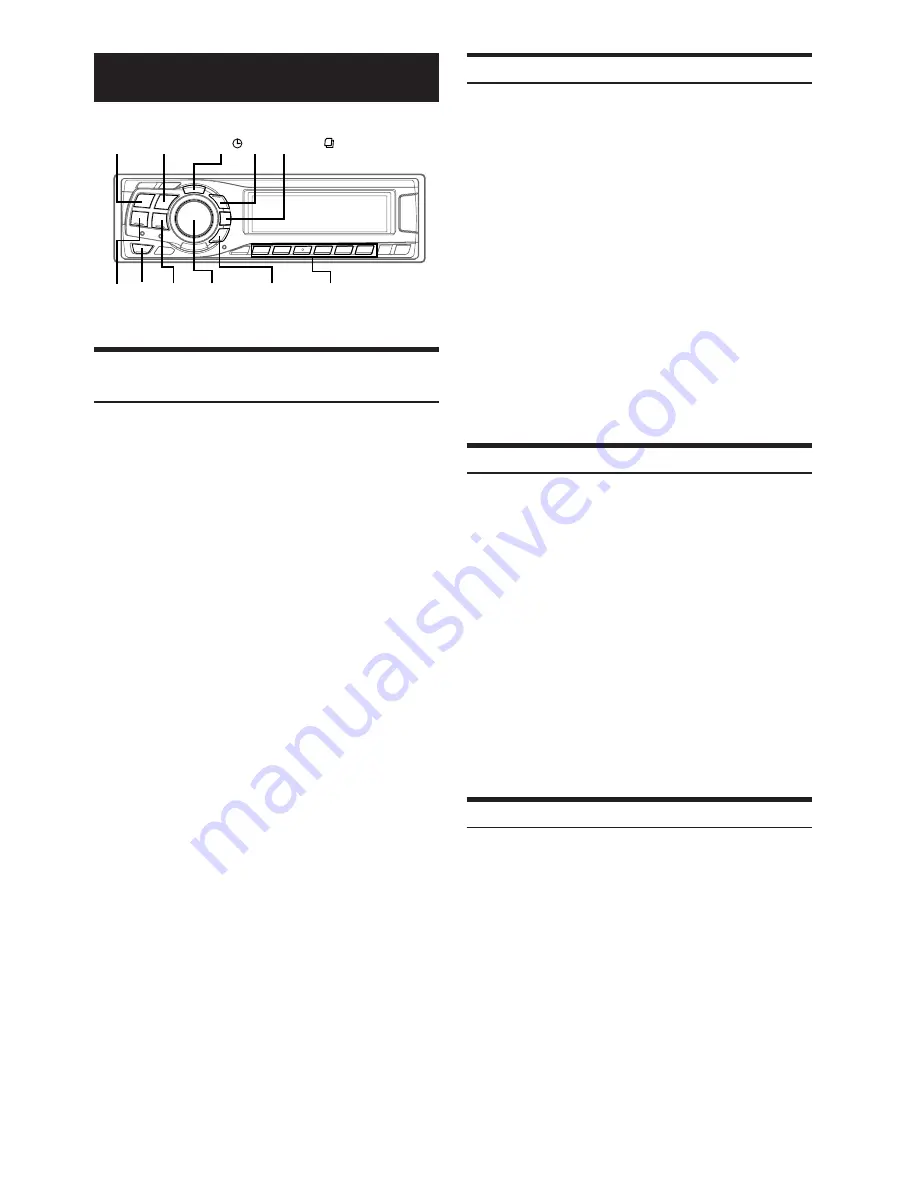
SOURCE/
POWER

Preset buttons
(1 through 6)

BAND/
TEL.


f


g

MENU

TITLE 

SEARCH 

Rotary
encoder

8


9

Checking the XM Radio ID Number

You need to provide XM with the unique XM Radio ID number for
your XM Radio Receiver in order to subscribe to XM's programming.

This number is an 8 character alphanumeric number that is printed on
a label directly on the XM Receiver.
It can also be displayed on the screen of the CDA-9831/CDA-9830 in
the following way.

1

While receiving XM1, XM2 or XM3, press 

g

 or

f

 to select channel “0.”

The unit alternately displays “RADIO ID” for 2 seconds,
then the ID number for 10 seconds.
While displaying "RADIO ID" as shown above, Blackout
(page 20) and Demonstration (page 25) become
nonfunctional.

2

To cancel the ID number display, set the channel to
other than “0.”

• You cannot use “O,” “S,”“ I,” or “F” for the ID Number.
• You can check your ID number printed on the label on the package

of your XM Satellite Radio Receiver (TUA-T020XM).

Storing XM Channel Presets

1

Press 

BAND/TEL.

 to select the desired band (XM1,

XM2 or XM3) you want to store.

2

After tuning in the desired channel, press and hold,
for at least 2 seconds, any one of the 

preset

buttons


(1 through 6)

 into which you wish to

store the channel.

The selected station is stored.

3

Repeat the procedure to store up to 5 other
channels onto the same band.

• To use this procedure for other bands, simply select the band

desired and repeat the procedure.

• A total of 18 channels can be stored in the preset memory (6

channels for each band; XM1, XM2 and XM3).

• If you store a channel in a preset memory which already has a

station, the current channel will be cleared and replaced with the
new one.

Receiving Stored XM Channels

1

Press 

BAND/TEL.

 to select the desired band (XM1,

XM2 or XM3).

 XM1 

 XM2 

 XM3 

 XM1

2

Press the channel 

preset button

 that has your

desired satellite channel in memory.

Summary of Contents for CDA-9830

Page 1: ...ALPINE 1 1 800 257 4631 ALPINE ELECTRONICS FRANCE S A R L RCS PONTOISE B 338 101 280 98 Rue de la Belle Etoile Z I Paris Nord Il B P 50016 95945 Roissy Charles de Gaulle Cedex France Phone 01 4863898...

Page 2: ...od le CHA S634 est un changeur 6 disques ultra performant quip des nouvelles fonctions M DAC CD R RW PLAY BACK MP3 PLAY BACK et CD TEXT Le mod le CHA 1214 Ai NET contient 12 disques Le mod le CHM S630...

Page 3: ...nd Setting Adjusting Balance Between Left and Right Fader Between Front and Rear Defeat 14 Adjusting and Storing the built in Crossover 14 Recalling the Stored built in Crossover Settings 14 Equalizer...

Page 4: ...ional 26 Checking the XM Radio ID Number 26 Storing XM Channel Presets 26 Receiving Stored XM Channels 26 Channel Category Search Function 27 Quick Search Function 27 Changing the Display 27 Setting t...

Page 5: ...ned application may result in fire electric shock or other injury DO NOT PLACE HANDS FINGERS OR FOREIGN OBJECTS IN INSERTION SLOTS OR GAPS Doing so may result in personal injury or damage to the produ...

Page 6: ...the Following Do not grip or pull out the disc while it is being pulled back into the player by the automatic reloading mechanism Do not attempt to insert a disc into the unit when the unit power is o...

Page 7: ...t discs correct performance cannot be guaranteed You can play CD Rs CD Recordable CD RWs CD ReWritable which have been recorded only on audio devices You can also play CD Rs CD RWs containing MP3 WMA...

Page 8: ...advance one hour SOURCE POWER DISP B OUT Opening and Closing the Movable Display Press c The movable display will open To close the movable display press c again The movable display will close Do not...

Page 9: ...l For CDA 9830 VOLUME SETTING LEVEL INDICATOR OFF VOLUME SETTING Detaching and Attaching the Front Panel Detaching 1 Turn off the unit power 2 Press Release at the upper left side until the front pane...

Page 10: ...a stereo FM station is tuned in Manual Storing of Station Presets 1 Select the radio band and tune in a desired radio station you wish to store in the preset memory 2 Press and hold for at least 2 sec...

Page 11: ...ng either If the CD does not eject press and hold c for at least 2 seconds with the movable display open Continued c J g f Rotary encoder SEARCH 6 8 9 4 5 Station Title Search Function If the title of...

Page 12: ...lease see Displaying the Title Text page 19 for information about display switching P LIST 03 05 P L F03 T05 Playing back a Playlist You can play playlists you have prepared in advance on the computer...

Page 13: ...X Random Play Press 5 in the play or pause mode The tracks files on the disc will be played back in random sequence To cancel M I X play press 5 again CD mode M I X Track are played back in random se...

Page 14: ...hin 10 seconds to select the desired folder or playlist 3 Press the Rotary encoder to play back the first file in the selected folder or playlist Search mode is canceled by pressing and holding SEARCH...

Page 15: ...660 standard there are some restrictions to remember The maximum nested folder depth is 8 including the root directory File folder names are limited to 30 characters including the extension Valid char...

Page 16: ...nit returns to normal mode Pressing and holding MENU for at least 2 seconds will return to normal mode The setting mode returns to normal mode if no buttons are pressed within 15 seconds Sound Setting...

Page 17: ...ND1 40Hz 60Hz 90Hz BAND2 100Hz 150Hz 200Hz BAND3 500Hz 700Hz 1kHz 2kHz 4kHz 6kHz BAND4 10kHz 12 5kHz 15kHz 5 Turn the Rotary encoder to adjust the level 6 Press SOURCE POWER to select your desired ban...

Page 18: ...istening position 0 5 m 19 11 16 Calculation L 2 25 m 0 5 m 1 75 m 68 7 8 Time correction 1 75 343 2 1000 5 1 ms 2 Speed of sound 343 m s 765 mph at 20 C In other words giving the front left speaker a...

Page 19: ...erence ms 0 0 0 1 0 2 0 3 0 4 0 5 0 6 0 7 0 8 0 9 1 0 1 1 1 2 1 3 1 4 1 5 1 6 1 7 1 8 1 9 2 0 2 1 2 2 2 3 2 4 2 5 2 6 2 7 2 8 2 9 3 0 3 1 3 2 3 3 3 4 3 5 3 6 3 7 3 8 3 9 4 0 4 1 4 2 4 3 4 4 4 5 4 6 4...

Page 20: ...reproduce the music clearly even in cars with a lot of road noise 1 Press MX to select MX ON 2 Press SOURCE POWER to select the source to which you want to apply MX Media Xpander 3 Press and hold MX f...

Page 21: ...tag data is ignored NO DATA will be displayed when an MP3 WMA file contains no ID3 tag WMA tag information 3 CDA 9830 only The recording sampling rate and bit rate of the MP3 WMA file are displayed 4...

Page 22: ...itle 6 Press TITLE to record the title If you cancel while entering a title selected characters are not written You can enter 24 radio station titles and 18 CD titles on this unit If you try to store...

Page 23: ...een completed press MENU to select RETURN The unit returns to normal mode Pressing and holding MENU for at least 2 seconds will return to normal mode To easily recall adjusted and stored contents 1 Pr...

Page 24: ...ress MENU to select RETURN The unit returns to normal mode Pressing and holding MENU for at least 2 seconds will return to normal mode No Memory is displayed if a preset that has not been stored is re...

Page 25: ...cel the download mode If a file is not found by the data search No File is indicated The No File display will automatically disappear if no operation is performed for 5 seconds 4 Turn the Rotary encod...

Page 26: ...ween three settings to suit your own personal sound preferences and usage NORMAL Standard setting HI FI Sound quality priority setting STABLE Noiseless priority setting If you find the sound is very n...

Page 27: ...e display and sound and the CDA 9830 has a demonstration feature only for the sound To quit Demo mode set to DEMO OFF MP3 WMA Playing MP3 WMA Data PLAY MODE CD DA Initial setting PLAY MODE CD DA MP3 T...

Page 28: ...annel number is input SOURCE POWER Preset buttons 1 through 6 BAND TEL f g MENU TITLE SEARCH Rotary encoder 8 9 Checking the XM Radio ID Number You need to provide XM with the unique XM Radio ID numbe...

Page 29: ...his information is not displayed see Setting the Auxiliary Data Field Display on this page 3 CDA 9831 only Refer to the Displaying the External Amplifier Information section page 21 When the Scroll Se...

Page 30: ...all is not disconnected and an ordinary call by the portable telephone is possible If there is an incoming call during operation except an outgoing call or talking operation mode will end and switch t...

Page 31: ...lphabetic Sort List 3 When displaying the Alphabetic Sort List turn the Rotary encoder or press g or f to select the addressee 4 Press J or Rotary encoder to place a call 5 Press BAND TEL to end the c...

Page 32: ...o 12 respectively SOURCE POWER BAND TEL Select buttons 1 through 6 Playing MP3 Files with the CD Changer Optional If you connect a changer compatible with MP3 you can play CD ROMs CD Rs and CD RWs con...

Page 33: ...rack 9 Button Radio mode Pressing this button will select in descending order stations programmed into the radio s presets as shown below 6 5 1 6 CD Changer mode DISC Select DN button Press this butto...

Page 34: ...ctions Blown fuse Check the fuse on the battery lead of the unit replace with the proper value if necessary Internal micro computer malfunctioned due to interference noise etc Press the RESET switch w...

Page 35: ...has not been performed Perform finalization and attempt playback again MP3 WMA MP3 or WMA is not played back Writing error occurred The CD format is not compatible Make sure the CD has been written in...

Page 36: ...re song program title or additional information associated with the channel at that time No action needed Indication for CD Changer CDA 9831 CDA 9830 Protective circuit is activated due to high temper...

Page 37: ...ise Ratio 105 dB Channel Separation 85 dB at 1 kHz PICKUP Wave length 795 nm Laser power CLASS I REMOTE CONTROL Battery Type AAA batteries 2 pcs Width 42 mm 1 21 32 Height 121 mm 4 25 32 Depth 23 mm 2...

Page 38: ...ler where you purchased this product to have the work done USE SPECIFIED ACCESSORY PARTS AND INSTALL THEM SECURELY Be sure to use only the specified accessory parts Use of other than designated parts...

Page 39: ...l other leads of the CDA 9831 CDA 9830 according to details described in the CONNECTlONS section 3 Slide the CDA 9831 CDA 9830 into the dashboard When the unit is in place make sure the locking pins a...

Page 40: ...kers Rear left Blue White Pink Black Red Yellow Black REMOTE TURN ON AUDIO INTERRUPT IN IGNITION BATTERY GND SPEAKER RIGHT FRONT SPEAKER RIGHT REAR SPEAKER LEFT REAR SPEAKER LEFT FRONT Gray Gray Black...

Page 41: ...Right Front Speaker Output Lead Gray Black Right Rear Speaker Output Lead Violet Black Right Rear Speaker Output Lead Violet Left Rear Speaker Output Lead Green Left Rear Speaker Output Lead Green Bla...

Page 42: ...charges Alpine will at its option repair or replace the product with a new or reconditioned product without charge If the repairs are covered by the warranty and if the product was shipped to an Autho...

Reviews: