bearings ref. 53.
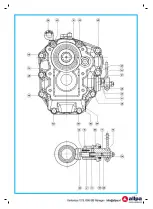
- Shafts assembly on cover: place cover ref. 3 on a horizontal surface with the bearing seat upward and an opening which
allows the protuding part of shaft ref. 12 and the spigot 88 mm to go through.
Place bearing cups ref. 53 in the relevant cover seets. Insert both input and output shafts, which have been previously
assembled, in the relevant positions. Insert pins ref. 47. Assemble the cups of bearings ref. 53 on box ref. 1. Close box
ref. 1 using only three screws to fasten the box to its cover. Insert flange ref. 25 on the output shaft and lock it into place
by means of nut ref. 17 (torque wrench setting 155 Nm). By means of a comparator measure the play end of both input
and output shafts. Bearings will have to be shimmed using as many shims as required in order to build a preloading of
0,03
±
0,02 mm. Shims must be inserted between the bearing cone and the reverse-gear cover seat; therefore, it is
necessary to disassemble once again the output flange, the box, the shafts and the bearing cups located on the cover.
Upon positioning all required shims, assemble the bearing cups on the box again, fasten the previously assembled inter-
mediate shaft ref. 10 to cover ref. 3 by means of screw ref. 55 and of washer ref. 42, 44. Put sealing paste between the
cover plate ref. 3 and the shaft ref. 10.
- Position the input and output shafts and close with box ref. 1 by inserting sealing paste into the connecting surface bet-
ween the box and the cover and by tightening screws ref. 48, 49, 50.
Assemble oil seals ref. 34 and 35. Insert flange ref. 25 on the output shaft spline, insert sealing paste and tighten the lock
nut ref. 17 by a 155 Nm torque wrench setting and lock it.
-
Control unit assembly: upon positioning spring ref. 8 on the stem of guide shoe ref. 20, insert it into the hole of drive
shaft ref. 9. Guide shoe ref. 20 must be positioned with its beveled side upward (behind the v-shaped surface touching
the clutch-unit). Insert the complete control unit (cover ref. 2, shaft ref. 9, spring ref. 8, guide shoe ref. 20) into the
reverse-gear unit box making sure to maintain the guide shoe position described above and to avoid dropping the guide
into the casing. Fasten both bolts ref. 54 and assemble control level ref. 16 fastening it by means of screw ref. 48.
-
Clutch control unit adjustment: with the operating lever ref. 16 in neutral position, turn by hand the output flange ref. 25
and, at the same time, screw the adjusting screw ref. 28 with an alien wrench (4 mm) until the output flange rotation gets
hard on a small arc only. Unscrew of 3/4 of turn the adjusting screw and fix it by locking the nut ref. 56.
7


