background image

17

F232198

© Copyright, Alliance Laundry Systems LLC – DO NOT COPY or TRANSMIT

Maintenance

IMPORTANT: Replace all panels that are removed 
to perform service and maintenance procedures. 
Do not operate the machine with missing guards or 
with broken or missing parts. Do not bypass any 
safety devices.

Daily

IMPORTANT: Door lock should be checked daily 
to ensure proper operation. Also check that all 
safety and instruction stickers are on the machine. 
Any missing or illegible safety instructions stickers 
should be replaced immediately.

Beginning of Day

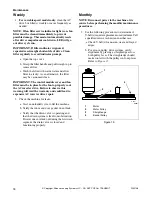
1. Inspect water inlet valve hose connections on the 

back of the machine for leaks.

2. Inspect steam hose connections for leaks (where 

applicable).

3. Check door interlock before starting operation: 

a. Attempt to start the machine with the door 

open. The machine should not start with the 
door open.

b. Close the door without locking it and attempt 

to start the machine. The machine should not 
start with the door unlocked.

c. Close and lock the door, and start a cycle. 

Attempt to open the door while the cycle is in 
progress. The door should not open.

If the door lock and interlock are not functioning 
properly, call a service technician.

End of Day

1. Clean the door gasket of residual detergent and 

all foreign matter.

2. Clean between the door gasket and the door glass 

with a damp cloth.

3. Clean automatic supply dispenser lid and general 

area. Flush dispenser with clean water.

4. Clean the machine’s top, front and side panels 

with mild detergent. Rinse with clean water.

5. Leave loading door open at the end of each day to 

allow moisture to evaporate.

NOTE: Unload the machine promptly 

after each


completed cycle

 to prevent moisture buildup. Leave 

loading door open 

after each completed cycle

 to 

allow moisture to evaporate.

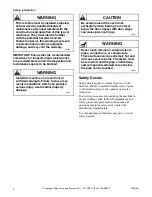
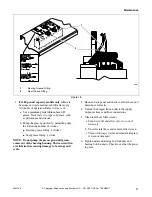
Sharp edges can cause personal injury. 
Wear safety glasses and gloves, use 
proper tools and provide lighting when 
handling sheet metal parts.

W366R1

WARNING

Summary of Contents for F232198R4

Page 1: ...2 Speed and Variable Speed Refer to Page 6 for Model Identification CHM166C Keep These Instructions for Future Reference If this machine changes ownership this manual must accompany machine Part No F232198R4 January 2008 Para bajar una copia de estas instrucciones en español visite www comlaundry com ...

Page 2: ......

Page 3: ...lisher Table of Contents Safety Information 2 Explanation of Safety Messages 2 Important Safety Instructions 2 Safety Decals 4 Operator Safety 5 Introduction 6 Model Identification 6 Nameplate Location 7 Replacement Parts 7 Customer Service 7 Operation 9 Control Panel 9 Display Indicators 11 Operating Instructions Vend Models 13 Operating Instructions OPL Models 15 Maintenance 17 Daily 17 Beginnin...

Page 4: ...stances to the wash water These substances give off vapors that could ignite or explode 5 Under certain conditions hydrogen gas may be produced in a hot water system that has not been used for two weeks or more HYDROGEN GAS IS EXPLOSIVE If the hot water system has not been used for such a period before using a washing machine or combination washer dryer turn on all hot water faucets and let the wa...

Page 5: ... recommended by the manufacturer of the fabric softener or product 19 Keep washer in good condition Bumping or dropping the washer can damage safety features If this occurs have washer checked by a qualified service person 20 If the supply cord is damaged it must be replaced by a special cord or assembly available from the manufacturer or its service agent 21 Be sure water connections have a shut ...

Page 6: ...stalled adjusted and serviced by qualified electrical maintenance personnel familiar with the construction and operation of this type of machinery They must also be familiar with the potential hazards involved Failure to observe this warning may result in personal injury and or equipment damage and may void the warranty SW004 WARNING Install the machine on a level floor of sufficient strength Fail...

Page 7: ... door unlocked c Close and lock the door and start a cycle Attempt to open the door while the cycle is in progress The door should not open If the door lock and interlock are not functioning properly call a service technician 3 Do not attempt to operate the machine if any of the following conditions are present a The door does not remain securely locked during the entire cycle b Excessively high w...

Page 8: ...F UC60AN2 HC20AX2 HC30AYV HC60AX2 SC20AL2 SC30AN2 SC60AC2 SC60AYV UC60ANF HC20AY2 HC40AC2 HC60AXF SC20AN2 SC30AX2 SC60ACF SC80ACV UC60ANV HC20AYV HC40ACV HC60AY2 SC20AX2 SC30AY2 SC60ACV SC80ALV UC80ANV HC25AC2 HC40AL2 HC60AYF SC20AY2 SC30AYV SC60AL2 SC80ANV UC125ANV HC25AL2 HC40AX2 HC60AYV SC20AYV SC40AC2 SC60ALF SC80AXV HC25AX2 HC40AY2 HC80ACV SC25AC2 SC40ACV SC60AN2 SC80AYV HC25AY2 HC40AYV HC80A...

Page 9: ...model number when ordering parts or when seeking technical assistance Figure 1 Replacement Parts If literature or replacement parts are required contact the source from whom the machine was purchased or contact Alliance Laundry Systems at 920 748 3950 for the name and address of the nearest authorized parts distributor Customer Service For technical assistance call 920 748 3121 Ripon Wisconsin CHM...

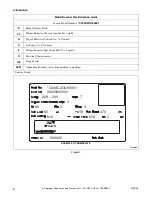
Page 10: ... Number Prefix 40 Washer Extractor Capacity pounds dry weight A Type of Electrical Control A A Control C Actuation C Coin drop 2 Washer Extractor Speed Capability 2 2 speed O Electrical Characteristics U6 Design Series 0001 Option Identification varies from machine to machine CHM2008N CHM2008N C40AC2OU60001 00000000000 500000 208 240 60 3 3 0 18 3 60 N A N A 470 7 EXAMPLE OF NAMEPLATE ...

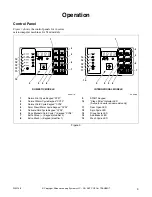
Page 11: ... 10 Clean Filter Indicator LED Active for inverter drive models only 3 Normal Cold Cycle Keypad CY03 4 Perm Press Warm Cycle Keypad CY04 11 Door Open LED 5 Delicate Cold Cycle Keypad CY05 12 Spin Cycle LED 6 Rugs Blankets Cold Cycle Keypad CY06 13 Rinse Cycle LED 7 Extra Rinse Keypad modifier 2 14 Add Bleach LED 8 Extra Wash Keypad modifier 1 15 Wash Cycle LED CHM477R 1 4 5 6 7 8 10 2 9 3 11 12 13...

Page 12: ...n Cycle LED 3 Cycle Keypad 5 13 Rinse Cycle LED 4 Rapid Advance Up Edit 14 Add Bleach LED 5 Cycle Keypad 2 15 Wash Cycle LED 6 Cycle Keypad 4 16 Out of Balance Indicator Dot 7 Cycle Keypad 6 Variable speed only 8 Stop Down Edit 17 High Water Level Indicator Dot 9 START Keypad 18 Medium Water Level Indicator Dot 10 CLEAN FILTER Indicator LED 19 Low Water Level Indicator Dot CHM1766C 1 2 3 4 5 6 1 5...

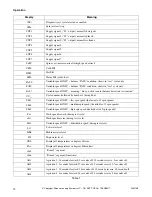
Page 13: ...justified 250 Vend remaining to be satisfied shows on display as left justified Err Card reader error bAL xxxx Balance remaining card system is xxxx xxxx cash balance PULL CArd Remove card from card reader slot Adv Rapid Advance displays during Rapid Advance mode if enabled Erdn Drain count error will display for certain models Erfl Fill error count will display for certain models E Pr The number ...

Page 14: ...le number followed by number 1 through 46 SPn1 Variable speed ONLY low spin speed the lowest of 3 spin speeds SPn2 Variable speed ONLY medium spin speed the middle of 3 spin speeds SPn3 Variable speed ONLY high spin speed the highest of 3 spin speeds For Wash speed forward during test cycle rEv Wash speed reverse during test cycle dISt Variable speed ONLY distribution speed during test cycle LO Lo...

Page 15: ...pacity whenever possible Refer to Figure 6 NOTE Underloading can cause out of balance conditions that can shorten machine life Figure 6 4 Close door and turn handle counterclockwise until button pops out Refer to Figure 7 Figure 7 5 The default wash cycle will display NOTE The default cycle is Normal Cold Domestic Models or Perm Press 60 C International Models for coin models if no cycle is select...

Page 16: ...onsole make payment select the machine and follow central remote pay system instructions 12 Press the desired wash cycle key if it has not already been selected NOTE Once START keypad is pressed the selected wash cycle is locked in and wash cycle will begin 13 Press the START keypad 14 Add bleach if and when prompted display will show bLCH for 45 seconds or until water level is reached signal will...

Page 17: ...acity whenever possible DO NOT OVERLOAD Refer to Figure 11 NOTE Underloading can cause out of balance conditions that can shorten machine life Figure 11 5 Close door and turn handle counterclockwise until button pops out Refer to Figure 12 Figure 12 6 The default wash cycle will display Refer to Figure 13 Figure 13 CHM2027N 1 Rocker Switch 2 Handle U003I 2 1 U005I CHM1766C 1 2 3 4 5 6 To avoid per...

Page 18: ...ermanent Press Light Soil 2 Cotton Terrycloth Light Soil 3 Permanent Press Medium Soil 4 Cotton Terrycloth Medium Soil 5 Permanent Press Heavy Soil 6 Cotton Terrycloth Heavy Soil 11 Table Napery Blends Colors 12 Table Napery Blends Whites 13 VISA Table Napery Colors 14 VISA Table Napery Whites 15 Rags Heavy Soil 16 Reclaim 21 Personals with Bleach 22 Personals No Bleach 23 Delicates Spreads Cold W...

Page 19: ...without locking it and attempt to start the machine The machine should not start with the door unlocked c Close and lock the door and start a cycle Attempt to open the door while the cycle is in progress The door should not open If the door lock and interlock are not functioning properly call a service technician End of Day 1 Clean the door gasket of residual detergent and all foreign matter 2 Cle...

Page 20: ...ol the AC inverter drive Failure to observe this warning will void the warranty and could lead to expensive AC inverter drive repair 2 Check the machine for leaks a Start an unloaded cycle to fill the machine b Verify that door and door gasket do not leak c Verify that the drain valve is operating and that the drain system is free from obstruction If water does not leak out during the first wash s...

Page 21: ... Allowable Distance from Edge 20 09 in 2 mm 25 09 in 2 mm 30 09 in 2 mm 40 09 in 2 mm 50 60 38 in 10 mm Table 3 H039I 1 Deflection 2 Span Length 1 2 Belt Tension Testing for Variable Speed Models Model Belt Belt Span Deflection Range Force Min Max 20 Motor Basket 15 in 381 mm 31 34 in 7 8 8 5 mm 6 3 7 lbs 28 31 N 30 Motor Basket 13 8 in 350 mm 34 41 in 9 3 10 2 mm 7 2 8 lbs 32 36 N 35 40 Motor Bas...

Page 22: ...0 Copyright Alliance Laundry Systems LLC DO NOT COPY or TRANSMIT Figure 17 CHM2009N 1 Motor 2 Belt Tension Spring 3 Adjust Eye Bolt for Belt Tensioning 4 Frame 1 3 2 BELT TENSIONING 40 50 AND 60 VARIABLE SPEED MODELS ONLY 4 ...

Page 23: ...roke NOTE Do not pump the grease gun until grease comes out of the bearing housing This can result in overlubrication causing damage to bearings and seals 3 Remove back panel and check overflow hose and drain hose for leaks 4 Unlock the hinged lid and check the supply dispenser hoses and hose connections 5 Clean inlet hose filter screens a Turn water off and allow valve to cool if necessary b Unsc...

Page 24: ...rning the door handle 3 Tighten anchor bolts if necessary 4 Verify that the drain motor shield is in place and secure if so equipped 5 Check all painted surfaces for exposed metal Matching paint is available from the manufacturer If bare metal is showing paint with primer or solvent based paint If rust appears remove it with sandpaper or by chemical means and then paint the affected area with prim...

Page 25: ...to be rusting the source of the rust may be an iron or steel part not made of stainless steel such as a nail or screw Tip Paint all carbon steel parts with a heavy protective coating Stainless steel fasteners should be used whenever possible Remove discoloration or heat tint from overheating by scouring with a powder or by employing special chemical solutions Do not leave sterilizing solutions on ...

Page 26: ......

Reviews: