background image

SECTION 3

SERVICE

068521

Page 36

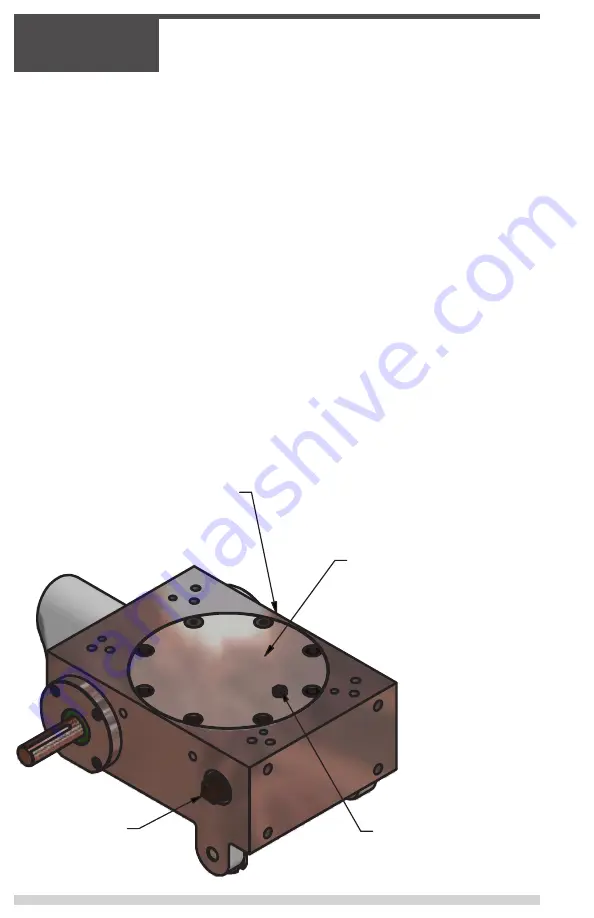
Trowel Gearbox

GEARBOX (015202)

FILL PLUG

FILL PLUG LOCATION

TOP COVER

RELIEF VALVE

Trowel Gearbox Maintenance

Check Oil levels in the gearbox daily (every 8 hours) Add oil if oil level is 
below the check sight glass.

1.  To add oil, tilt gearbox to the side and remove the fill plug. Add oil 

through hole opening. Replace fill plug after proper level has been 
achieved. Fill so that there is oil 1/2 way in the sight glass. Use Allen 
Oil only.

Summary of Contents for 068344

Page 1: ...SAFETY OPERATIONS MANUAL PRO436DF DUAL FUEL WALKBEHIND Manual Part 068350 Revision Language English Original Instructions ...

Page 2: ...4 876B1 6 857 815B2 6 582 153 With other Patents Pending Printed in U S A This manual or a copy of it must be kept with the machine at all times There is a manual storage container located on the machine for your convenience This manual covers the Trowel Parts listed below Kitted Part Numbers Includes Power Unit and Handle Kitted Part Numbers Includes Power Unit and Handle Part No Part No Descript...

Page 3: ...on to product alterations or repairs made to the product without the written approval of Allen Allen specifically excludes from warranty any damage to any trowels resulting from an impact to the rotors 7 Impact damage to gear boxes is not covered under the Allen warranty and is deemed customer abuse 8 Allen will pay shop labor on warranty items at the Allen Shop Labor Rate in existence on the date...

Page 4: ...etail 13 Spark Arrestor Notice Hazard Symbols 14 Operating Safety 15 Engine Safety 16 Service Safety 17 Propane Operating Safety 18 Lifting Safety 20 Transportation Safety 22 Pan Installation Safety Lifting Bridle 23 2 0 Operation 24 Introduction 25 Pre Start Procedure 26 Engine Control 27 Fuel Conversion Gas LP 28 Trowel Controls 30 Operating Instructions 32 3 0 Service 34 Periodic Maintenance Sc...

Page 5: ...068521 Page 5 GENERAL INFORMATION ...

Page 6: ...divided into the following sections Complete any warranty requirements as specified by the engine manufacturer in their instruc tions found inside the manual box located on the back of the riding trowel operator s seat Your engine and clutch is not manufactured by Allen Engineering Corporation Inc and there fore is not covered under Allen Engineering Corporation Inc warranty Your engine manufactur...

Page 7: ... instructions below when ordering parts to ensure prompt and accurate delivery 1 All orders for service parts include the serial number for the machine Shipment will be delayed if this information is not available 2 Include correct description and part number from the PARTS DECALS MANUAL 3 Specify exact shipping instructions including the preferred routing and complete desti nation address 4 DO NO...

Page 8: ...ensure that you receive the correct replacement parts 36P 01 12 001 Year Manufactured Month Manufactured Production Sequence Series Model Unit Identification Plate Location An identification plate listing the model number and the serial number is attached to each unit and is located on the rear lower left side of mainframe Refer to Figure 1 for serial number and model number location This plate sh...

Page 9: ...tures Dimensions L x W x H inch mm 81 5 8x37x41 5 16 guard ring long handle 2073x939x049 Rotor Speed RPM 110 135 Combo Blade Standard Gearbox Standard Duty STD Fixed Guard Rings Standard Steering System Manual Gearbox Rotation Standard Safety Shutdown Switch Centrifugal Fuel Capacity gal L 1 6 6 05 Run Time Approximate hr 2 5 Transmission Type Clutch Drive Belt Type Kevlar Vee 81 5 8 37 41 5 16 ...

Page 10: ...Peak Torque ft lb 2800 RPM 13 9 Bore x Stroke mm 3 1 x 2 3 78 x 58 Compression Ratio 8 8 1 Starter Recoil Dry Weight lbs kg 61 5 27 9 Length inches 15 9 Width inches 16 8 Height inches 16 2 Fuel Capacity US Gallons ltrs 7 Lube Type Engine Oil SAE 10W 30 20W 30W Oil Capacity US Quarts ltrs 1 16 1 1 Air Cleaner Quad Clean Muffler type Standard Ignition System CDI Lube System Splash Oil Sensor Low Le...

Page 11: ...068521 Page 11 SECTION 1 SAFETY SECTION 1 SAFETY ...

Page 12: ... cutting drilling of masonry concrete metal and other materials can generate dust mists and fumes containing chemicals known to cause serious or fatal injury or illness such as respiratory disease cancer birth defects or other reproductive harm SILICOSIS WARNING Grinding cutting drilling of masonry concrete metal and other materials with silica in their composition may give off dust or mists conta...

Page 13: ... that contains useful or important information EMERGENCY is used for the identification of safety equipment first aid or emergency egress locations NOTICE used to convey safety information on labels and signs CAUTION is indicative of a potentially hazardous situation which if not avoided may result in minor or moderate injury WARNING Indicative of a potentially hazardous situ ations that could res...

Page 14: ...It is often required when operating equipment on for ested land to prevent the risk of fires Consult the engine distributor or local authorities and make sure that you comply with regulations regarding spark arrestors Potential hazards associated with the operation of this equip ment will be referenced with hazard symbols which may ap pear throughout this manual in conjunction with safety notes Sp...

Page 15: ... and pulleys create potentially dangerous hazards that can cause serious injuries NEVER leave machine running unattended DO NOT run the machine indoors or in an enclosed area such as a deep trench unless adequate ventilation through such items as exhaust fans or hoses is provided Exhaust gas from the engine contains poisonous carbon monoxide gas exposure to carbon mon oxide can cause loss of consc...

Page 16: ...n cause loss of consciousness and may lead to death DO NOT smoke while operating the machine DO NOT smoke when refueling the engine DO NOT use fuel that is more than 90 days old Use of unmixed improperly mixed or fuel older than 90 days stale fuel may cause hard starting poor performance or severe engine damage and void the product warranty DO NOT refuel a hot or running engine DO NOT refuel the e...

Page 17: ...e or other types of fuels or flammable solvents to clean parts espe cially in enclosed areas Fumes from fuels and solvents can become explosive ALWAYS turn engine off and remove key from machine before performing maintenance or making repairs ALWAYS keep the area around the muffler free of debris such as leaves paper cartons etc A hot muffler could ignite the debris and start a fire ALWAYS replace...

Page 18: ...n vapor air or other contaminants It is essential that these be removed before filling the container and placing it into service Air in the container will cause abnormally high pressure with the result that the pressure relief valve may open Air in the system is also likely to cause lean mix ture making ignition difficult If a cylinder is suspected of being de pressurized or open to the atmosphere...

Page 19: ...pletely filled with liquid propane 80 of the total tank volume is to be considered at ALL times as full EXPANSION MUST BE ALLOWED FOR Propane Buffer tanks are equipped with a fixed liquid level gauge which contacts the liquid level at 80 of container capacity allowing 20 for expansion The top part of this device must be unscrewed counterclockwise so that vapor can escape through the small hole in ...

Page 20: ...forth guidelines which detail the use of Rigging Equipment for Material handling This guideline is found under OSHA Standard Number 1926 251 Please read and follow all guidelines found in this standard Removal from service Synthetic web slings shall be immediately removed from service if any of the following conditions are present Lifting Safety ...

Page 21: ... instructions using a hoist Place slings chains or hooks through each lifting point on the machine Use a sling or chains connected to a central lifting device Ensure that all lifting devices have sufficient weight bearing capacity ALWAYS shutdown engine before transporting Lifting Point ALWAYS DO A THOROUGH INSPECTION OF THE SLINGS CHAINS AND HOOKS BEFORE ATTEMPTING TO LIFT THE MACHINE ...

Page 22: ...erfectly safe for the machine Extra care should be taken when lifting the machine off the ground however Serious damage to the machine or personal injury could be caused by dropping a trowel Remove the auxiliary lifting tube B located on the bottom of the main handle Insert the tube into the socket C located on the opposite side of the gearbox from the handle Make sure that the hole in the tube en...

Page 23: ...as they are sharp 4 Align the pans so that the clips will not be crushed when the machine is lowered back down 5 Slowly lower the machine down onto the pans Make sure the blades are going into the proper gaps Typically the pans can only be installed one way 6 Once the machine is on securely on the ground with the pans underneath remove the lifting bridle from the machine 7 Start the machine and sl...

Page 24: ...SECTION 2 OPERATION 068521 Page 24 SECTION 2 OPERATION ...

Page 25: ... are designed for the floating and finishing of concrete slabs The standard duty gearbox is designed to provide exceptional performance with low maintenance and trouble free use under some of the worst conditions Power is trans ferred from the engine to the gearbox input shaft via a V belt pulley drive system The pulley engages using a clutch see the Parts Section Section 4 of this manual for a br...

Page 26: ...the performance of the trowel If a V belt is defective or worn simply replace the V belt as outlined in the maintenance section of this manual Belt Guard Check Check for damage lose or missing hardware Blade Check Check for worn or damaged blades Check to see if a blade is worn out while the others look new If this is the case there could be a blade pitch issue Replace any worn blades Engine Oil C...

Page 27: ... briskly and smoothly 5 Gasoline Fuel Shut Off Valve OPEN to let fuel flow CLOSE to stop the flow of fuel 6 Choke Lever Used in the starting of a cold engine or in cold weather condi tions The choke enriches the fuel mixture 7 Air Cleaner Prevents dirt and other debris from entering the fuel system Remove wing nut on top of air filter cannister to gain access to filter element 8 Gaseous Fuel Selec...

Page 28: ... to the engine 5 Turn the Engine ON OFF Switch if equipped to the ON position 6 Pull the Recoil Starter pull rope 4 to start the engine 7 Use the Choke Lever 6 as needed To Run Engine On Gasoline 1 Make sure gaseous fuel supply is not connected to the Gaseous Fuel Regulator 12 2 Turn the Gasoline Fuel Shut Off Valve 5 to the ON position 3 Turn the Engine ON OFF Switch if equipped to the ON positio...

Page 29: ...068521 Page 29 SECTION 2 OPERATION PAGE LEFT BLANK INTENTIONALLY ...

Page 30: ...nt of the gearbox 8 Throttle Lever Controls engine speed Returns engine to idle when released 9 Trowel Lifting Point The trowel is equipped with a lifting bail that can be used to safely lift and move the trowel 10 Main Tube When disassembling components inside the tube exercise caution 11 Guard Ring NEVER put hands or feet inside guard ring while the machine is running 12 Engine This trowel uses ...

Page 31: ...068521 Page 31 SECTION 2 OPERATION Trowel Controls 1 5 8 2 3 6 10 12 9 13 15 14 4 11 ...

Page 32: ...d until the desired blade speed is obtained To maneuver the trowel gently lift up on or press down on the main trowel handle To move the machine to the operator s left lift up on the handle to move machine to the right push down on the handle 2 The best method for finishing concrete is to slowly walk backwards with the trowel guiding the trowel from side to side This will cover all foot prints on ...

Page 33: ...ent Different pitch angles are needed as you work the different stages of the concrete When changing or setting pitch angle of trowel blades slow the machine down set the desired degree of pitch on the left side of the machine and then adjust the right side to match To increase the pitch turn the pitch control clockwise use the pitch indicator to adjust pitch equally on both right and left trowel ...

Page 34: ...SECTION 3 SERVICE 068521 Page 34 SECTION 3 SERVICE ...

Page 35: ...of the engine operator s manua was supplied with the machine when it was shipped CHECK LIST ITEM DAILY EVERY 20 HRS EVERY 50 HRS EVERY 100 HRS EVERY 300 HRS Grease towel arms ü Check oil level in gearbox ü Check engine oil level ü Check tighten external hardware ü Check drive belt for wear ü Check valve clearance ü Change engine oil ü Replace engine oil filter ü Grease trowel gearbox ü Replace spa...

Page 36: ...aintenance Check Oil levels in the gearbox daily every 8 hours Add oil if oil level is below the check sight glass 1 To add oil tilt gearbox to the side and remove the fill plug Add oil through hole opening Replace fill plug after proper level has been achieved Fill so that there is oil 1 2 way in the sight glass Use Allen Oil only ...

Page 37: ...ess of the trowel arms The steps below describe the general procedure to remove the trowel arms to be aligned 1 Block up pressure plate A using a wooden block 2 Remove stabilizer ring from spider assembly only on available models 3 Remove blades from trowel arms 4 Loosen hex head cap screw B and remove it and the external star washer from the spider boss 5 Remove trowel arms from spider boss with ...

Page 38: ...SECTION 3 SERVICE 068521 Page 38 Lift Lever Adjustment BLADE TROWEL ARM A PRESSURE PLATE LOCATION SPIDER BOSS B FASTENER HARDWARE REMOVAL ...

Page 39: ...068521 Page 39 SECTION 4 ACCESSORIES SECTION 4 ACCESSORIES ...

Page 40: ...SECTION 4 ACCESSORIES 068521 Page 40 Accessories ...

Page 41: ... 41 SECTION 4 ACCESSORIES Spare Parts Part 071160 Description Filter Fuel For Kohler CH395TF Part 070090 Description Filter Air Pre Cleaner For Kohler CH395TF Part 070089 Description Filter Air For Kohler CH395TF ...

Page 42: ... 300mm away from the machine Keep a perpendicular angle 90 when cleaning over a decal Holding nozzle of a pressure washer at an angle different from 90 may lift the decal from the machine Recommended using a safe cement dissolver BACK SET or sim ilar to remove hardened concrete It is NOT recommended to use chemicals such as Muriatic Acid Hydrochloric Acid Hydrofluoric Acid Sulfuric Acid Phosphoric...

Page 43: ...See below for ways to access the Parts Decals Manual Mobile Device Scan this QR code with a compatible device cellular phone tablet etc Computer Click the link or go to the following website PRO436DF Parts and Decals Manual Mail A physical copy of the manual can also be mailed to you upon request Please con tact Allen Engineering and one will be sent to you Allen Engineering P O Box 819 Paragould ...

Page 44: ...CONNECT WITH US ON P O BOX 819 PARAGOULD AR 72451 USA 800 643 0095 USA ONLY 870 236 7751 FAX 800 643 0097 USA ONLY 870 236 3934 ...

Reviews:

Related manuals for 068344