background image

Rockwell Automation Publication 2080-UM004C-EN-E - March 2015

71

Specifications 

Appendix


A

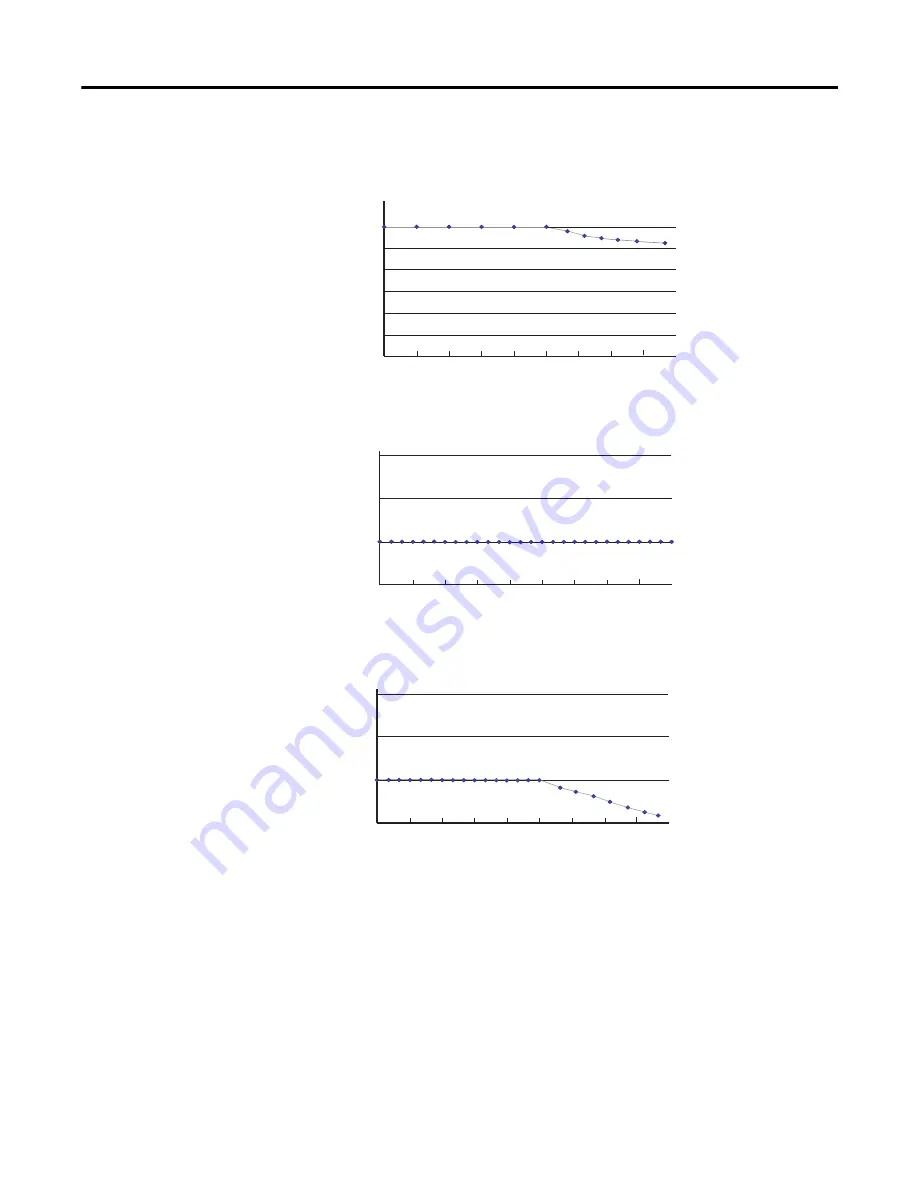
Maximum output voltage – 24V DC operation  

Maximum output currrent per point – 5V DC operation

Maximum output current per point – 24V DC operation  


-20

-10

0

10

20

30

40

50

60

70

0

5

10

15

20

25

30

35

Vo

lts

 (DC

)

Ambient Temperature (°C)

Voltage Derating Based on Temperature

26.4V DC @ 65 °C

-20

-10

0

10

20

30

40

50

60

70

0

0.5

1

1.5

Cur

rent per poin

ts 

(A)

Ambient Temperature (°C)

Current Derating Based on Temperature

-20

-10

0

10

20

30

40

50

60

70

0

0.5

1

1.5

Curre

nt p

er p

oint

(A)

Ambient temperature (°C)

Current derating based on temperature

Summary of Contents for 2080-DNET20

Page 1: ...cro800 Plug in Modules Catalog Numbers 2080 IQ4 2080 IQ4OB4 2080 IQ4OV4 2080 OB4 2080 OV4 2080 OW4I 2080 IF2 2080 IF4 2080 OF2 2080 TC2 2080 RTD2 2080 MEMBAK RTC 2080 TRIMPOT6 2080 SERIALISOL 2080 DNET20 2080 MOT HSC ...

Page 2: ...ect to use of information circuits equipment or software described in this manual Reproduction of the contents of this manual in whole or in part without written permission of Rockwell Automation Inc is prohibited Throughout this manual when necessary we use notes to make you aware of safety considerations Allen Bradley Rockwell Software Rockwell Automation Micro800 Micro820 Micro830 Micro850 Kine...

Page 3: ...on concerning related Rockwell Automation products Resource Description Micro800 Programmable Controller External AC Power Supply Installation Instructions 2080 IN001 Information on mounting and wiring the optional external power supply Micro830 Programmable Controllers Installation Instructions 2080 IN002 Information on mounting and wiring the Micro830 10 point controllers Micro830 Programmable C...

Page 4: ...unting and wiring the Micro800 6 channel trimpot analog input plug in module Micro800 Digital Relay Output Plug in Module Wiring Diagrams 2080 WD010 Information on mounting and wiring the Micro800 digital relay output plug in module Micro800 Digital Input Output and Combination Plug in Modules Wiring Diagrams 2080 WD011 Information on mounting and wiring the Micro800 digital input output and combi...

Page 5: ...ommunication Plug ins 4 RS232 RS485 Isolated Serial Port 2080 SERIALISOL 4 DeviceNet Scanner 2080 DNET20 5 Chapter 2 Install and Wire Your Module Hardware Features 7 Insert Module into Controller 7 Wiring 8 Wiring Considerations and Applications for 2080 TC2 12 Type of CJC Sensor 12 Wire the CJC Thermistor on the 2080 TC2 Module 12 Wiring Considerations and Applications for 2080 RTD2 13 Two wire a...

Page 6: ... Defined Function Blocks 45 RA_DNET_MASTER 45 RA_DNET_NODE_STATUS 46 RA_DNET_LDX_DISCRETE 47 RA_DNET_LDX_ANALOG 48 RA_DNET_LDX_TC_RTD 49 RA_PF_DNET_STANDARD 50 RA_PF_DNET_MULTIDRIVE 51 RA_DNET_OVERLOAD 53 RA_DNET_GENERIC 53 Send Explicit Messages to 2080 DNET20 Plug in Using Micro800 Pass Through 56 Error Codes 57 Use the 2080 DNET20 Plug in 58 Appendix A Specifications Digital Plug in Modules 59 ...

Page 7: ... for 2080 MOT HSC Plug in 93 Setup and Wiring 94 Configuration for UDFB 1 RA_HSCPlugIn 95 Build and Download 96 Execute the Function Block 96 Configuration for UDFB 2 RA_EncoderFDBK 97 Build and Download 98 Execute the Function Block 99 Configuration for HSC UDFB 3 RA_ServoFDBK 100 Build and Download 101 Execute the Function Block 102 Appendix C Error Codes Troubleshooting 105 Error Codes for Micr...

Page 8: ...viii Rockwell Automation Publication 2080 UM004C EN E March 2015 Table of Contents Notes ...

Page 9: ...0 and Micro850 support the following plug in modules Micro800 Plug in Modules Module Type Description 2080 IQ4 Digital 4 point 12 24V DC Sink Source input 2080 IQ4OB4 Digital 8 point Combo 12 24V DC Sink Source input 12 24V DC Source output 2080 IQ4OV4 Digital 8 point Combo 12 24V DC Sink Source input 12 24V DC Sink output 2080 OB4 Digital 4 point 12 24V DC Source output 2080 OV4 Digital 4 point 1...

Page 10: ...TC 1 Specialty Memory backup and high accuracy RTC 2080 TRIMPOT6 Specialty 6 channel trimpot analog input 2080 MOT HSC Specialty High speed counter 2080 DNET20 Communication 20 node DeviceNet scanner 2080 SERIALISOL Communication RS232 485 isolated serial port 1 2080 MEMBAK RTC is not supported on Micro820 controllers Plug in Slots on Micro800 Controllers Controller Number of Plug in Slots Micro81...

Page 11: ... offer 12 bit resolution Specialty Plug ins Non isolated Thermocouple and RTD 2080 TC2 and 2080 RTD2 These non isolated plug in modules help to make temperature control possible when used with PID Proportional Integral Derivative See Non isolated Thermocouple and RTD Plug in Modules 2080 TC2 and 2080 RTD2 on page 19 for more information Memory Backup and High Accuracy RTC 2080 MEMBAK RTC This plug...

Page 12: ... is enhanced to support up to 250 KHz 5V differential line driver for improved noise immunity and provides additional dedicated I O For more information see High Speed Counter 2080 MOT HSC on page 25 Communication Plug ins RS232 RS485 Isolated Serial Port 2080 SERIALISOL The 2080 SERIALISOL plug in supports CIP Serial RS 232 only Modbus RTU RS232 and RS485 and ASCII RS232 and RS485 1 protocols Unl...

Page 13: ...ieldbus network It also provides better performance than using serial and Ethernet EtherNet IP Class 3 communications For more information see the DeviceNet Plug in 2080 DNET20 on page 39 IMPORTANT 2080 SERIALISOL is suitable for communication over longer cable length of up to 1000 m using RS485 with up to 19200 bps baud rate The electrical characteristics of cable used and good wiring practices a...

Page 14: ...6 Rockwell Automation Publication 2080 UM004C EN E March 2015 Chapter 1 Micro800 Plug in Modules Notes ...

Page 15: ...es Hardware Features The plug in modules except for the 2080 MEMBAK RTC can be plugged into any plug in slots on the Micro800 controllers Insert Module into Controller Follow the instructions to insert and secure the plug in module to the controller 45010 terminal block mounting screw hole mounting screw hole 20 0 79 31 5 1 24 62 2 44 Measurements in millimeters inches 45811 Side view Front view 2...

Page 16: ... For longer cable length requirements use the 2085 expansion I O modules instead 1 2 3 4 1 2 3 4 5 6 5 6 Back A B Front Twelve pin Female Terminal Block Pin Designations for 12 Pin Female Terminal Block Modules Pin 2080 IQ4 2080 IQ4OB4 2080 IQ4OV4 2080 OB4 2080 OV4 2080 OW4I 2080 IF2 2080 IF4 2080 TC2 2080 RTD2 I 02 I 02 Not used COM3 COM COM CH0 CH0 I 03 I 03 Not used O 3 Not used VI 2 CH0 CH0 CO...

Page 17: ...idually shielded twisted pair cable or the type recommended by the encoder or sensor manufacturer should be used for the 2080 MOT HSC plug in 2 Sinking Output Sourcing Output wiring for the 2080 MOT HSC plug in is shown below COM RS485 B O COM GND A COM RS232 RTS B COM RS232 CTS Z VO 0 RS232 DCD O CO 0 RS232 RXD A VO 1 RS232 TXD B CO 1 RS485 A Z 1 2 3 4 1 2 3 4 Back Front B A Eight pin female term...

Page 18: ... the cable length may be extended is 15 24 m 50 ft ATTENTION Do not connect to pins A1 and B4 for RS 232 connections This connection will cause damage to the RS 232 485 communication port DTE Device Micro800 RS232 Isolated Serial Port Plug in Module DCE Device Modem and so on 8 Pin 25 Pin 9 Pin B3 TXD TXD 2 3 B2 RXD RXD 3 2 A2 GND GND 7 5 A1 B DCD 8 1 B4 A DTR 20 4 B1 DCD DSR 6 6 A4 CTS CTS 5 8 A3...

Page 19: ...lor Chips dots Red Dot Black Dot Blue Dot White Dot 10 position Plug 5 position Plug D D D D D Linear Plug 10 position Drop Line or DeviceNet Trunk Cable Red White Bare Blue Black DeviceNet Port Pinout V RED CANH WHITE SHIELD CANL BLUE V BLACK 20474 Esc Sel Micro800 controller CompactBlock LDX COMM power supply Component on DeviceNet network PowerFlex Drive 523 via 25 COMM D COMM power supply 1 Kw...

Page 20: ...ected to channels 0 and 1 If the bead is not in proper contact with the screw there will be deviation in readings due to inadequate isothermal compensation Wire the Thermocouple Module and Thermocouple Sensor in the Field Connect the thermocouple sensors directly to the module terminals IMPORTANT CJC Channel Error The CJC channel on 2080 TC2 has a worst case error of 1 2 C 25 C This error does not...

Page 21: ...s of different colors Wires of the same color are shorted and form the compensation leads Measuring resistance between these wires confirms the position of sensing element and compensation elements Compensation elements will always show 0 ohms ATTENTION Direct wiring is the preferred method of wiring for thermocouples 2080 TC2 1 2 3 4 5 6 1 2 3 4 5 6 Red Blue Green Red Blue Process temperature mea...

Page 22: ...RTD Sensor in the Field The RTD sensing element should always be connected between terminals B1 and B2 for channel 1 and A1 and A2 for channel 0 in the module Terminals B3 and A3 should always be shorted to B2 and A2 respectively to complete the constant current loop Mismatch in wiring can cause erroneous over or underrange readings white red Ch0 Ch0 Ch0L white red red green black black white red ...

Page 23: ...controller end It is advisable to use 22 AWG wires to connect the sensors to the module Use sensors dipped in oil filled thermowells for stable and uniform readings Recommended cable type Alpha wire P N 5471C Performance is dependent on the application For better noise immunity cable length should ideally be less than 10 m because the plug ins are non isolated For longer cable length requirements ...

Page 24: ...w wiring applications for the 2080 MOT HSC plug in with Kinetix Servo drives Kinetix 3 in feedback configuration to 2080 MOT HSC Kinetix 300 in feedback configuration to 2080 MOT HSC Micro830 Micro850 QBB 24 pts PTO I O Connector 49 24V_PULS 12 PLUS 14 SIGN 25 24V_SIGN I O Connector 29 AM 30 AM 31 BM 32 BM 49 12 14 25 FEEDBACK A A B B O 00 CM0 CM1 O 03 29 30 31 32 ...

Page 25: ...M004C EN E March 2015 17 Install and Wire Your Module Chapter 2 Micro830 Micro850 QBB 24 pts PTO I O Connector 49 24V_PULS 12 PLUS 14 SIGN 25 24V_SIGN I O Connector 29 AM 30 AM 31 BM 32 BM 1 2 3 4 FEEDBACK A A B B O 00 CM0 CM1 O 03 7 8 9 10 ...

Page 26: ...18 Rockwell Automation Publication 2080 UM004C EN E March 2015 Chapter 2 Install and Wire Your Module Notes ...

Page 27: ...nsor Types and Ranges The module supports B E J K N R S T types of thermocouple sensors The module channels are referred to as Channel 0 Channel 1 and CJC respectively The cold junction compensation is provided by an external NTC thermistor which comes with the module The thermistor has to be fitted to the screw terminals A3 and B3 of the module This CJC is common to channel 0 and 1 thermocouple s...

Page 28: ...onverting temperature data to actual temperature degree RTD Sensor Types and Ranges Each channel provides open circuit all wires short circuit excitation and return wires only and over and under range detection and indication The 2080 RTD2 module supports 11 types of RTD sensors Thermocouple Sensor Types and Temperature Ranges Thermocouple Type Temperature Range C F Accuracy C F ADC Update Rate in...

Page 29: ...or Types and Temperature Ranges RTD Type Temperature Range C F Accuracy C F ADC Update Rate in Hz Accuracy C Min Max 1 0 C 3 0 C PT100 385 200 328 660 1220 150 590 238 1094 150 238 590 1094 3 wire others 4 17 6 25 10 16 7 19 6 33 50 1 0 62 123 242 470 3 0 2 and 3 wire Cu10 1 4 17 6 25 10 16 7 1 0 3 0 19 6 33 50 62 123 242 470 3 0 2 wire others 4 17 6 25 10 16 7 1 0 19 6 33 50 62 123 242 470 3 0 PT...

Page 30: ...report an unknown update rate error in configuration OR Overrange Bit set to indicate overrange on channel input The Channel Temperature Data shows maximum temperature count for individual type of sensor used and the value does not change until overrange error is clear UR Underrange Bit set to indicate the channel input underrange happens The Channel Temperature Data will show minimum temperature ...

Page 31: ...Connected Components Workbench software Data Count Temp C 270 0 10 This equation illustrates how the Connected Components Workbench data count does not use full range of 0 65535 of data word Derive Actual Temperature C From Connected Components Workbench Data Count The following formula shows how to derive temperature Celsius degree from temperature data word in the Connected Components Workbench ...

Page 32: ...24 Rockwell Automation Publication 2080 UM004C EN E March 2015 Appendix 3 Non isolated Thermocouple and RTD Plug in Modules 2080 TC2 and 2080 RTD2 Notes ...

Page 33: ...ou have configured the plug in for Feedback Axis you can also edit the input filter values in the plug in configuration module properties IMPORTANT To configure the plug in module you need to download and use the HSC UDFBs from the Sample Code Library http www rockwellautomation com go scmicro800 From Connected Components Workbench Release 7 0 onwards the sample code is included in the installatio...

Page 34: ...8 ms 500 Hz DC 1 ms 778 Hz DC 0 65 ms 527 Hz DC 0 95 ms 250 Hz DC 2 ms 389 Hz DC 1 3 ms 263 Hz DC 1 9 ms 125 Hz DC 4 ms 195 Hz DC 2 6 ms 131 Hz DC 3 79 ms 62 5 Hz DC 8 ms 97 3 Hz DC 5 2 ms 65 9 Hz DC 7 6 ms 31 25 Hz DC 16 ms 38 8 Hz DC 10 3 ms 32 9 Hz DC 15 2 ms IMPORTANT For low frequency pulses filter times should be set appropriately to avoid extra pulses from a noisy environment For high frequ...

Page 35: ...Counter with external direction 3 Counter with external direction reset and hold 4 Two input counter up and down 5 Two input counter up and down with external reset and hold 6 Quadrature counter phased inputs A and B 7 Quadrature counter phased inputs A and B with external reset and hold 8 Quadrature X4 counter phased inputs A and B 9 Quadrature X4 counter phased inputs A and B with external reset...

Page 36: ...er to increment Pulses on B causes the counter to decrement Pulses may occur at any time Note that pulses can occur very closely that is much faster than plug in scan time that the plug in never notices the change in count In such cases both counts may be ignored the net change being zero anyway In no case shall a pulse be lost See the following diagram INPUT A INPUT B INPUT Z Direction control Co...

Page 37: ...he direction of the rotation The third signal Z occurs once per revolution and is often used as a home reference The module s use of this signal is discussed below in the Z input section INPUT A INPUT B INPUT Z Increment Pulse Input A Count Pulse Input A 1 2 3 2 1 0 0 1 Increment Pulse count up Decrement Pulse count down Incrementing Encoder or Sensor Decrementing Encoder or Sensor Present Count U...

Page 38: ... direction respectively See previous illustration Quadrature X2 Counter The counter increments or decrements on each edge of the A pulse when the signal is in the positive or negative direction respectively See previous illustration Down Counter Pulses on A will cause the down counter Counter 0 Also pulses on B will cause the down counter Counter 1 INPUT A INPUT B INPUT Z Quadrature Encoder A B X1...

Page 39: ...e_n the next input count in the up direction will cause the PresentCount_n to become the MinCountValue_n This action is known as rollover And the CountOverflow_n flag will be set to indicate that a rollover has happened It is reset using the ResetCountOverflow bit Conversely when the PresentCount_n is equal to MinCountValue_n the next input count in the down direction will cause the PresentCount_n...

Page 40: ...n is reset using the ResetCountOverflow_n bit Conversely when the PresentCount_n is equal to MinCountValue_n the next input count in the down direction will activate the CountUnderflow_n bit and the PresentCount_n will remain at MinCountValue_n CountUnderflow_n is reset using the ResetCountUnderflow_n bit IMPORTANT The counts in overflow and underflow will not be accumulated at all That is even if...

Page 41: ...lane as HSC_PULSE_WIDTH_Bn Understanding Rates There are different applications which require rate information but there is no one perfect method for all Generally the user must weigh rate accuracy with the need for new information quickly Broadly there are two different ways to calculate rates and optimize accuracy and speed of the rate of calculation Per Pulse 1 HSC_PULSE_WIDTH_B supported throu...

Page 42: ...e inaccuracy Also the rate may be calculated many times over during the course of one backplane scan time This means that the rate data is obtained at a backplane scan is only that of the very last pair of pulses and disregards the other rate calculations that have happened during that interval This is especially problematic if the pulses during the update time are unevenly spaced the reported rat...

Page 43: ...er setting Maximum Cyclic Rate Errors Update Time Value Scalar Frequency 100 Hz 1 kHz 10 kHz 100 kHz 1 MHz 1 NA NA 20 02 20 02 0 210 10 NA 20 11 2 020 0 210 0 030 100 20 01 2 110 0 220 0 031 0 012 1000 3 010 0 310 0 040 0 013 0 010 10 000 1 210 0 130 0 022 0 011 0 010 IMPORTANT For low frequency pulses filter times should be set appropriately to avoid extra pulses from a noisy environment For high...

Page 44: ...ction block Enable output IDCHeck OUTPUT BOOL TRUE HSC plug in is at selected slot FALSE Wrong plug in or no plug in at selected slot Initialized OUTPUT BOOL TRUE HSC plug in initialization finished and ready to execute FALSE HSCplug in initialization not yet finished Accumulator OUTPUT LINT Accumulator value Rate OUTPUT Real Current pulse rate The rate calculation is based on how many pulses have...

Page 45: ... plug in or no plug in at selected slot Initialized OUTPUT BOOL TRUE Indicates HSC initialization has finished FALSE Indicates HSC initialization has not finished CurrentPos OUTPUT REAL Current position CurrentSpd OUTPUT REAL Current speed Unit user distance per second Accumulator OUTPUT LINT Accumulator value TpPosition OUTPUT REAL Position recorded when the latest touch probe is triggered Direct...

Page 46: ...TrvPerRev INPUT REAL The actual distance travelled when motor turns one revolution Start INPUT BOOL Start counter Stop INPUT BOOL Stop the counter and clear MaxDPos and MaxDSpd value FBENO OUTPUT BOOL Function block enable output IDCheck OUTPUT BOOL TRUE HSC plug in is at selected slot FALSE Wrong plug in or no plug in at selected slot Initialized OUTPUT BOOL TRUE Indicates HSC initialization has ...

Page 47: ...able plug in slots Only one 2080 DNET20 DeviceNet scanner is supported per controller Status Indicators The DeviceNet plug in module supports two standard DeviceNet green and red LED indicators Module status Network status IMPORTANT Rockwell Automation recommends that only one 2080 DNET20 DeviceNet scanner be used for each network trunk line IMPORTANT If the 2080 DNET20 DeviceNet scanner is contro...

Page 48: ...ng firmware update Red Unrecoverable fault A non recoverable fault is detected Network Status Indicator LED state Module Status Description OFF No power or offline There is no network power or device is not operating Flashing Green Idle No valid network connection has been made Green Online The plug in module is operating normally and receiving messages Flashing Red Connection time out One or more...

Page 49: ...ss 2 cable maximum allowable current 4A NEC CECode ON 1 2 3 4 5 7 6 8 Dim A Pos 1 Designate Pin 1 Location 1 3 5 7 9 11 13 15 2 4 6 8 10 12 14 16 CONTACT CONFIGURATION Pos 1 denotes Pin 1 DeviceNet Address MAC_ID Switch Definitions Node Address SW1 Switch Positions 3 4 5 6 7 8 Switch Position Values 32 16 8 4 2 1 0 default OFF OFF OFF OFF OFF OFF 1 OFF OFF OFF OFF OFF ON 2 OFF OFF OFF OFF ON OFF 3...

Page 50: ...evices in the network and add 10 for current surge Recommended power supply is 1606 XLSDNET4 DeviceNet Baud Rate Switch Definitions Baud Rate DR Data Rate SW1 Switch Position 1 2 125k OFF OFF 250k OFF ON 500k default ON OFF Autobaud ON ON IMPORTANT For most applications Rockwell Automation recommends that you use default node and baud rate settings The DeviceNet scanner plug in will be at node 0 a...

Page 51: ...work If grounding at only one location it is recommended that you ground at the center of the network Single Source Power Supply End segment Kwiklink Lite Cable 9 00 8 00 7 00 6 00 5 00 4 00 3 00 2 00 1 00 0 00 0 0 60 197 120 394 180 591 240 787 300 984 360 1181 420 1378 Single Source Power Supply Trunkline Length and Maximum Current Network Length in meter ft Current max Network Length in meter f...

Page 52: ...le 9 00 8 00 7 00 6 00 5 00 4 00 3 00 2 00 1 00 0 00 0 0 40 131 80 262 120 394 160 525 200 656 240 787 280 919 320 1050 360 1181 400 1312 Dual source power supply both ends Kwiklink Lite Cable Network length in meters ft Current max Network length in meters ft Current max 0 0 8 00 1 1 Exceeds NEC CL2 CECode 4A limit 220 722 4 69 20 66 8 00 240 787 4 30 40 131 8 00 260 853 3 97 60 197 8 00 280 919 ...

Page 53: ... To calculate for percentage of loading divide the total voltage calculated from the above formula by 4 65 RA_DNET_MASTER Input and Output Parameters Variable Name Type Data Type Description FBEN INPUT BOOL TRUE To continue reading and writing the scanner status FBEN changed to level Triggered SlotID INPUT UINT Plug in slot number 1 5 Run INPUT BOOL TRUE Set the scanner to RUN mode FALSE Scanner i...

Page 54: ...ActiveNodes OUTPUT USINT Number of slave nodes in the network Scanlist0_62 OUTPUT LWORD Details on active node table bit 0 62 Bit 0 Represent Node 0 Bit 62 Represent Node 62 Sequence of Operation RA_DNET_MASTER Sequence Run Autoscan Description 1 False False Reinitializes scan list from the plug in scanner if FBEN TRUE 2 False True Triggers autoscan to scan the network after clearing scan list 3 F...

Page 55: ...meters Variable Name Type Data Type Description FBEN INPUT BOOL Function block enable input TRUE to enable the function block SlotID INPUT UINT Plug in slot number 1 5 NodeID INPUT USINT Node address of the digital Compact I O slave node Module1 INPUT STRING Base module I O configuration INPUT X OUTPUT Channels For example 16X0 16 input 0 output is physically present as base module Valid String 32...

Page 56: ...ta from base module Module 1 DI_Module2 OUTPUT UDINT Input data from expansion module 1 Module 2 DI_Module3 OUTPUT UDINT Input data from expansion module 2 Module 3 DI_Module4 OUTPUT UDINT Input data from expansion module 3 Module 4 RA_DNET_LDX_ANALOG Input and Output Parameters Variable Name Type Data Type Description FBEN INPUT BOOL Function block enable input TRUE to enable the function SlotID ...

Page 57: ... Channel 2 value This value is valid only if Module1 4X0 AI_CH3 OUTPUT WORD Analog Input Channel 3 Value This value is valid only if Module1 4X0 StatusCH0_3 OUTPUT WORD Analog input channel 0 3 status DI_Module2 OUTPUT UINT Digital Expansion Module 1 Input Data Applicable only if catalog is with digital inputs DI_Module3 OUTPUT UINT Digital Expansion Module 2 Input Data Applicable only if catalog ...

Page 58: ...A_PF_DNET_STANDARD Input and Output Parameters Variable Name Type Data Type Description FBEN INPUT BOOL Function block enable input TRUE to enable the function PlcPortNum INPUT UINT Plug in slot number 1 5 for plug in slots DriveNodeNum INPUT USINT Slave node address for PowerFlex drive Start INPUT BOOL TRUE to start PowerFlex drive Stop INPUT BOOL TRUE to stop PowerFlex drive ReferenceSpeed INPUT...

Page 59: ...PowerFlex drive PF_Active OUTPUT BOOL Active bit from PowerFlex drive PF_Alarm OUTPUT BOOL Alarm bit from PowerFlex drive PF_Fault OUTPUT BOOL Fault bit from PowerFlex drive PF_AltReference OUTPUT BOOL Alt Reference bit from PowerFlex drive IMPORTANT Ensure that your PowerFlex drives settings are correct For basic setup configuration see the PowerFlex drives user manuals in the Rockwell Automation...

Page 60: ...og in PowerFlex drive Each element of the array corresponds to each drive for example Reference Jog 1 for Drive 1 and Jog 5 for Drive5 ClearFault INPUT BOOL 1 5 TRUE to clear fault in PowerFlex drive Each element of the array corresponds to each drive for example ClearFault 1 for Drive 1 and ClearFault 5 for Drive5 Fwd_Rev INPUT BOOL 1 5 TRUE to configure PowerFlex drive for forward motion FALSE t...

Page 61: ...ves user manuals in the Rockwell Automation Literature Library RA_DNET_OVERLOAD Input and Output Parameters Variable Name Type Data Type Description FBEN INPUT BOOL Function block enable input TRUE to enable the function SlotID INPUT UINT Plug in slot number 1 5 for plug in slots NodeID INPUT USINT DeviceNet node address of the slave node OutA INPUT BOOL TRUE to turn on Output A TripReset INPUT BO...

Page 62: ...in slot number 1 5 for plug in slots NodeID INPUT USINT Node address of slave node CnxnNumber INPUT USINT Connection number values 1 2 3 4 5 MsgLength INPUT USINT Specifies the size of the CIP message in the transaction block CIPService INPUT UINT CIP service code CIPClass INPUT UINT CIP Class code valid values 0 65535 CIPInstance INPUT UINT CIP instance valid values 0 65535 CIPAttribute INPUT UIN...

Page 63: ...ntents 0 Status 1 Transaction ID 2 Size 3 Reserved 4 MAC ID 5 Service 6 7 Class 8 9 Instance 10 115 Service Data 106 Bytes Explicit Message Response Format Byte Offset Contents 0 Status 1 Transaction ID 2 Size 3 Reserved 4 MAC ID 5 Service Byte Offset Contents Request Data 0 Status Can be read from UDFB status 6 115 ServiceData Can be read from UDFB response data Response data shows CIP error Code...

Page 64: ...ve node through the plug in the target path would be 1 3 2 40 Note that the number 1 refers to the Virtual backplane port number and 2 refers to the 2080 DNET20 plug in s DeviceNet port number These are fixed values The slot number starts from 1 up to the maximum number of slots physically present in the controller When the controller pass through feature is used in the following example Micro850 ...

Page 65: ... firmware revision 2 011 or higher DeviceNet plug in Error Codes and Descriptions ErrorID Description 0 No errors 1 Node number not in scanlist 65 AutoScan active 70 Scanner failed DUP MAC check 71 Illegal value in scanlist 72 Device stopped communicating 73 Device does not match scanlist 74 Scanner has detected data overrun 75 No network traffic detected 76 No network traffic detected for scanner...

Page 66: ...ET20 Plug in on page 88 90 User has disabled scanner 91 Bus Off detected on scanner 92 No network power detected 93 CRC failure detected on one or more configuration blocks 95 Scanner application program flash is being updated 96 Port is in test mode 97 Scanner is halted by user 98 ESC overflow divide or other processor error 99 Scanner watchdog has timed out DeviceNet plug in Error Codes and Desc...

Page 67: ... output modules 50V continuous Basic Insulation Type Inputs to Outputs I Os to Backplane Type tested for 60 s 720 V DC I Os to Backplane Wire size 1 3 0 2 mm2 16 24 AWG solid or stranded copper wire rated 90 C 194 F or greater insulation max Wire category 2 on signal ports 2 on power ports North American temp code T4 Input Specifications 2080 IQ4 2080 IQ4OV4 2080 IQ4OB4 Attribute Value DC on state...

Page 68: ...erature surrounding air max 65 C 149 F Temperature non operating IEC60068 2 1 Test Ad Operating Cold IEC60068 2 2 Test Bd Operating Dry Heat IEC 60068 2 14 Test Nb Operating Thermal Shock 40 85 C 40 185 F Relative humidity IEC 60068 2 30 Test Db Unpackaged Damp Heat 5 95 noncondensing Vibration IEC 60068 2 6 Test Fc Operating 2 g 10 500 Hz Shock operating IEC 60068 2 27 Test Ea Unpackaged Shock DI...

Page 69: ...nity EN 61000 6 4 Industrial Emissions EN 61131 2 Programmable Controllers Clause 8 Zone A B C Tick Australian Radiocommunications Act compliant with AS NZS CISPR 11 Industrial Emissions KC Korean Registration of Broadcasting and Communications Equipment compliant with Article 58 2 of Radio Waves Act Clause 3 General Specifications 2080 OW4I Digital Relay Output Plug in Module Attribute Value Moun...

Page 70: ...lay time max 10 ms ON or OFF Relay Contact Ratings 0 35 power factor 2080 OW4I Maximum Volts Amperes Amperes Continuous Volt Amperes Make Break Make Break 120V AC 15 A 1 5 A 2 0 A 1800 VA 180 VA 240V AC 7 5 A 0 75 A 24V DC 1 0 A 28 VA 125V DC 0 22 A Environmental Specifications 2080 OW4I Attribute Value Temperature operating IEC60068 2 1 Test Ad Operating Cold IEC60068 2 2 Test Bd Operating Dry He...

Page 71: ...ked 1 1 See the Product Certification link at http www rockwellautomation com products certification for Declarations of Conformity Certificates and other certification details Value c UL us UL Listed Industrial Control Equipment certified for US and Canada See UL File E322657 UL Listed for Class I Division 2 Group A B C D Hazardous Locations certified for U S and Canada See UL File E334470 CE Eur...

Page 72: ...range 20 65 C 4 149 F Voltage 1 5 Current 2 0 Input channel configuration Through configuration software or the user program Field input calibration Not required Update time 180 ms per enabled channel Input group to bus isolation No isolation Channel to channel isloation Non isolation Temperature operating IEC 60068 2 1 Test Ad Operating Cold IEC 60068 2 2 Test Bd Operating Dry Heat IEC 60068 2 14...

Page 73: ...rature operating IEC 60068 2 1 Test Ad Operating Cold IEC 60068 2 2 Test Bd Operating Dry Heat IEC 60068 2 14 Test Nb Operating Thermal Shock 20 65 C 4 149 F Temperature non operating IEC 60068 2 1 Test Ab Unpackaged Nonoperating Cold IEC 60068 2 2 Test Bb Unpackaged Nonoperating Dry Heat IEC 60068 2 14 Test Na Unpackaged Nonoperating Thermal Shock 40 85 C 40 185 F Relative humidity IEC 60068 2 30...

Page 74: ... Tick Australian Radiocommunications Act compliant with AS NZS CISPR 11 Industrial Emissions Specifications 2080 MEMBAK RTC Attribute Value Resolution READ_RTC 1 s Accuracy 5 sec month 25 C 9 sec month 20 65 C Power off Battery 3 5 years from date of manufacture 25 65 C 2 5 years from date of manufacture 0 C Temperature operating IEC 60068 2 1 Test Ab Unpackaged Nonoperating Cold IEC 60068 2 2 Tes...

Page 75: ...onformity Certificates and other certification details Value c UL us UL Listed Industrial Control Equipment certified for US and Canada See UL File E322657 UL Listed for Class I Division 2 Group A B C D Hazardous Locations certified for U S and Canada See UL File E334470 CE European Union 2004 108 EC EMC Directive compliant with EN 61326 1 Meas Control Lab Industrial Requirements EN 61000 6 2 Indu...

Page 76: ...68 2 2 Test Bd Operating Dry Heat IEC 60068 2 14 Test Nb Operating Thermal Shock 40 85 C 40 185 F North American temp code T4 Certifications 2080 TC2 2080 RTD2 Certification when product is marked 1 1 See the Product Certification link at http www rockwellautomation com products certification for Declarations of Conformity Certificates and other certification details Value c UL us UL Listed Indust...

Page 77: ...or 60s 720V DC Inputs Outputs to Backplane Wiring Category 1 1 Use this Conductor Category information for planning conductor routing Refer to Industrial Automation Wiring and Grounding Guidelines publication 1770 4 1 2 on signal ports North American Temp Code T4 Input Specifications 2080 MOT HSC Attribute Value Number of inputs 1 Quadrature ABZ differential input Maximum count 48 bits Input volta...

Page 78: ... Value Number of outputs 16 1 physical output 15 virtual Output voltage range 5 30V DC Output on state current max 0 5 A Output on state current min 1 mA On state voltage drop max 0 5V DC Off state leakage current max 0 5 mA Turn ON time max 2 ms Turn OFF time max 2 ms Reverse polarity protection None Input A Input B Phase separation 20 10 0 10 20 30 40 50 60 70 0 5 10 15 20 25 30 35 Volts DC Ambi...

Page 79: ...per point 24V DC operation 20 10 0 10 20 30 40 50 60 70 0 5 10 15 20 25 30 35 Volts DC Ambient Temperature C Voltage Derating Based on Temperature 26 4V DC 65 C 20 10 0 10 20 30 40 50 60 70 0 0 5 1 1 5 Current per points A Ambient Temperature C Current Derating Based on Temperature 20 10 0 10 20 30 40 50 60 70 0 0 5 1 1 5 Current per points A Ambient temperature C Current derating based on tempera...

Page 80: ...t Db Unpackaged Damp Heat 5 95 noncondensing Vibration IEC 60068 2 6 Test Fc Operating 2 g 10 500 Hz Shock operating IEC 60068 2 27 Test Ea Unpackaged Shock 25 g Shock nonoperating IEC 60068 2 27 Test Ea Unpackaged Shock 25 g 35 g PANEL mount Emissions CISPR 11 IEC 61000 6 4 Class A ESD immunity IEC 61000 4 2 6 kV contact discharges 8 kV air discharges Radiated RF immunity IEC 61000 4 3 10V m with...

Page 81: ...ink at http www rockwellautomation com products certification for Declarations of Conformity Certificates and other certification details Specifications 2080 DNET20 Attribute Value Screw torque See Torque Specifications for the 2080 DNET20 Plug in Module on page 74 Dimensions HxWxD 62 x 31 5 x 20 mm 2 44 x 1 24 x 0 78 in Weight 35 g DeviceNet communication rate max 125 Kbps 420 m 1378 ft 250 Kbps ...

Page 82: ...ons 2080 DNET20 Attribute Value Temperature operating IEC 60068 2 1 Test Ad Operating Cold IEC 60068 2 2 Test Bd Operating Dry Heat IEC 60068 2 14 Test Nb Operating Thermal Shock 20 65 C 4 149 F Temperature surrounding air max 65 C 149 F Temperature nonoperating IEC60068 2 1 Test Ad Operating Cold IEC60068 2 2 Test Bd Operating Dry Heat IEC 60068 2 14 Test Nb Operating Thermal Shock 40 85 C 40 185...

Page 83: ...n power ports 2 kV 5 kHz on communication ports Surge transient immunity IEC 61000 4 5 1 kV line line DM and 2 kV line earth CM on power ports 2 kV line earth CM on communication ports Conducted RF immunity IEC 61000 4 6 10V rms with 1 kHz sine wave 80 AM from 150 kHz 80 MHz Environmental Specifications 2080 DNET20 Attribute Value ...

Page 84: ... ODVA conformance tested to DeviceNet specifications 1 See the Product Certification link at http www rockwellautomation com products certification for Declarations of Conformity Certificates and other certification details General and Environmental Specifications 2080 SERIALISOL Attribute Value Mounting torque 0 2 Nm 1 48 lb in Terminal screw torque 0 22 0 25 Nm 1 95 2 21 lb in using a 2 5 mm 0 1...

Page 85: ...European Union 2004 108 EC EMC Directive compliant with EN 61326 1 Meas Control Lab Industrial Requirements EN 61000 6 2 Industrial Immunity EN 61000 6 4 Industrial Emissions EN 61131 2 Programmable Controllers Clause 8 Zone A B European Union 2006 95 EC LVD compliant with EN 61131 2 Programmable Controllers Clause 11 C Tick Australian Radiocommunications Act compliant with AS NZS CISPR 11 Industr...

Page 86: ...78 Rockwell Automation Publication 2080 UM004C EN E March 2015 Appendix A Specifications Notes ...

Page 87: ... Connected Components Workbench software and open your Micro800 project On the Project Organizer pane right click the project name and select Open Topic Page Add and Configure Plug ins in Connected Components Workbench 79 Browse Your 2080 DNET20 Plug in Using RSLinx 81 Flash Upgrade Your 2080 DNET20 Plug in Firmware 84 Quickstart Project for 2080 DNET20 Plug in 88 Quickstart Projects for 2080 MOT ...

Page 88: ...0 UM004C EN E March 2015 Appendix B Quickstart The Controller Properties page appears 2 To add a Micro800 plug in you can do any of the following Right click the plug in slot you would like to configure and choose the plug in as shown below ...

Page 89: ...u can use to browse for your 2080 DNET20 plug in using RSLinx The first method is browsing directly to the plug in through the DeviceNet network The second method is browsing through a Micro820 Micro830 Micro850 controller using the pass through feature This allows you to upgrade the firmware of the plug in IMPORTANT To use the controller pass through feature the following firmware revisions are r...

Page 90: ...Net network This requires an additional device to connect the computer to the DeviceNet network For example you can use the 1788 EN2DN or 1784 U2DN devices For instructions on connecting the plug in to the DeviceNet network see Setup and Wiring on page 89 Browsing the 2080 DNET20 plug in through the DeviceNet network Right click on the plug in and select Properties to view the Device properties ...

Page 91: ...g in from the controller backplane through EtherNet IP Browsing the 2080 DNET20 plug in from the controller backplane through USB IMPORTANT To use the controller pass through feature the following firmware revisions are required Micro820 Micro830 Micro850 controller firmware revision 8 011 or higher 2080 DNET20 plug in firmware revision 2 011 or higher ...

Page 92: ...art will show you how to flash update the firmware in a 2080 DNET20 plug in using ControlFLASH ControlFLASH is installed or updated when Connected Components Workbench software is installed on your computer It is recommended that the controller is in Program mode and the plug in is in Idle mode when performing the upgrade 1 Check the firmware revision of the plug in To do this check the Device Pro...

Page 93: ...Rockwell Automation Publication 2080 UM004C EN E March 2015 85 Quickstart Appendix B 2 Launch ControlFLASH and click Next 3 In the Catalog Number dialog select the 2080 DNET20 plug in and click Next ...

Page 94: ...r dialog appears select the 2080 DNET20 plug in and click OK 5 Select the firmware revision to flash and click Next IMPORTANT To upgrade from firmware revision 1 012 to 2 011 the DeviceNet network should be used From revision 2 011 onwards you can upgrade the firmware using the controller pass through feature ...

Page 95: ...mation Publication 2080 UM004C EN E March 2015 87 Quickstart Appendix B 6 Verify your selection and click Finish 7 Click Yes to continue 8 Click OK to begin the upgrade process A dialog showing the progress appears ...

Page 96: ...roject for 2080 DNET20 Plug in Using your 2080 DNET20 plug in module and user defined function blocks in Connected Components Workbench the following quickstart project shows you how to turn on all the outputs of a CompactBlock LDX module connected in Node 3 IMPORTANT Quickstart Prerequisite For the following quickstart projects you first need first need to download the DNET UDFBs and sample proje...

Page 97: ...g in slot in your Micro800 controller 2 Next wire your 2080 DNET20 plug in following the diagram shown below Color Chips dots Red Dot Black Dot Blue Dot White Dot 10 position Plug 5 position Plug D D D D D Linear Plug 10 position Drop Line or DeviceNet Trunk Cable Red White Bare Blue Black DeviceNet Port Pinout V RED CANH WHITE SHIELD CANL BLUE V BLACK 20474 ...

Page 98: ...nloaded from the Sample Code Library 2 Import the following DNET UDFBs into your project RA_DNET_MASTER RA_DNET_LDX_DISCRETE RA_PF_DNET_STANDARD See User Defined Function Blocks on page 45 for information on input and output parameters for these UDFBs WARNING Do not change the configuration when the Controller is in RUN mode Esc Sel Micro800 controller CompactBlock LDX Component on DeviceNet Netwo...

Page 99: ...tomation Publication 2080 UM004C EN E March 2015 91 Quickstart Appendix B 3 Configure the RA_DNET_MASTER UDFB as shown 4 Configure the PowerFlex UDFB as shown that is set the node address plug in slot ID and so on ...

Page 100: ...tion 2080 UM004C EN E March 2015 Appendix B Quickstart 5 Configure the CompactBlock LDX UDFB as shown that is set the node address plug in slot ID Module1 Module4 Build and Download Build and download the project into the controller ...

Page 101: ...start projects will show you how to write and use three user defined function blocks to configure and use your Micro800 High Speed Counter plug in IMPORTANT It is recommended that when Autoscan is running for the nodes in range or for the connection to be established the nodes should be idle without any pre occupied connections requests IMPORTANT Quickstart Prerequisite For the following quickstar...

Page 102: ...er 2 Wire your plug in to your controller as shown in the following diagram 1 2 3 4 1 2 3 4 Back Front View into terminal block Pin A1 0 Pin B1 0 Pin A2 A Pin B2 A Pin A3 B Pin B3 B Pin A4 Z Pin B4 Z B A 0 A B Z A B Z 0 DC DC CR CR 0 A B Z A B Z 0 DC DC Sinking Output Wiring Sourcing Output Wiring NOTE Output functionality is not currently supported and is dependent on availability of UDFB support...

Page 103: ...lse frequency Input and Output Parameters Parameter Type Data Type Description FBEN INPUT BOOL Function block Enable input SlotID INPUT UINT Plug in slot number Slot ID 1 5 starting with the far left slot 1 NoiseFilter INPUT USINT 00 No filter 01 250 kHz 02 200 kHz 03 80 kHz 04 40 kHz 05 13 3 kHz 06 10 kHz 07 4 kHz 08 2 kHz 09 1 kHz 10 500 Hz 11 250 Hz 12 125 Hz 13 63 5 Hz 14 31 25 Hz HSCMode INPU...

Page 104: ...if the user wants to know the positioning information the user needs to do the following steps to make sure position information is in sync Initialize the RA_HSCPlugIn function block Start the counting process when neccessary User can stop pause the process by giving a rising edge of Stop If you want to disable the function block set Stop to true first Initialized OUTPUT BOOL TRUE HSC plug in init...

Page 105: ...nts Workbench and open the HSC project you have downloaded from the Sample Code Library 2 Import the downloaded RA_EncoderFDBK into this project Note that the UDFB comes with the following input and output variables NOTE This UDFB will get the positioning information of a motion axis based on pulses counted from the encoder External encoder Differential Open Collector type Encoder Feedback Input a...

Page 106: ...hen motor turns one revolution Start INPUT BOOL Start counter Stop INPUT BOOL Stop the counter and clear MaxDPos and MaxDSpd value FBENO OUTPUT BOOL Function block enable output IDCheck OUTPUT BOOL TRUE HSC plug in is at selected slot FALSE Wrong plug in or no plug in at selected slot Initialized OUTPUT BOOL TRUE Indicates HSC initialization has finished FALSE Indicates HSC initialization has not ...

Page 107: ...ck process Note that if you want to know the positioning information you need to do the following to make sure position information is in sync a Initialize the RA_FDBKAxis function block b Home the PTO axis to be monitored c Once home is done start the feedback process You can stop pause the process and clear the MaxDPos and MaxDSpd by given a rising edge of Stop To disable the function block you ...

Page 108: ...ded from the Sample Code Library 2 Import the RA_ServoFDBK UDFB into this project Note that the UDFB comes with the following input and output variables NOTE This UDFB gets positioning information of a PTO axis that is controlled by a Micro800 controller with HSC plug in installed Input and Output Parameters Parameter Type Data Type Description FBEN INPUT BOOL Function block Enable input SlotID IN...

Page 109: ...hen motor turns one revolution Start INPUT BOOL Start counter Stop INPUT BOOL Stop the counter and clear MaxDPos and MaxDSpd value FBENO OUTPUT BOOL Function block enable output IDCheck OUTPUT BOOL TRUE HSC plug in is at selected slot FALSE Wrong plug in or no plug in at selected slot Initialized OUTPUT BOOL TRUE Indicates HSC initialization has finished FALSE Indicates HSC initialization has not ...

Page 110: ... note that if you want to get positioning information you need to do following steps to ensure that position information is in sync a Initialize the RA_FDBKAxis function block b Home the PTO axis to be monitored c Once home is done start the feedback process You can stop pause the process and clear the MaxDPos and MaxDSpd by giving a rising edge of Stop If you want to disable the function block yo...

Page 111: ...l Automation Publication 2080 UM004C EN E March 2015 103 Quickstart Appendix B IF FBEN is false then all outputs are cleared and accumulator is cleared When FBEN goes true again the HSC will be re initialized ...

Page 112: ...104 Rockwell Automation Publication 2080 UM004C EN E March 2015 Appendix B Quickstart Notes ...

Page 113: ...s encountered an error during operation Perform one of the following Check the condition and operation of the plug in I O module Cycle power to the Micro800 controller 0xF0Bz The plug in I O module configuration does not match the actual I O configuration detected Perform one of the following Correct the plug in I O module configuration in the user program to match that of the actual hardware conf...

Page 114: ...lling Rockwell Automation for Assistance If you need to contact Rockwell Automation or local distributor for assistance it is helpful to obtain the following prior to calling controller type series letter revision letter and firmware FRN number of the controller controller indicator status ...

Page 115: ...tifications 61 specifications 59 wiring 8 2080 OW4I 3 certifications 63 relay contact ratings 62 specifications 61 wiring 8 2080 RTD2 3 19 20 certification 66 67 68 certifications 68 data maps 22 specifications 67 wiring 8 2080 SERIALISOL 4 certifications 77 specifications 76 wiring 9 2080 TC2 3 12 19 certifications 66 67 68 data maps 22 features 19 specifications 67 thermocouple sensor types and ...

Page 116: ... analog I O plug in module 3 relay output plug in module 3 RS232 RS485 isolated serial port plug in module 4 O open circuit 22 open circuit 19 overrange 19 21 22 P plug in modules 7 R Removal and Insertion Under Power 19 RS 232 cable 10 RTD 19 23 sensor types 20 21 S specifications analog plug in modules 64 communication plug in modules 73 specialty plug in modules 66 system overrange bit SOR 22 s...

Page 117: ...Rockwell Automation Publication 2080 UM004C EN E March 2015 109 ...

Page 118: ...oblem within the first 24 hours of installation review the information that is contained in this manual You can contact Customer Support for initial help in getting your product up and running New Product Satisfaction Return Rockwell Automation tests all of its products to ensure that they are fully operational when shipped from the manufacturing facility However if your product is not functioning...

Reviews: