background image

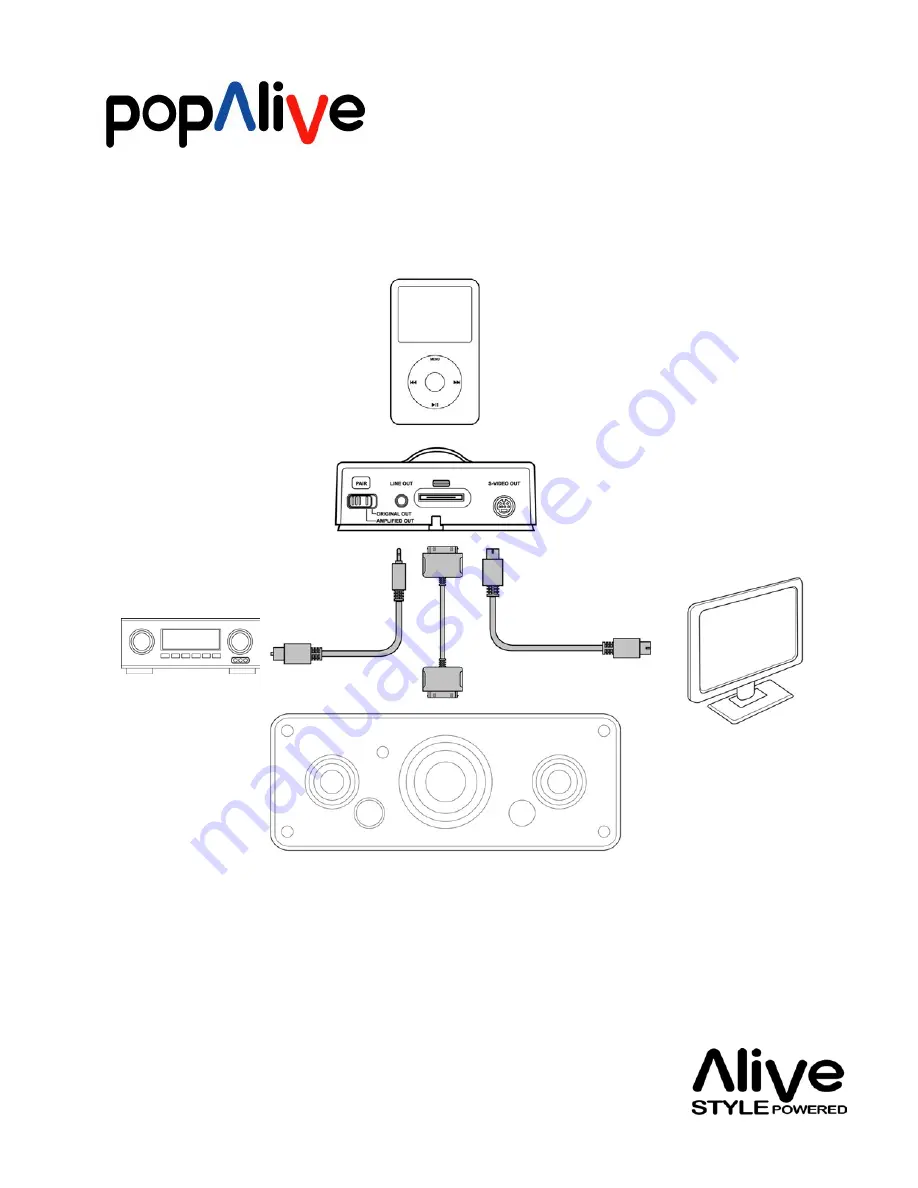
* Apple iPod, speakers, amplifier, video system, S- video cable & 
audio cables are sold separately.

iPod

Docking

Station

30-pin iPod

connector cable

Speakers or Amplifier with 30-pin iPod connector

Video System

Speakers 

or 

Amplifier 

with 

Audio-In 

Connectivity

*  Images are not to scale

S-Video cable

Stereo

Audio cable

Summary of Contents for Popalive

Page 1: ...Quick Start Guide Limited Warranty Statement Apple iPod sold separately REMOTE DOCK...

Page 2: ...Using the controls Popalive Remote Front view Bottom view Rear view Images are not to scale...

Page 3: ...Top view Using the controls Popalive Dock Images are not to scale Rear view...

Page 4: ...Bottom view Using the controls Popalive Dock Images are not to scale...

Page 5: ...ble audio cables are sold separately iPod Docking Station 30 pin iPod connector cable Speakers or Amplifier with 30 pin iPod connector Video System Speakers or Amplifier with Audio In Connectivity Ima...

Page 6: ...ds X 6 Dock adaptor Popalive Dock Popalive Remote Cable Apple iPod is sold separately Packing List Images are not to scale Fifth Gen iPod 60 80Gb Fifth Gen iPod 30GB iPod nano 1 2 4GB iPod with color...

Page 7: ...the Popalive Dock The recommended first charging time for Popalive Remote is 12 hours Note The low battery indicator on the Popalive Remote display will appear when the battery level is very low 2 Pa...

Page 8: ...ive Dock to a stereo or speakers with 30 pin iPod connector using the cable that came with your Popalive Dock to play music from your iPod and charge the battery i Connect the female side of the cable...

Page 9: ...able to play music from your iPod iii Control playback from a distance using the Popalive Remote 6 Select Amplifier Mode Important i Amplified out the amplifier of Popalive Dock will increase the ampl...

Page 10: ...een no playback progress ratings photos and lyrics information will be shown 8 Playing video photo on a TV or other video device i Connect Popalive Dock to a TV or other video device using a S video C...

Page 11: ...tion Important i Press Select button and choose Eject before remove your iPod from Popalive Dock ii Press Menu Center button both at the same time to reset your iPod when it hangs after use 10 Please...

Page 12: ...enu item o Press Select button Select Preference and Language o Press Select button Select Preference and Backlight timeout o Press Select button Select Preference and Sleep Mode o Press Volume Up but...

Page 13: ...ss Menu button o Hold Menu button o Select the song press the Select or Play button o Select the list title an album title or the title of a play list and press Play Pause o Press Forward button o Pre...

Page 14: ...opalive Dock to your computer with the cable that came with your iPod then place your iPod in it o Choose Preference then select Others o Press the reset hole with a pin o Connect Popalive Dock to a h...

Page 15: ...es or other such harsh environmental conditions unauthorized modifications unauthorized connections unauthorized repair including but not limited to use of authorized spare parts in repairs misuse neg...

Page 16: ...with the limits for a Class B digital device pursuant to Part 15 of the FCC Rules These limits are designed to provide reasonable protection against harmful interference in a residential installation...

Reviews: