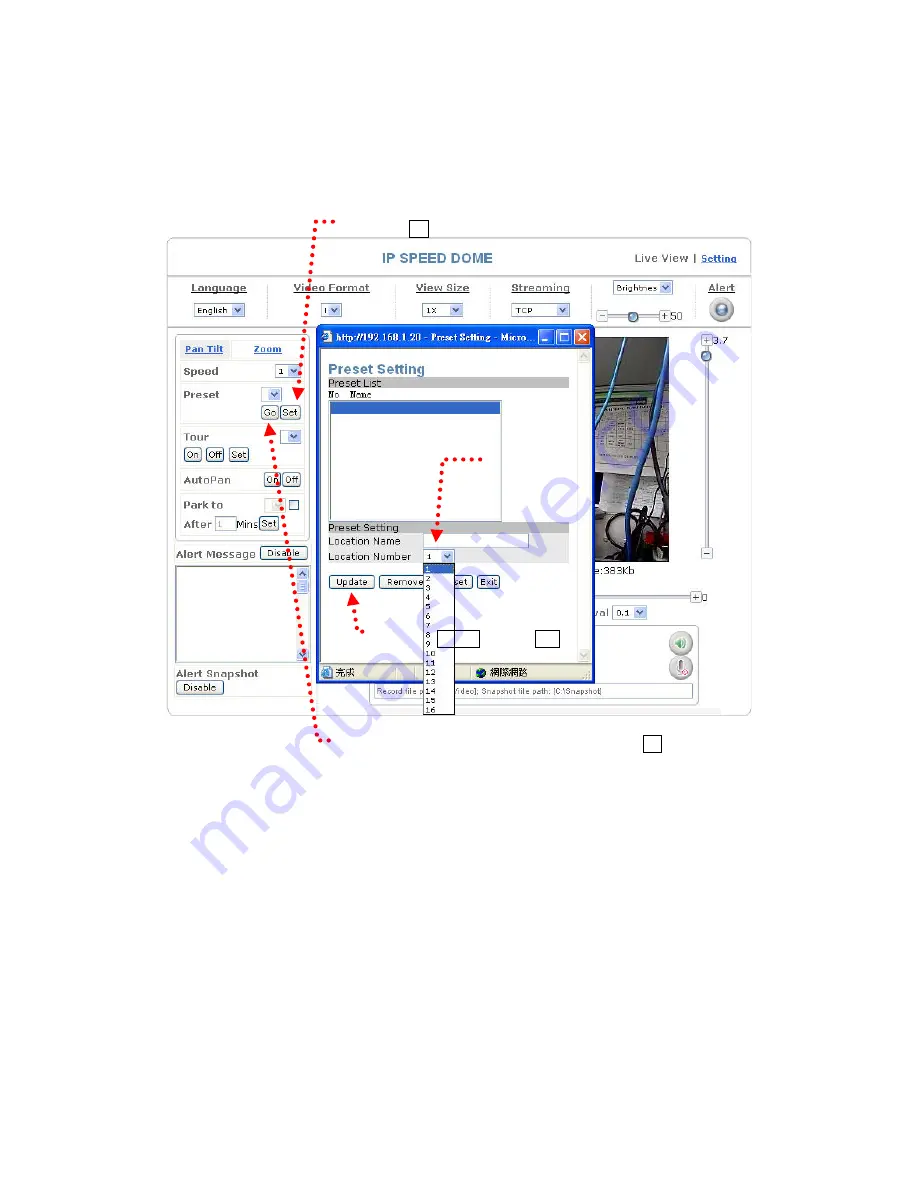
Alinking ALC-9451 User Manual Download Page 32

7. Preset: 

You can use this function to preset the location that the camera will rotate 

to (64 locations).


This function can save the location you want to monitor and the camera will 
automatically rotate to the saved location when you click the number of that location. 
Precise positioning can be achieved without the need for manual control. 


4. Click Update and then Exit. 

1. Click Set to enter the preset setting window. 

2. Enter a name for the location.


5. When a location number has been selected, click Go and the camera will 
automatically position to the preset location. 


32 

Summary of Contents for ALC-9451

Page 1: ...ALC 9551 Outdoor High Speed Dome Network Camera User Manual Software Version 1 14 1...

Page 2: ...11 Camera Settings 19 Camera Setting from a Router 21 Change the Internet Explorer Setting 22 Enter the Main Page 24 Camera Main Page 27 System Settings 42 Basic Settings 42 System 42 Video Image 43 A...

Page 3: ...65 Event 65 Motion Detection 74 Firmware upgrade 76 Factory Default 79 Reboot 80 Attachment A External Alarm 82 Attachment B Bandwidth Estimation 84 Attachment C Troubleshooting and FAQs 85 FCC Class...

Page 4: ...have received the following items If any item is missing please contact your dealer Camera Unit Pack 1 PTZ Dome Camera 2 Optical Cover Accessory Pack 3 Quick Guide 4 Hardware Installation Guide 5 CD...

Page 5: ...hernet Monitoring system resource requirements Operating system Windows 2000 Professional SP4 XP Home SP2 Browser Internet Explorer 6 x or later versions System hardware CPU Pentium 4 2 4GHz or better...

Page 6: ...ovides vivid image quality z The 18x or 26x optical zooming camera lens allows a clearer view from a distance z MPEG4 MJPEG dual image compression modes and the dual encoding capability meet different...

Page 7: ...onnector is provided for connection to the 10Base T Ethernet cable or 100 Base T High Speed Ethernet cable This port can automatically detect or coordinate the transmission rate of the network 3 Use a...

Page 8: ...he product to your network from the LAN socket Video out Please connect the product to the display using the video out cable Audio in Please connect the product to the microphone using the audio in ca...

Page 9: ...r heater The product equipped with automatic temperature detection and air heater to prevent fogging Please connect to AC 24V power outlet Power inlet for cooler fan The product will automatic activat...

Page 10: ...External alarm connector DI DO See Appendix A for details of D1 DO 10...

Page 11: ...lder wall or ceiling to avoid damage to personnel and equipment 10 Do not open the protective cover to avoid electric shock or other hazards 11 Do not attempt repairs by yourself Otherwise electric sh...

Page 12: ...intended to provide all required knowledge regarding installation of the camera As for the setting of the network and the description of the interface refer to User s Manual Network Connection Diagra...

Page 13: ...Notice for unpacking Take out the items from the accessory pack but do not remove the outer packaging of the optical cover Take out the lens protection pad Take out the PTZ Camera 13...

Page 14: ...stallation Procedure Please refer to below dimension for bracket purchasing UNC 9551 does not provide any bracket or pendant If there is any question please contact our sales representative Option 1 W...

Page 15: ...1 It is recommended not to plug the power on before the installation is done since the camera will automatically rotate right after the power has been plug in Notice 2 Refer to the pine defined diagra...

Page 16: ...The Pin Defined Diagram 16...

Page 17: ...due to the waterproof rim surrounded the optical cover Please use more strength to push it Notice 2 The camera needs to be fixed on a concrete or brick surface suitable screws and brackets should prep...

Page 18: ...a surface made from different material 3 When using a screw to fix the camera to the ceiling please protect your eyes from falling screws 4 Reminder you can fix the camera to the ceiling after setting...

Page 19: ...ry IP setting 192 168 0 20 appears on the screen 1 Click Search to find the IPCAM on the LAN 3 Changing the IP address and related settings for the network environment When you find the camera click i...

Page 20: ...Setting 2 All UIC camera network server products can be found and changed using the IP FINDER software 3 If the IP FINDER software cannot be executed check your antivirus software or firewall to remov...

Page 21: ...SL router After completing the settings you can operate the camera from a WAN IP Address via the ADSL router Example The Virtual Server setting screen of the Zonet ADSL router Note 1 The virtual serve...

Page 22: ...that the security level is set to Medium the commonly used default security level Steps Open the IE browser Tools Internet Options Security Custom Level Check that the security level is Medium Check...

Page 23: ...Install IE Tab Restart Firefox IE Tab online learning 23...

Page 24: ...2 Key in the default username and password Default User Name root Default Password root You can access the camera as an administrator by default and set up for other users or privileges from the Basic...

Page 25: ...ning screen appears Click Install The ActiveX Control is named UIC ActiveX Control This software is owned by UIC and well certified You can use it without any doubts about its validity Click Install 5...

Page 26: ...6 When installation of the ActiveX control is completed the image transmitted from the camera and the operation interface appear on the screen 26...

Page 27: ...lution of the current video stream 2 FPS Frame Per Second of the current video stream 3 BitRate bandwidth per second of the current video stream Product Video image Source Attention Please change the...

Page 28: ...each movement of the camera refer to the following picture You can also click the image to control the direction of the camera 2 Rotation speed This function controls the speed of rotation in the Pres...

Page 29: ...ds of the control bar to zoom precisely The movement speed of the lens is adjustable 4 Digital ZOOM The build in 12x digital zooming function can enlarge the picture You can directly drag the small ba...

Page 30: ...the zooming page Optical zoom Digital zoom 5 Auto Focus The default is On You can click Off to enter the manual focus mode 6 Focus In the manual focus mode you can choose Near or Far and 7 speed optio...

Page 31: ...Auto focus function on off Manual focus adjustment 31...

Page 32: ...matically rotate to the saved location when you click the number of that location Precise positioning can be achieved without the need for manual control 4 Click Update and then Exit 1 Click Set to en...

Page 33: ...pdate and then Exit 6 Click On to activate the auto tour mode Auto horizontal tour mode 9 AutoPan You can use this function to enable or disable the automatic horizontal tour mode In the AutoPan mode...

Page 34: ...age When Disable is selected no message will show Save AlertImg The Enable Disable button can activate or stop the save of the alert image in the Snapshot directory When the button shows Enable you ha...

Page 35: ...Chinese Traditional Chinese and Japanese Language selection 15 Video Format sets the format for streaming MPEG4 main stream Stream mode at MJPEG MPEG4 or Dual MPEG4 MPEG4 sub stream Stream mode at Du...

Page 36: ...he firewall Refer to Setting Basic Setting Network Streaming for more information UDP provides the fastest but most unreliable transmission service Video steams are transmitted through UDP Port 50000...

Page 37: ...Tunneling Pocket Loss Speed HTTP Easy Fair Fair TCP Fair Lower Fast UDP Hard Lowest Fastest Video streaming 37...

Page 38: ...Press means to increase the value and to decrease the value of the selected item Brightness Adjusts the brightness of videos Contrast Adjusts the contrast of colors Saturation Adjusts the saturation o...

Page 39: ...ding button Snapshot button 20 Snapshot When you click this button a picture of the current image will be saved in the default folder C snapshot Note If you are using the Windows Vista operation syste...

Page 40: ...nput is completed click on Add 9 Click on Close after completion 10 Exit the IE Browser and reopen again If the setting is correct Trusted Sites will display 6 Enter the IP address of the speed dome 2...

Page 41: ...Disable microphone When you click the microphone icon a Forbidden mark will show on the icon and the sound from an external microphone will not be received 23 Enable Disable speaker When you click th...

Page 42: ...etting System System info Basic Setting System System Info Device Name You can set the name for your camera here Click Set to complete the setting MAC Address IP Address Network Mask and Gateway Netwo...

Page 43: ...Video Format You can select MPEG4 or MJPEG as the video format It is recommended to select MPEG4 for real time browsing to optimize the bandwidth MJPEG is a good choice for the best resolution when vi...

Page 44: ...loading bandwidth Generally it is recommended to use CIF resolution for normal bandwidth To meet other requirements refer to Attachment B for more information The product offers 4 image resolutions PA...

Page 45: ...ncy priority at the same bandwidth Five options are available for your choice Best Better Normal Fast and fastest FPS selection Fix bitrate Video quality selection 15 transmission speeds ranging from...

Page 46: ...lect this option when the product is in normal deployment Flip Select this option when the product is mounted on the ceiling Mirror Select this option when the product is in normal deployment but from...

Page 47: ...n e g Lobby IP Cam Date time position Selects the location where the date and time are displayed on the screen any of the four corners Text position Selects the location where text is displayed on the...

Page 48: ...e ambient illumination becomes dim the ICR changes the color filter to the monochrome mode via a micro motor in front of the lens The Auto ICR is On by default Select Off if manual setting is required...

Page 49: ...ou are not familiar with the setting select Full Auto Exposure mode setting Basic Setting Audio Sound Basic Setting Audio Audio sound setting Basic Setting Audio Audio Mode Audio mode Full duplex half...

Page 50: ...and setting steps are described as below Basic Setting User User List access privilege list The access privileges of the administrator operator and viewer are listed as follows The administrator has t...

Page 51: ...t or Delete to delete a user from the list and complete required fields Then Click Save to complete the setting Options Add Add a new user and set up a different privilege Update Change the privilege...

Page 52: ...imultaneously can be defined Note The initial login name and password of this product is root This root user name cannot be deleted but the password can be changed For security purposes we recommend t...

Page 53: ...lly when DHCP is in ON status otherwise you need to key in the values manually Note Where no IP address is assigned from the DHCP server the system will set the Link Local Address automatically Basic...

Page 54: ...2 Use DHCP or fixed IP for connection to the LAN environment 3 Key in the IP address of the camera and enter PPPoE Setting following the route Setting Basic Setting Network PPPoE 4 Key in the xDSL Use...

Page 55: ...number while the website address is like a name in an address book The DDNS allows the user to access the website by entering the name of the website without memorizing a bunch of cold numbers When y...

Page 56: ...You may log on this website for relevant information and apply for free domain names Username your account for the domain name you applied for Password your password for the domain name you applied f...

Page 57: ...32768 to 65535 as default Link URL location After the network camera penetrates the firewall successfully the actual external IP address and port will be shown Click Save to confirm when you finish We...

Page 58: ...rol Panel 5 Click Detail 6 Check UPuP User Interface 3 Click Add Remove Windows Components 2 Open Windows firewall option 2 Click Exceptions 1 Click Windows Firewall in the Control Panel 3 Check UPnP...

Page 59: ...n a mail server setting for the camera is required Enter the following information in sequential order to complete the setting z SMTP server the SMTP server IP address z SMTP From the email of the sen...

Page 60: ...f IP Address Change IP address change notice This setting is not necessary for a fixed IP For a dynamic IP you need to update the IP address every time you connect to the Internet to access the camera...

Page 61: ...of your HTTP server Refer to the installation setting of your HTTP server for the setting of the parameters such as Username Password and Proxy Select Save to complete and activate your settings Notif...

Page 62: ...asic Setting Network Multicast M JPEG This function allows multiple users to view the M JPEG video stream free from restrictions on the number of users However this is only effective within the LAN 62...

Page 63: ...Get Time from an NTP server synchronize the time with the NTP Network Time Protocol z Click on the NTP Button z Enter the NTP server s IP address z Press SAVE to activate it The camera will update its...

Page 64: ...ilter IP Address Overview of the set IPs Add enter the IP address you want to allow or deny the access of in the front field Remove removes a set IP addresses Remove All removes all the set IP address...

Page 65: ...lligent security management functions It ensures security monitoring by allowing user to define trigger events based on particular times and situations and sets the camera respond to the event Applica...

Page 66: ...66 66...

Page 67: ...et the time Trigger by sources of trigger events Note You can only set one trigger event once Alarm input The alarm is triggered by the security equipment connected from the DI terminals behind the ma...

Page 68: ...seconds post trigger 5 seconds and continue video upload 5 seconds have been selected the total file size will be 15 seconds Upload img to The camera will sent the capture photo of the event to the FT...

Page 69: ...Add Schedule Add Schedule setting page 69...

Page 70: ...the alarm or recorded image to the specified server To use this function enter the server information by accessing Application Setting Event Event Server You may perform manual test as specified in t...

Page 71: ...Sending AVI file to FTP Server Upload AVI files to FTP server to test the file integrity HTTP Server Sending message to HTTP Server Upload message to HTTP server to test the message integrity Enter th...

Page 72: ...pecified Name the name of the FTP Network Address IP address of the FTP Login Log in name Password Log in password Upload Path Uploading path Port Port Passive Check to set the FTP status as passive C...

Page 73: ...og in password Proxy Proxy server name Proxy Port Proxy server port Proxy Login Proxy server log in name Proxy Password Proxy server log in password Click Add Tcp to go to the setting page and enter t...

Page 74: ...sitive 100 is extremely sensitive Select Save to complete and activate your settings Motion detection Setting area Application Setting Privacy mask The privacy zone function can mask the image in the...

Page 75: ...priority A is the highest and X is the lowest When the setting is completed the computer reads the new setting and it takes about one minute to return to the live image screen Please be patient Priva...

Page 76: ...firmware upgrade The sales representative will transmit the latest version to you via e mail When you receive the firmware decompress the file uImage gz to your PC and follow the steps below to execu...

Page 77: ...tion where the firmware file is stored 4 Click submit 5 The auto upgrade runs The Upgrade Status shows the progress of the upgrade When the firmware upgrade has been completed the machine reboots auto...

Page 78: ...if the power cable is removed or becomes loose during the upgrade Firmware upgrading in a wireless network environment is not recommended because unstable packet transmission may bring about loss of d...

Page 79: ...e this function to reset to factory default All changes you have made are deleted but the IP address and all settings relevant to networking remain valid including cable and wireless network settings...

Page 80: ...bin Attention Don t change the file name otherwise the backup may fail Restore backup parameters You can select this function to restore the changes you have made To do this click Browse to select a...

Page 81: ...81...

Page 82: ...r close NC these external devices These 4 pins only act as relay output contacts and no power is output dry contacts The default status for this DI sets is NO The gray color indicates the current stat...

Page 83: ...here connecting of a low or high current loop to the external alarm input output of the product is required the wiring and connection shall be conducted by a qualified electrician Incorrect wiring may...

Page 84: ...he actual situation of the place being monitored Image Resolution Average range of Data Sizes 176 x 144 QCIF 20 40k bit 352 x 288 CIF 40 200k bit 704 x 576 D1 200 530k bit Ex The transmission speed on...

Page 85: ...ed Plug the power cable and reboot the machine If the problem remains contact your dealer for help What network cable is used for the camera The camera uses a 10 or 100 Base T Category 5 UTP network c...

Page 86: ...not able to access the Internet Contact your ISP to acquire a usable port The proxy server might be blocking you from connecting to the camera Do not set the proxy server Please be sure that the defau...

Page 87: ...are transmitted via a congested network The number of frames transmitted may become less when multiple users are viewing the video stream The network hub might be another reason for this problem espe...

Page 88: ...your display card color quality to at least 16 bits 24 bits or more are recommended Incorrect camera video setting You may need to adjust some parameters such as brightness contrast color and saturati...

Page 89: ...in a particular installation If this equipment does cause harmful interference to radio or television reception which can be determined by turning the equipment off and on the user is encouraged to tr...

Reviews: