background image

58

  |  Removing 

the 

Speakers

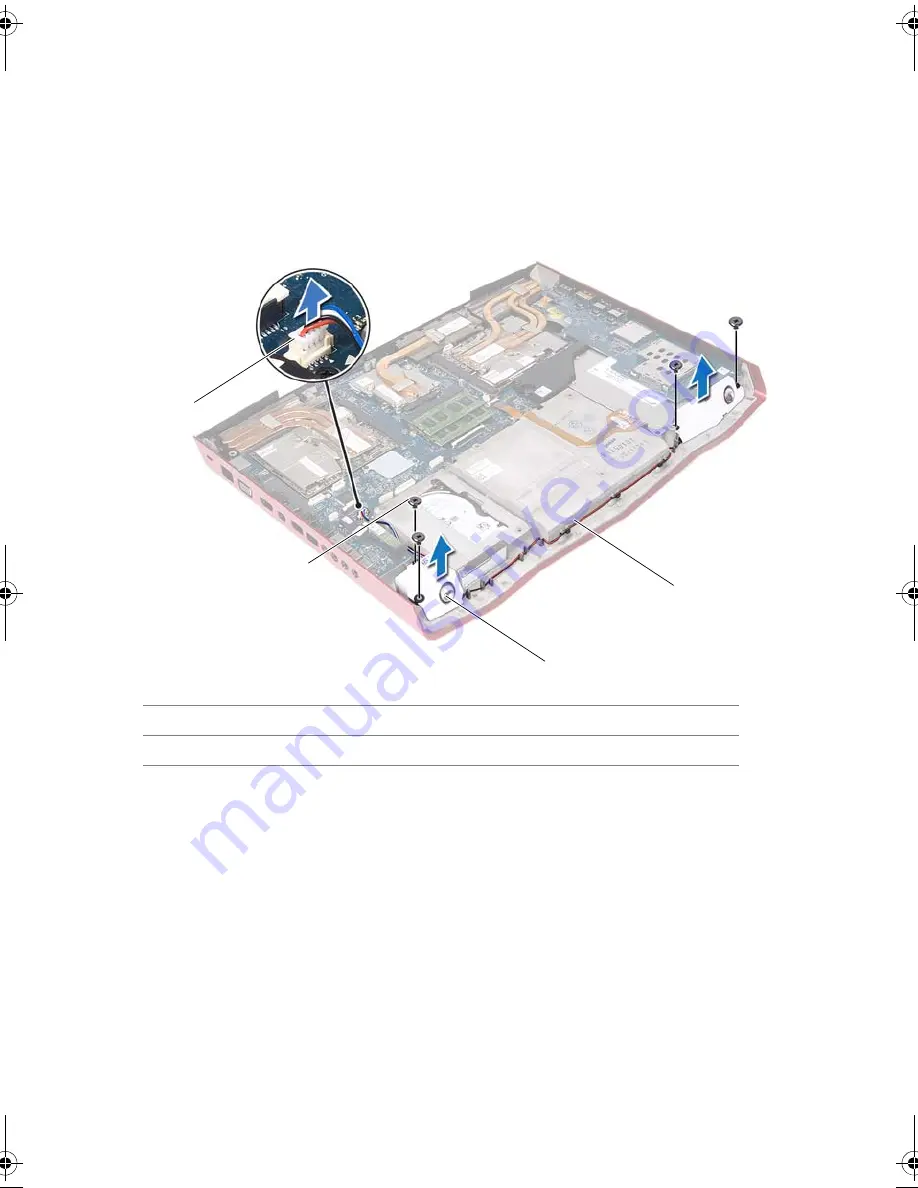
Procedure

1

Disconnect the speakers cable from the connector on the system board.

2

Note the speakers cable routing and remove the cable from the routing guides on the 
computer base.

3

Remove the screws that secure the speakers to the computer base.

4

Lift the speakers, along with the speaker cable, off the computer base.

1

speakers-cable connector

2

screws (4)

3

speakers (2)

4

speakers-cable routing

1

2

3

4

Book.book  Page 58  Thursday, April 19, 2012  2:38 PM

Summary of Contents for M18x R2

Page 1: ...Alienware M18x R2 Owner s Manual Computer model M18x R2 Regulatory model P12E Regulatory type P12E002...

Page 2: ...ewrittenpermission of Dell Inc is strictly forbidden Trademarks used in this text Alienware is a registered trademark of Alienware Corporation Dell is a trademark of Dell Inc Microsoft Windows and the...

Page 3: ...y Pack 12 Procedure 12 4 Replacing the Battery Pack 13 Procedure 13 Postrequisites 13 5 Removing the Base Cover 14 Prerequisites 14 Procedure 14 6 Replacing the Base Cover 15 Procedure 15 Postrequisit...

Page 4: ...ol Cover 26 Prerequisites 26 Procedure 26 14 Replacing the Center Control Cover 29 Procedure 29 Postrequisites 29 15 Removing the Power Button Board 30 Prerequisites 30 Procedure 30 16 Replacing the P...

Page 5: ...lay Assembly 43 Prerequisites 43 Procedure 43 24 Replacing the Display Assembly 48 Procedure 48 Postrequisites 48 25 Removing the Palm Rest 49 Prerequisites 49 Procedure 50 26 Replacing the Palm Rest...

Page 6: ...Procedure 64 34 Replacing the Optical Drive 66 Procedure 66 Postrequisites 66 35 Removing the Video Card Heat Sink Fan s 67 Prerequisites 67 Procedure 67 36 Replacing the Video Card Heat Sink Fan s 6...

Page 7: ...requisites 78 Procedure 79 44 Replacing the Processor Heat Sink 80 Procedure 80 Postrequisites 80 45 Removing the Processor Module 81 Prerequisites 81 Procedure 82 46 Replacing the Processor Module 83...

Page 8: ...tes 92 51 Removing the Subwoofer 93 Prerequisites 93 Procedure 94 52 Replacing the Subwoofer 95 Procedure 95 Postrequisites 95 53 System Setup 97 Overview 97 Entering System Setup 97 System Setup Scre...

Page 9: ...omputer is unplugged press and hold the power button for about 5 seconds to ground the system board Safety Instructions Use the following safety guidelines to protect your computer from potential dama...

Page 10: ...pate static electricity which could harm internal components CAUTION When you disconnect a cable pull on its connector or on its pull tab not on the cable itself Some cables have connectors with locki...

Page 11: ...ay screws remain inside your computer Connect any external devices cables cards and any other part s you removed before working on your computer Connect your computer and all attached devices to their...

Page 12: ...er and follow the steps in Before You Begin on page 9 For additional safety best practices information see the Regulatory Compliance Homepage at dell com regulatory_compliance Procedure 1 Slide the ba...

Page 13: ...itional safety best practices information see the Regulatory Compliance Homepage at dell com regulatory_compliance CAUTION To avoid damage to the computer use only the battery designed for this partic...

Page 14: ...additional safety best practices information see the Regulatory Compliance Homepage at dell com regulatory_compliance Prerequisites Remove the battery pack See Removing the Battery Pack on page 12 Pro...

Page 15: ...ctices information see the Regulatory Compliance Homepage at dell com regulatory_compliance Procedure 1 Align the tabs on the base cover with the slots on the computer base and slide the base cover in...

Page 16: ...al safety best practices information see the Regulatory Compliance Homepage at dell com regulatory_compliance Prerequisites 1 Remove the battery pack See Removing the Battery Pack on page 12 2 Remove...

Page 17: ...m regulatory_compliance Procedure 1 Insert the mSATA card connector at a 45 degree angle into the system board connector 2 Press the other end of the mSATA card down into the slot on the system board...

Page 18: ...off your computer and disconnect it from the electrical outlet for a few hours then reconnect the computer turn it on and enter system setup If the date and time are not correct in system setup repla...

Page 19: ...cell battery cable from the connector on the system board 2 Remove the coin cell battery cable from the routing guides on the computer base 3 Pry up the coin cell battery from the slot on the system...

Page 20: ...com regulatory_compliance Procedure 1 Place the coin cell battery into the slot and press gently to adhere it to the computer base 2 Route the coin cell battery cable through the routing guides on th...

Page 21: ...best practices information see the Regulatory Compliance Homepage at dell com regulatory_compliance CAUTION To avoid data loss do not remove the hard drive while the computer is in Sleep or On state...

Page 22: ...board and then disconnect the hard drive cable from the connector on the system board 2 Loosen the captive screws that secure the hard drive assembly to the computer base 3 Using the pull tab lift the...

Page 23: ...Removing the Hard Drive s 23 4 Disconnect the interposer from the hard drives 1 hard drives 3 2 interposer 2 1...

Page 24: ...r computer 5 Remove the screws that secure the hard drive s and slide the hard drive s out of the hard drive bracket Number of hard drives Dimensions supported One Two Three 9 5 mm or 7 0 mm 9 5 mm an...

Page 25: ...Replace the screws that secure the primary hard drive HDD 0 4 If applicable replace the screws that secure the secondary hard drive HDD 1 and tertiary hard drive HDD 2 to the hard drive bracket 5 Con...

Page 26: ...teps in Before You Begin on page 9 For additional safety best practices information see the Regulatory Compliance Homepage at dell com regulatory_compliance Prerequisites 1 Remove the battery pack See...

Page 27: ...cover along with the cable that attaches to it are fragile 2 Turn the computer over and open the display as far as possible 3 Gently pry up the center control cover and then ease the tabs on the cent...

Page 28: ...ld result in scratching the display panel 4 Turn the center control cover over and place it on the palm rest assembly 5 Lift the connector latch and disconnect the central control cover cable from the...

Page 29: ...ver cable into the connector on the system board and press down on the connector latch to secure the cable 2 Align the tabs on the center control cover with the slots on the palm rest assembly and sna...

Page 30: ...ory_compliance Prerequisites 1 Remove the battery pack See Removing the Battery Pack on page 12 2 Remove the base cover See Removing the Base Cover on page 14 3 Remove the center control cover See Rem...

Page 31: ...Align the screws holes on the power button board with the screw holes on the palm rest assembly 2 Replace the screws that secure the power button board to the palm rest assembly 3 Connect the power bu...

Page 32: ...fore You Begin on page 9 For additional safety best practices information see the Regulatory Compliance Homepage at dell com regulatory_compliance Prerequisites 1 Remove the battery pack See Removing...

Page 33: ...N The keycaps on the keyboard are fragile easily dislodged and time consuming to replace Be careful when removing and handling the keyboard CAUTION Be extremely careful when removing and handling the...

Page 34: ...d over and place it on the palm rest assembly 4 Lift the connector latches and pull the pull tabs to disconnect the keyboard cable and keyboard backlight cable from the connectors on the system board...

Page 35: ...into their connectors on the system board and press down on their connector latches to secure the cables 2 Slide the tabs on the keyboard into the slots on the palm rest assembly and lower the keyboar...

Page 36: ...es 1 Remove the battery pack See Removing the Battery Pack on page 12 2 Remove the base cover See Removing the Base Cover on page 14 3 Remove the center control cover See Removing the Center Control C...

Page 37: ...macro keyboard over and place it on the palm rest assembly 4 Lift the connector latches and pull the pull tabs to disconnect the macro keyboard cable and macro keyboard backlight cable from the conne...

Page 38: ...on the system board and press down on the connector latches to secure the cables 2 Slide the tab on the macro keyboard into the slot on the palm rest assembly and lower the macro keyboard into place...

Page 39: ...by your computer see Views Specifications at support dell com manuals NOTE Memory modules purchased from Dell or Alienware are covered under your computer warranty NOTE If you purchased a dual core pr...

Page 40: ...er on page 26 b Remove the keyboard See Removing the Keyboard on page 32 CAUTION To prevent damage to the memory module connector do not use tools to spread the memory module securing clips 3 Using yo...

Page 41: ...les on the system board For information on the type of memory supported by your computer see Views Specifications at support dell com manuals NOTE Memory modules purchased from Dell or Alienware are c...

Page 42: ...t hear the click remove the memory module and reinstall it 3 If you have replaced memory module s in connectors DIMM A and DIMM B go to Postrequisites 4 If you have replaced memory module s in connect...

Page 43: ...egulatory_compliance Prerequisites 1 Remove the battery pack See Removing the Battery Pack on page 12 2 Remove the base cover See Removing the Base Cover on page 14 3 Remove the center control cover S...

Page 44: ...embly 2 Pull the pull tab to disconnect the display cable from the connector on the system board 3 Disconnect the LED logo board cable from the connector on the system board 1 display cable connector...

Page 45: ...Removing the Display Assembly 45 4 Close the display and turn the computer over 5 Remove the screws that secure the display assembly on the computer base...

Page 46: ...es from the connectors on the Mini Card See Removing the Wireless Mini Card on page 89 7 Note the routing of the antenna cables and then remove the cables from the routing guides on the computer base...

Page 47: ...the routing guides on the palm rest assembly 10 Remove the screws on the display hinges that secure the display assembly to the computer base 11 Gently slide out the antenna cables through the slot o...

Page 48: ...d LED logo board cable to the respective connectors on the system board 4 Slide the Mini Card antenna cables through the slot on the computer base 5 Close the display and turn the computer over 6 Rout...

Page 49: ...ove any installed card or blank from the Media Card Reader 2 Remove the battery pack See Removing the Battery Pack on page 12 3 Remove the base cover See Removing the Base Cover on page 14 4 Remove th...

Page 50: ...utton board cable status light board cable speaker LED board cable and touchpad cable from the connectors on the system board 1 power button board cable connector 2 status light board cable connector...

Page 51: ...Removing the Palm Rest 51 2 Turn the computer over 3 Remove the screws that secure the palm rest assembly to the computer base...

Page 52: ...m the two tabs along the rear edge of the computer and then ease the palm rest assembly from the computer base CAUTION Carefully separate the palmrest from the computer base to avoid damage to the pal...

Page 53: ...e speaker LED board cable and touchpad cable to the respective connectors on the system board 5 Turn the computer over and replace the screws that secure the palm rest assembly to the computer base Po...

Page 54: ...y Pack on page 12 2 Remove the base cover See Removing the Base Cover on page 14 3 Remove the center control cover See Removing the Center Control Cover on page 26 4 Remove the keyboard See Removing t...

Page 55: ...Removing the Status Light Board 55 2 Remove the screw that secures the status light board to the palm rest assembly 3 Lift the status light board off the palmrest 1 screw 1...

Page 56: ...tatus light board to the palm rest assembly 3 Route the status light board cable through the routing guides on the palm rest assembly Postrequisites 1 Follow the instructions from step 2 to step 5 in...

Page 57: ...pliance Prerequisites 1 Remove the battery pack See Removing the Battery Pack on page 12 2 Remove the base cover See Removing the Base Cover on page 14 3 Remove the center control cover See Removing t...

Page 58: ...the speakers cable routing and remove the cable from the routing guides on the computer base 3 Remove the screws that secure the speakers to the computer base 4 Lift the speakers along with the speake...

Page 59: ...rough the routing guides on the computer base and then connect the speakers cable to the connector on the system board Postrequisites 1 Follow the instructions from step 2 to step 5 in Replacing the P...

Page 60: ...any installed card or blank from the Media Card Reader 2 Remove the battery pack See Removing the Battery Pack on page 12 3 Remove the base cover See Removing the Base Cover on page 14 4 Remove the ce...

Page 61: ...O board cable from the connector on the system board 2 Remove the screws that secure the I O board to the computer base 3 Gently lift the I O board and ease the connectors on the I O board out of the...

Page 62: ...connector on the system board and press down on the connector latch to secure the cable Postrequisites 1 Follow the instructions from step 2 to step 5 in Replacing the Palm Rest 2 Replace the dispaly...

Page 63: ...move the battery pack See Removing the Battery Pack on page 12 2 Remove the base cover See Removing the Base Cover on page 14 3 Remove the center control cover See Removing the Center Control Cover on...

Page 64: ...the optical drive cable from the connector on the system board and then gently peel off the optical drive cable from the computer base 2 Remove the screws that secure the optical drive assembly to th...

Page 65: ...y off the computer base 4 Remove the screws that secure the optical drive bracket to the optical drive 5 Remove the optical drive bracket from the optical drive 6 Remove the interposer from the optica...

Page 66: ...se 4 Replace the screws that secure the optical drive assembly to the computer base 5 Adhere the optical drive cable to the computer base slide the cable into the connector on the system board and pre...

Page 67: ...Prerequisites 1 Remove the battery pack See Removing the Battery Pack on page 12 2 Remove the base cover See Removing the Base Cover on page 14 Procedure 1 Disconnect the primary video card heat sink...

Page 68: ...n the system board 5 Loosen the captive screws that secure the secondary video card heat sink fan to the computer base 6 Lift the video card heat sink fan s along with the cable away from the computer...

Page 69: ...ive screws that secure the secondary video card heat sink fan to the computer base 3 Tighten the captive screws that secure the primary video card heat sink fan to the computer base 4 Route the primar...

Page 70: ...ee Removing the Base Cover on page 14 3 Remove the center control cover See Removing the Center Control Cover on page 26 4 Remove the keyboard See Removing the Keyboard on page 32 5 Remove the macro k...

Page 71: ...ving the Video Card Heat Sink s 71 Primary video card heat sink Secondary video card heat sink 1 primary video card heat sink 2 captive screws 4 1 captive screws 4 2 secondary video card heat sink 1 2...

Page 72: ...eat sink to the computer base 3 Tighten the captive screws that secure the secondary video card heat sink to the computer base Postrequisites 1 Follow the instructions from step 2 to step 5 in Replaci...

Page 73: ...the Base Cover on page 14 3 Remove the center control cover See Removing the Center Control Cover on page 26 4 Remove the keyboard See Removing the Keyboard on page 32 5 Remove the macro keyboard See...

Page 74: ...74 Removing the Video Card s Primay Video Card Secondary Video Card 1 screw 2 2 primary video card 1 secondary video card 2 screws 2 1 2 1 2...

Page 75: ...s that secure the video card s to the system board Postrequisites 1 Replace the video card heat sink s See Replacing the Video Card Heat Sink s on page 72 2 Follow the instructions from step 2 to step...

Page 76: ...m regulatory_compliance Prerequisites 1 Remove the battery pack See Removing the Battery Pack on page 7 2 Remove the base cover See Removing the Base Cover on page 7 Procedure 1 Disconnect the process...

Page 77: ...com regulatory_compliance Procedure 1 Align the screw holes on the processor heat sink fan with the screw holes on the computer base 2 Tighten the captive screws that secure the processor heat sink fa...

Page 78: ...ulatory_compliance Prerequisites 1 Remove the battery pack See Removing the Battery Pack on page 12 2 Remove the base cover See Removing the Base Cover on page 14 3 Remove the center control cover See...

Page 79: ...n sequential order indicated on the processor heat sink loosen the captive screws that secure the processor heat sink to the system board 2 Carefully lift the processor heat sink out of the computer b...

Page 80: ...that thermal conductivity is achieved Procedure Align the captive screws on the processor heat sink with the screw holes on the system board and tighten the screws in sequential order indicated on the...

Page 81: ...nd do not touch the metal pins Prerequisites 1 Remove the battery pack See Removing the Battery Pack on page 12 2 Remove the base cover See Removing the Base Cover on page 14 3 Remove the center contr...

Page 82: ...um cooling for the processor module do not touch the heat transfer areas on the processor thermal cooling assembly The oils in your skin can reduce the heat transfer capability of the thermal pads CAU...

Page 83: ...ated all four corners are aligned at the same height If one or more corners of the module are higher than the others the module is not seated properly CAUTION To avoid damage to the processor module h...

Page 84: ...l battery See Removing the Coin Cell Battery on page 18 6 Remove the video card heat sink fan s See Removing the Video Card Heat Sink Fan s on page 67 7 Remove the video card heat sink s See Removing...

Page 85: ...able and the subwoofer cable from the connectors on the system board 2 Lift the connector latch and disconnect the optical drive cable from the connector on the system board 1 speaker cable connector...

Page 86: ...ove the screws that secure the system board to the computer base 4 Carefully ease the connectors on the system board out of the slots in the computer base and lift the system board off the computer ba...

Page 87: ...sink See Replacing the Processor Heat Sink on page 80 3 Replace the wireless Mini Card See Replacing the Wireless Mini Card on page 91 4 Replace the mSATA card See Replacing the mSATA Card on page 17...

Page 88: ...ack See Replacing the Battery Pack on page 13 19 Replace any installed card or blank from the Media Card Reader 20 Follow the instructions in After Working Inside Your Computer on page 11 Entering the...

Page 89: ...ntee compatibility or provide support for wireless Mini Cards from sources other than Dell If you ordered a wireless Mini Card with your computer the card is already installed Your computer has one ha...

Page 90: ...ving the Wireless Mini Card 2 Remove the screw that secures the wireless Mini Card to the system board 3 Lift the wireless Mini Card out of the connector on the system board 1 screw 2 wireless Mini Ca...

Page 91: ...connectors on the wireless Mini Card and on the system board and realign the wireless Mini Card CAUTION To avoid damage to the wireless Mini Card never place cables under the wireless Mini Card 2 Ins...

Page 92: ...Card Postrequisites 1 Replace the base cover See Replacing the Base Cover on page 15 2 Replace the battery pack See Replacing the Battery Pack on page 13 3 Follow the instructions in After Working In...

Page 93: ...able from the connector on the system board See Removing the Processor Heat Sink Fan on page 76 8 Remove the video card heat sink s See Removing the Video Card Heat Sink s on page 70 9 Remove the vide...

Page 94: ...94 Removing the Subwoofer Procedure 1 Remove the screws that secure the subwoofer to the computer base 2 Lift the subwoofer along with the cable off the computer base 1 screws 2 2 subwoofer 1 2...

Page 95: ...e Wireless Mini Card on page 91 5 Replace the mSATA card See Replacing the mSATA Card on page 17 6 Replace the memory module s See Replacing the Memory Module s on page 41 7 Follow the instructions fr...

Page 96: ...drive s See Replacing the Hard Drive s on page 25 18 Replace the base cover See Replacing the Base Cover on page 15 19 Replace the battery pack See Replacing the Battery Pack on page 13 20 Replace any...

Page 97: ...E Before you change system setup it is recommended that you write down the system setup screen information for future reference Entering System Setup 1 Turn on or restart your computer 2 During POST w...

Page 98: ...etup window and contains information about each option listed in the Setup Item In this field you can view information about your computer and make changes to your current settings Press the up and do...

Page 99: ...nable or disable the USB emulation feature This feature defines how the BIOS in the absence of a USB aware operating system handles USB devices USB emulation is always enabled during POST NOTE You can...

Page 100: ...u to configure fields in the Performance Options sub menu For more information see Advanced Menu Performance Options on page 123 SATA Operation Allows you to configure the operating mode of the integr...

Page 101: ...ores physically present in the CPU Memory Override Support Allows you to enable or disable the memory override option support Disabled The memory override support is disabled Enabled Displays addition...

Page 102: ...device Wireless Switch Hotkey Allows you to disable all internal wireless devices Security Menu Supervisor Password Displays if the supervisor password is clear or set User Password Displays if the u...

Page 103: ...ive If no disc is in the drive or if the disc is not bootable the computer generates an error message Boot Menu Use the up or down arrow keys to change the boot device priority You can choose from Har...

Page 104: ...1 If you are booting from a USB device connect the USB device to a USB port 2 Turn on or restart your computer 3 When F2 Setup F12 Boot Options appears in the lower right corner of the screen press F...

Page 105: ...g or Express Service Code a Select one of the following options Automatically detect my Service Tag for me Choose from My Products and Services List Choose from a list of all Dell products b Click Con...

Reviews: