background image

7

www.Observint.com

© 2017 Observint Technologies. All rights reserved.

5. 

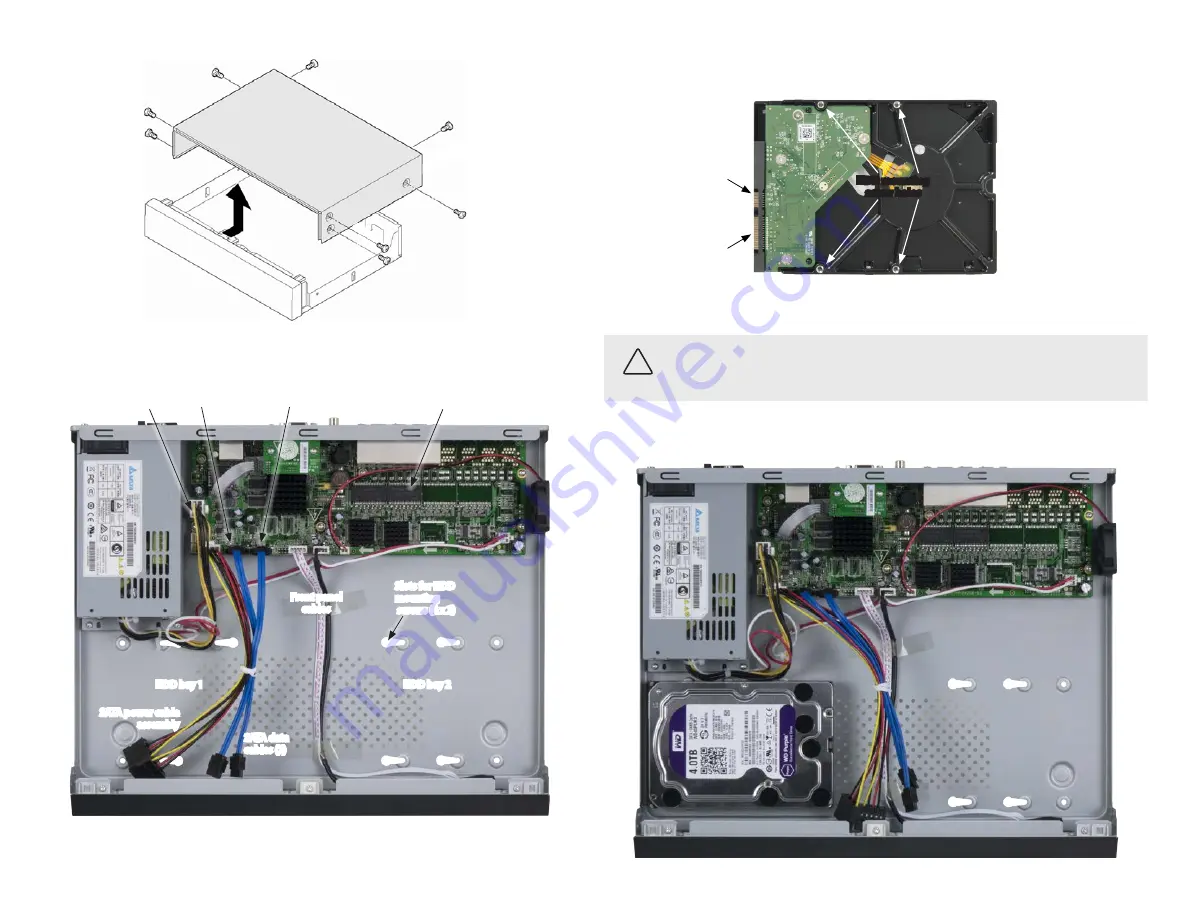
Un-package the HDD. In the photo below, note the location of the HDD mounting screw holes on the underside of the HDD. Also 
shown are the SATA and Power cable connectors. 

SATA cable  

connector

Power cable  

connector

HDD mounting  

screw holes

6. 

Screw the four HDD mounting screws into the mounting screw holes until the screw heads are about 1/8 inch from the surface of the 
HDD. 

CAUTION

Follow recommended electrostatic discharge (ESD) guidelines while performing this procedure. Install the HDD in a static-free 
environment, wearing a certified ESD wrist strap. If a static free environment and ESD wrist strap is not available, touch the bare metal of 
the NVR chassis frequently when installing the drive to dissipate the static charge naturally generated on your skin and clothing and avoid 
touching electronic components.

7. 

Position the HDD in 

HDD bay 1

 such that the HDD cable connectors are toward the middle of the chassis and the HDD mounting 

screws are fully seated in the mounting screw slots. 

3. 

Orient the chassis as shown in the picture below. Become familiar with the locations of the HDD mounting screws for HDD 1 (initial 
HDD) and HDD 2 (second HDD), and the location of the HDD 1 SATA connector on the PC board. 

Back

PC board

HDD 1 SATA data 

cable connector

HDD power  

cable connector

HDD 2 SATA data 

cable connector

HDD bay 1 

HDD bay 2 

SATA power cable  

assembly

SATA data  

cables (2)

Front panel 

cables

Slots for HDD 

mounting 

 screws (4 x 2)

4. 

If the SATA power cable assembly and the SATA data cables provided are not plugged into the PC board, plug them into the board as 
shown above. 

Summary of Contents for ALI-NVR3308P

Page 1: ...G ground Alarm inputs 1 4 Alarm input is tied to ground at G or G terminals through the alarm sensor N O or N C ALARM OUT 1 and G Alarm outputs 1 with ground termination Mouse control A standard 3 button left right scroll wheel USB mouse can also be used with this NVR To use a USB mouse This quick setup guide provides instructions to initially setup and use the ALI NVR3304P ALI NVR3308P and ALI NV...

Page 2: ...nd enter Double click Live view Switch between single screen and multi screen Click and drag PTZ control pan tilt and zoom Tamper proof privacy mask and motion detection Select target area Digital zoom in Drag and select target area Live view Drag channel time bar Right click Live view Show menu Menu Exit current menu to upper level menu Scroll wheel Scroll up Live view Previous screen Menu Previo...

Page 3: ...enus interface enables you to refine your configuration settings and expand the functionality of the system To use most menus the user must log into the NVR system either locally or remotely with administrative privileges To open the Menu system from the Live View screen right click anywhere in the screen then select Menu Step 5 Install a monitor mouse power For the following steps refer to the ba...

Page 4: ...2000 2003 XP Vista 7 8 10 32 64 bit version Apple MacOS X 10 5 and above Web Browser Microsoft Internet Explorer 8 0 9 0 10 and 11 32 bit version Safari 5 and higher Software Requirements Web Component Installation Mobile Client OS Platform iOS Android Alibi Witness If ID Authentication is not disabled see the Menu Configuration General settings a login window will open In the Login window select ...

Page 5: ...procedure as a guideline NVR compatible HDDs For the best performance of your system install only a high reliability security grade HDD such as Western Digital Purple series or GreenPower series HDD Security grade HDDs are designed to stream video efficiently and have a very low failure rate The NVR can accommodate one HDD ALI NVR3304P or two HDDs ALI NVR3308P and ALI NVR3316P each with a capacity...

Page 6: ...n HDD The HDD mounting screws and HDD cables are provided with your recorder CAUTION Followrecommendedelectrostaticdischarge ESD guidelineswhileperformingthisprocedure InstalltheHDDinastatic free environment wearingacertifiedESDwriststrap IfastaticfreeenvironmentandESDwriststrapisnotavailable touchthebare metaloftheNVRchassisfrequentlywheninstallingthedrivetodissipatethestaticchargenaturallygenera...

Page 7: ...requentlywheninstallingthedrivetodissipatethestaticchargenaturallygeneratedonyourskinandclothingandavoid touchingelectroniccomponents 7 Position the HDD in HDD bay 1 such that the HDD cable connectors are toward the middle of the chassis and the HDD mounting screws are fully seated in the mounting screw slots 3 Orient the chassis as shown in the picture below Become familiar with the locations of ...

Page 8: ... to secure the HDD Be careful not to overtighten the screws HDD 1 mounting screws 9 Turn the chassis over so the top is up 10 Attach the SATA data cable that is plugged into the HDD 1 SATA data cable connector to the HDD 1 SATA data connector When the connector is fully seated it clips into place See the photo below 11 Plug either HDD power cable connectors into the SATA power cable connector on t...

Reviews: