


6
www.observint.com
© 2020 Observint Technologies. All rights reserved.
Smart Event setup through the camera web interface
Install a microSD card in the camera
To retain alarm and event information in the camera, you must install a microSD card:
1.
Install a microSD card in the camera. See the Specifications section at the back of this document
for card type and capacity.
a.
Remove the cover on the underside of the camera (see the photo above).
b.
Slide a formatted microSD card into the card slot. It should slide in smoothly. Push the card
all the way into the slot, and then release it. The card should latch into place. (To remove
the card, push it all the way in to unlatch it, and then release it.)
c.
Reinstall the maintenance panel cover.
2.
Log into the camera using credentials with administrative privileges. See “Step 1. Route wiring to
the camera” on page 1.
3.
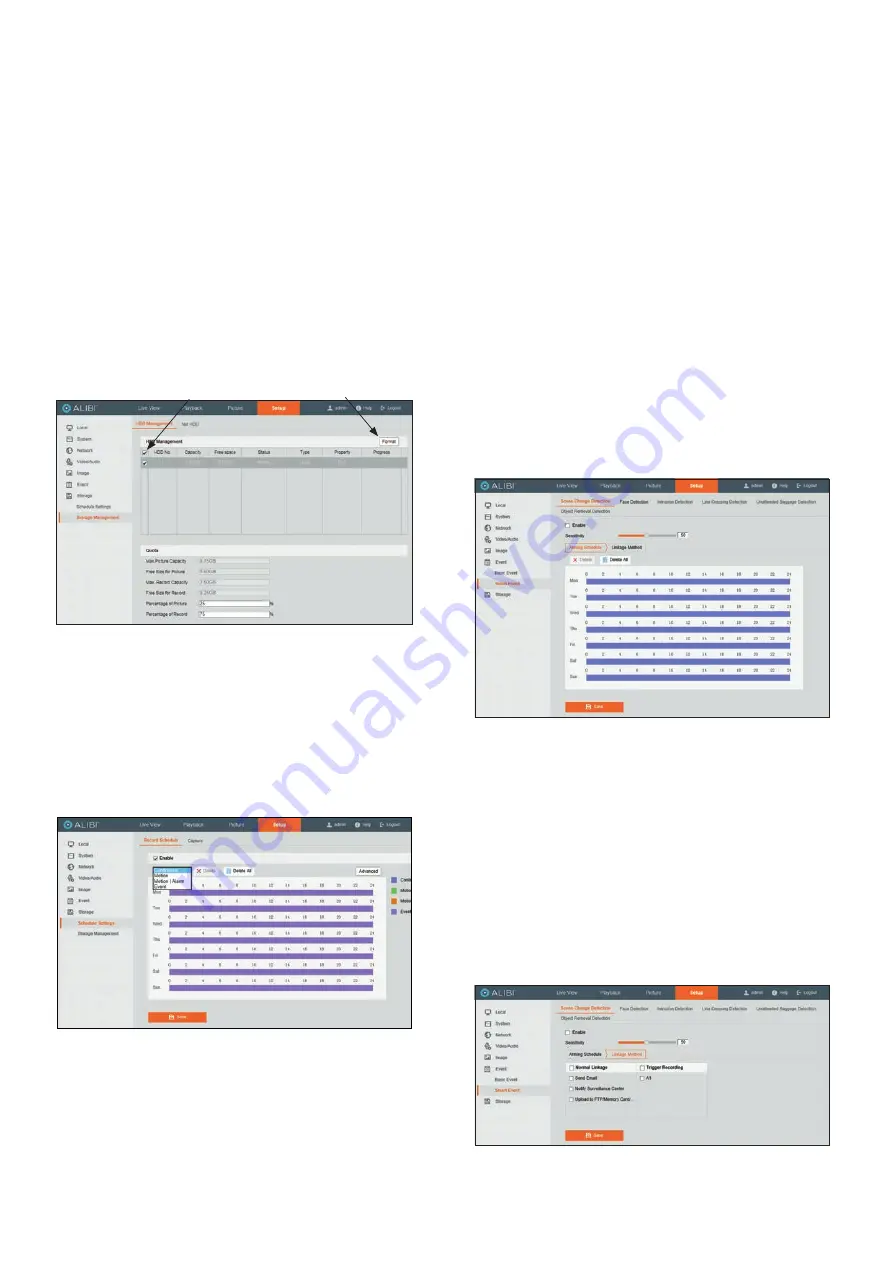
Setup the microSD card:
a.
The microSD card may need to be initialized before it can be used to record data. Click the
Setup
tab, then click the
Storage
link in the left frame. Click
Storage Management
in
the list that opens. See below.
Select box
Format
b.
Find the card you installed in the HDD Management list, and then check the Status. If the
status is
not
Normal
, or you want to clear all data from the card, check the select box for
then card and then click
Format
. Allow the operation to complete before continuing.
c.
Adjust the percentage of the card you want to use for pictures (captures) and recordings,
if necessary.
Setup the Record Schedule
To setup the camera to record Smart events, setup the record schedule to record events. To setup the
Storage Schedule:
1.
Click
Storage Settings
under
Storage
in the left frame.
2.
To configure the
Storage Settings
menu for events only:
a.
Click the
Enable
select box to check it, if necessary.
b.
Click the
Deselect All
button if any colored bars are on the calendar.
c.
Right click on one of the days to open a pop-up menu.
d.
Open the drop-down list at the top of the popup menu, and then select the type of event
you want to apply to the schedule (
Continuous
/
Motion
/
Motion | Alarm
/
Events
).
Adjust the time span in the same menu as needed, and then click
Save
.
Note:
You can define up to 7 storage periods in any one day, each with one of the four
event types. The screen shown above was configured for Event recording all week.
e.
To copy this setting you made for one day to other days of the week, place the mouse
cursor over schedule you want to copy, and then click the green icon to the right end of
the day.
f.
In the popup menu, select the days you want to copy the schedule to, and then click
OK
.
g.
Add additional recording events as needed. You cannot assign two event types to the
same time segment.
h.
Click the
Advanced
button above the calendar. In this menu, you can:
Check the
Overwrite
select box to write newer data across old date when the card
becomes full.
Select the
pre-record
and
post-record
time. These options will save video beginning
at the time “pre-” time increment selected before the event occurs, until after the “post-”
time increment after the event occurs.
You can also select the stream you want to record.
i.
Click
OK
to save your selections in the
Advanced
menu.
j.
Click the
Save
button at the bottom of the menu to retain your settings.
Scene Change Detection Smart Event setup
Scene change detection feature detects the change of surveillance field of view affected by the external
factors such as the intentional rotation of the camera. This alarm can trigger actions performed by the
camera to report and record the alarm information.
1.
Open the
Scene Change Detection
settings menu.
Go to
Setup | Event | Smart Event | Scene Change Detection
2.
Check the
Enable
select box to enable the feature.
3.
Click-and-drag the slider to set the detection
Sensitivity
. The sensitivity value ranges from 1 to
100. The higher the sensitivity value, the more readily a change of scene can trigger an alarm.
4.
Click
Arming Schedule
to set the time when this feature will be detected. By default, the
feature is always armed when enabled. To create a custom arming schedule:
—
To clear the arming schedule for a day of the week, click on the colored bar for that day,
and then click
Delete
in the popup menu.
—
To set an arming schedule for a period of a day that is clear, drag the cursor across the
period of the day you want to arm, and then click
OK
in the popup menu.
—
To copy the arming schedule for one day of the week to other days, place the cursor over
the day you want to copy, then click the green icon that appears to the right. Select the
days you want to copy the schedule to, and then click
OK
.
—
Click the
Save
button to retain your settings.
5.
Click
Linkage Method
to select the linkage methods options menu.
To configure the Linkage Methods menu, check the select boxes for the options you want to use.
6.
Click the
Save
button to retain your settings.


