


3
www.observint.com
© 2015 Observint Technologies. All rights reserved.
Click here to Call
Preset 95
3.
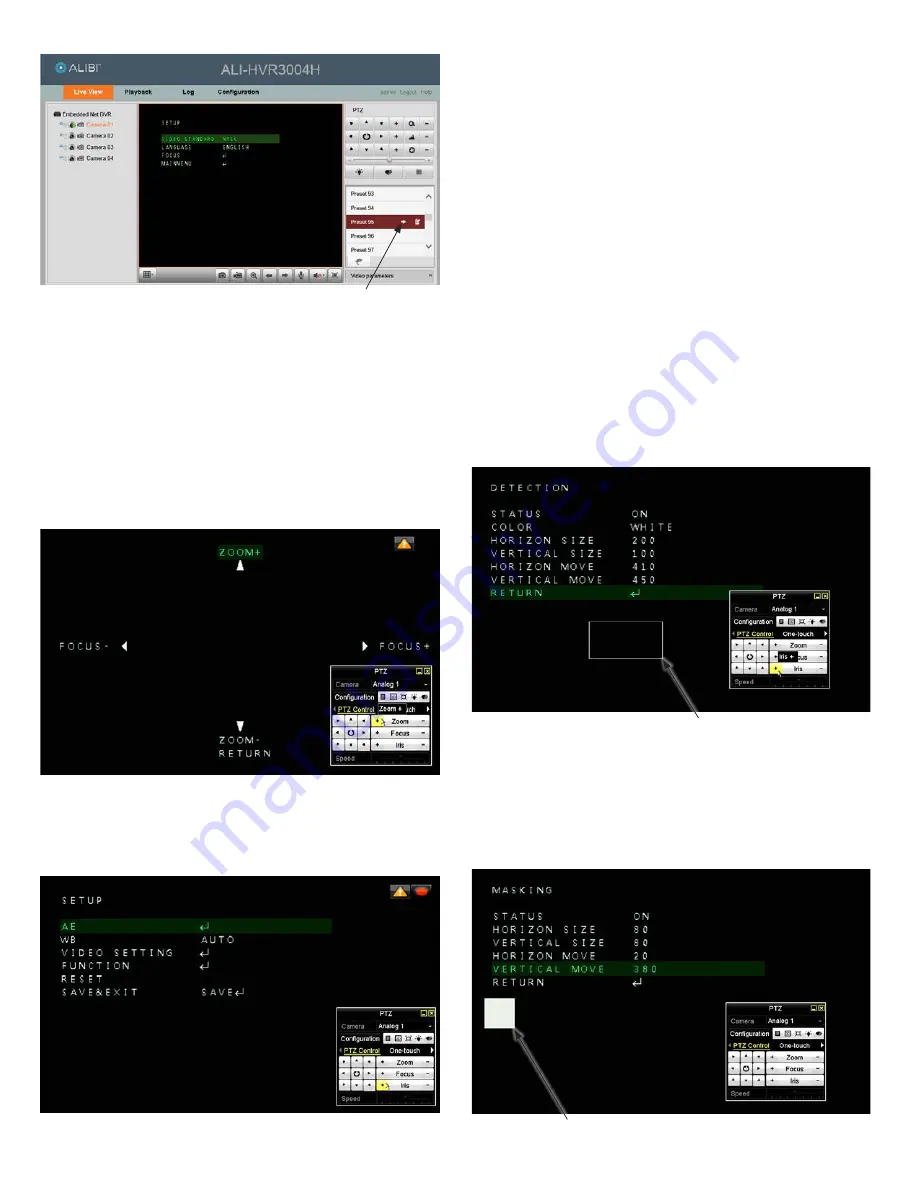
In the PTZ menu, execute (Call) a
Preset 95
command to open the camera OSD menu system. See
above.
The green highlighting in the OSD menu identifies the currently selected parameter. Use the buttons
in the PTZ control panel described above to navigate the OSD menus.
OSD PARAMETER DEFINITIONS
SETUP
menu
•
VIDEO STANDARD
: Click the
u
or
t
buttons to show either
NTSC or PAL.
•
LANGUAGE
: Click the
u
or
t
buttons to show either ENGLISH or (Chinese).
•
FOCUS
: Click
q
or
p
buttons to highlight FOCUS, and the click the Iris + to open the FOCUS screen.
In the
FOCUS
screen, click and hold down the
q
or
p
buttons or the
Zoom -
or
Zoom +
buttons to
zoom out or zoom in.
Click and hold down the
u
or
t
buttons or the
Focus +
or
Focus -
buttons to
focus in or focus out. Click
Iris +
to save your settings and return to previous menu.
•
MAIN MENU
: Highlight MAIN MENU, and then click
Iris +
to open the main SETUP menu.
MAIN MENU - SETUP
menu
•
AE
: Highlight AE, and click
Iris +
to open to open the automatic exposure submenu.
—
Brightness
: Set the brightness value from 1 .. 10 for best image.
—
AE Mode
: Set to HLS (highlight suppression) or GLOBAL AE mode. If you select HLS, click
Iris +
and then set the Level (0 .. 8).
—
AGC
: Set the AGC to High, Middle, Low or Off for best performance under differing conditions.
—
Shutter
: Set to a high shutter value as to improve the image quality when the vehicle speed is
very high. Default value is 1/100.
•
WB
: White Balance. Select either Auto or Manual. If you select Manual, click
Iris +
and then set the
RGAIN (red) and BGAIN (blue) levels.
•
VIDEO SETTING
: In the Video Setting submenu, you can set the following:
—
Contrast
: Set the contrast level from 1 .. 10 for best image.
—
Sharpness
: Set the sharpness level from 1 .. 10 for best image.
—
Color Gain
: Set the color gain level from 1 .. 10 for best image.
—
3DNR
: Select either High, Middle, Low or off for the best level of noise reduction.
—
Mirror
: Set the mirror feature to H (flip horizontal), V (flip vertical), HV (rotate 180 degrees), or
Off (no change [default}]) as needed.
•
FUNCTION
:
—
Detection
: Detection is used to identify specific (rectangular) areas of the field of view (FOV)
for motion detection. You can define up to four areas (0 .. 3) for motion. For each area, you must
open a submenu to enable the area and set the position of the rectangle (horizontal and vertical
pixel offset from the upper left corner of the FOV), and size (horizontal and vertical pixel size) of
the rectangle. You can also set the sensitivity for motion detection (High, Middle, Low, Weak).
Areas enabled for detection appear as rectangles with a colored border when the OSD is open.
Detection area represented by white border
—
Masking
: With Masking you can cover areas of the field of view (FOV) with an opaque
rectangle to protect it from being viewed or recorded. You can define up to eight areas of the
FOV (0 .. 7) for masking. For each area, you must open a submenu to enable the area and set the
position (horizontal and vertical pixel offset from the upper left corner of the window), and size
(horizontal and vertical pixel size) of the mask. You can also set the fill color, or select Mosaic.
Areas enabled for masking appear as rectangles filled with the color (or mosaic) as configured.
Mask represented by white rectangle


