


2
www.observint.com
Installing the camera
Position the camera in a location that provides the best view of your surveillance target.
1.
Install the camera mounting bracket using the documentation provided by the manufacturer.
2.
Route video and power extension cables between the video recorder and power sources, and the
location where the camera will be installed. Do not connect the extension cable to the recorder or
power source at this time.
3.
Attach (bolt) the camera to the mounting bracket.
4.
Connect the camera drop cable to video and power extension cables as required.
NOTE
: The camera
includes connectors for both HD-TVI and CVBS video.
NOTE
Camera drop cable connectors are not waterproof.
5.
Connect the other end of the video extension cable(s) to a video recorder device. Video from the
HD-TVI drop cable must be connected to an HD-TVI compatible video recorder (DVR) system.
6.
Connect the other end of the power extension cable to a 12 Vdc power source, and then apply power
to the camera. For 12 Vdc power, observe the polarity of the cable shown in the photo on page 1 of
this guide.
Camera adjustments
7.
Verify that video from the camera can be seen on a monitor or at the video recorder.
NOTE
: Video
from the CVBS drop cable is NTSC video. It can be displayed on most NTSC compatible monitors.
8.
While observing video from the camera, loosen the mounting bracket pan, elevation and tilt
adjustment lock screws, point the camera at your surveillance target, and then tighten adjustment
lock screws to hold the camera in position.
USING THE OSD
Camera configuration settings are made using the On Screen Display (OSD) menus. Use the OSD menus to
maximize your camera’s performance in your surveillance venue.
SETUP
3DNR
Brightness
Mirror
Contrast
Shutter
Color Gain
Sharpness
Sensitivity
Area 1 .. 8
Detection
Masking
Zoom In
Lamp
AGC
AE Mode
Function
Save & Exit
Reset
AE
WB
Video
Setting
Focus
Language
Video
Standard
Main Menu
Color
Area 1 .. 8
OSD menu tree
OSD menus are only accessible through the ALIBI Digital Video Recorder (DVR) or Hybrid Video Recorder
(HVR) it is connected to. They can be made using either the recorder directly or through logging into the
recorder remotely.
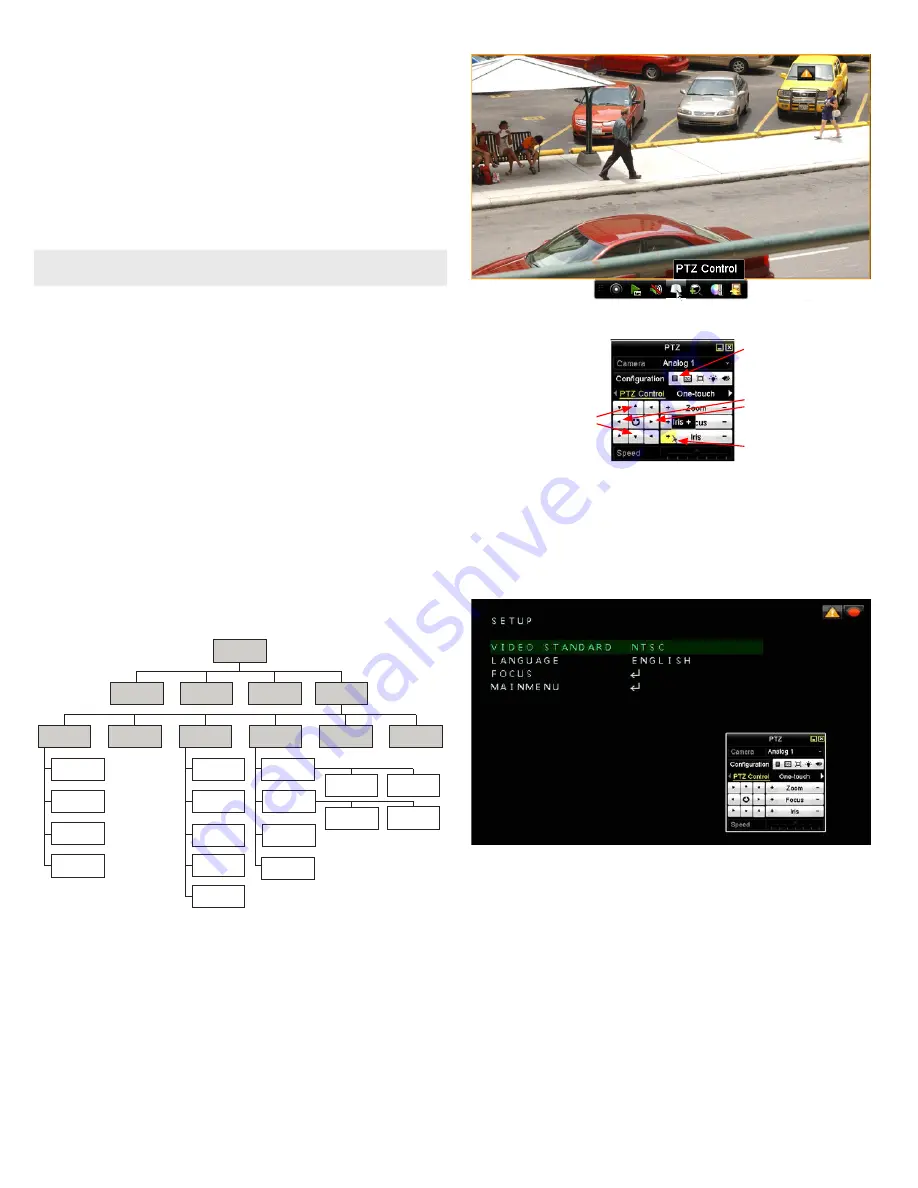
Accessing the OSD through the recorder
1.
At the recorder, click on the Live View image from then camera, and then click the
PTZ Control
icon
in the Quick Setting toolbar.
2.
In the PTZ Control pop-up menu, click the
MENU
icon on the Configuration line.
Click
q
/
p
to go to
next / previous menu item
Click
Iris +
to open
a parameter sub-menu (
)
Click
u
/
t
to change
parameter option
Click
MENU
to
open OSD menu
Use the PTZ pop-up menu to navigate through the OSD menu system.
—
To open the OSD menu, click the
Menu
icon (see above).
—
To move vertically through the menu,
click
q
/
p
to go to next / previous menu item.
—
To select a different menu option,
click the
u
or
t
buttons.
—
When a menu option shows a
symbol, click
Iris +
to open the parameter sub-menu.
—
To save parameter changes, navigate to the
SAVE&EXIT
option in the
MAIN MENU
(
SETUP
menu),
and then click
Iris +
.
NOTE
: In the screen shown above and those that follow, the background video image was removed
for clarity.
Accessing the OSD through remote login to the recorder
1.
Log into your Alibi video recorder through a web browser (remotely). Refer to the user manual for
your recorder for more information.
2.
Open a the camera video in a
Live View
window, and then click on the window to select it.
NOTE
: For clarity, the video background was removed from the following screen captures.
© 2015 Observint Technologies. All rights reserved.


