background image

Alfatron ALF-12X-SDIC, ALF-20X-SDIC and ALF-30X-SDIC 


Content 


1. Camera Installation .................................................................................................................................................. 2


1.1 Camera Introduction ...................................................................................................................................... 2


1.2 General Operation at Boot up ........................................................................................................................ 3


1.3 Mounting Brackets ......................................................................................................................................... 3


2. Product Overview .................................................................................................................................................... 6


2.1 Dimension ...................................................................................................................................................... 5


2.2 Accessory ....................................................................................................................................................... 7


2.3 RS-232 Interface ............................................................................................................................................ 7


2.4 Rotary DIP Switch ......................................................................................................................................... 8


2.5 Main Features ................................................................................................................................................ 9


2.6 Technical Parameter ....................................................................................................................................... 9


3. Remote Control ....................................................................................................................................................... 11


3.1 Match Code for Wireless Remote Control .................................................................................................... 11


3.2 Keys Introduction for IR Remote Control .................................................................................................... 11


3.3 Menu Introduction ....................................................................................................................................... 14


4. Network Configuration .......................................................................................................................................... 16


4.1 Network Connection .................................................................................................................................... 16


4.2 IE Login ....................................................................................................................................................... 17


4.3 Streaming ..................................................................................................................................................... 18


4.4 Software Upgrading ..................................................................................................................................... 19


5. Serial port communication and control .................................................................................................................. 20


5.1 VISCA Protocol Return Command .............................................................................................................. 20


5.2 VISCA Protocol Control Command ............................................................................................................ 20


5.3 VISCA Protocol Inquiry Command ............................................................................................................. 23


5.4 Pelco-D protocol command list ................................................................................................................... 25


5.5 Pelco-P protocol command list .................................................................................................................... 25


6. Maintenance and Troubleshooting ......................................................................................................................... 26


6.1 Maintenance ................................................................................................................................................. 26


6.2 Troubleshooting ........................................................................................................................................... 26


7. Warranty ................................................................................................................................................................ 27


Summary of Contents for ALF-12X-SDIC

Page 1: ...www alfatronelectronics com ALFATRON ELECTRONICS GmbH GERMANY ALF 12X SDIC ALF 20X SDIC ALF 30X SDIC Full HD PTZ Camera User Manual ...

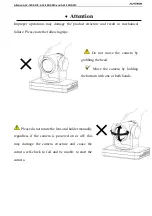
Page 2: ...ure Please note the following tips Do not move the camera by grabbing the head Move the camera by holding the bottom with one or both hands Please do not rotate the lens and holder manually regardless if the camera is powered on or off this may damage the camera structure and cause the camera self check to fail and be unable to start the camera ...

Page 3: ...that interference will not occur in a particular installation If this equipment does cause harmful interference to radio or television reception which can be determined by turning the equipment off and on the user is encouraged to try to correct the interference by one or more of the following measures Reorient or relocate the receiving antenna Increase the separation between the equipment and rec...

Page 4: ...gent if needed Do not use strong or corrosive detergents to avoid scratching the lens and affecting the image 1 7 This product contains no parts which can be maintained by users themselves Any damage caused by dismantling the product by the user without permission voids the warranty 2 Electrical Safety Installation and use of this product must strictly comply with local electrical safety standards...

Page 5: ...ch Code for Wireless Remote Control 11 3 2 Keys Introduction for IR Remote Control 11 3 3 Menu Introduction 14 4 Network Configuration 16 4 1 Network Connection 16 4 2 IE Login 17 4 3 Streaming 18 4 4 Software Upgrading 19 5 Serial port communication and control 20 5 1 VISCA Protocol Return Command 20 5 2 VISCA Protocol Control Command 20 5 3 VISCA Protocol Inquiry Command 23 5 4 Pelco D protocol ...

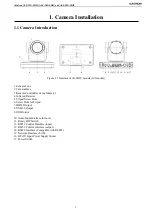
Page 6: ...3 Remote Control Receiving Indicator 4 Infrared Receiver 5 Tripod Screw Hole 6 Screw Hole for Tripod 7 HDMI Output 8 USB3 0 Output 9 SDI Output 10 Audio Input Interface Line in 11 Rotary DIP Switch 12 RS232 Control Interface input 13 RS232 Control Interface output 14 RS422 Interface Compatible with RS485 15 Network Interface LAN 16 DC12V Input Power Supply Socket 17 Power Switch ...

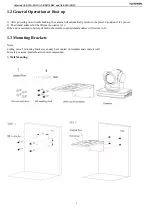
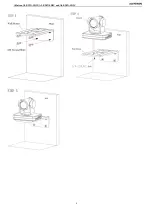
Page 7: ...the preset 0 position if it s pre set 2 The default address for the IR remote control is 1 If the unit is restored to factory defaults the remote control default address will restore to 1 1 3 Mounting Brackets Notes Ceiling or wall mounting brackets can only be mounted on template and concrete wall For safety reasons plasterboard is not recommended 1 Wall Mounting ...

Page 8: ...Alfatron ALF 12X SDIC ALF 20X SDIC and ALF 30X SDIC 4 ...

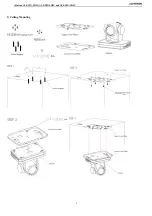
Page 9: ...Alfatron ALF 12X SDIC ALF 20X SDIC and ALF 30X SDIC 5 2 Ceiling Mounting ...

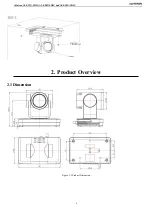
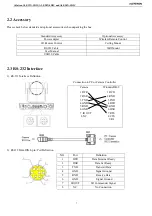
Page 10: ...Alfatron ALF 12X SDIC ALF 20X SDIC and ALF 30X SDIC 6 2 Product Overview 2 1 Dimension Figure 2 2 Product Dimension ...

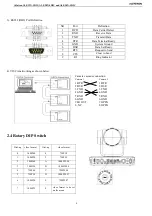
Page 11: ...2 RXD 3 TXD 3 TXD 4 GND 4 DTR 5 RXD 5 GND 6 GND 6 DSR 7 IR OUT 7 RTS 8 NC 8 CTS 9 RI 2 RS232 Mini DIN 8 pin Port Definition Standard Accessory Optional Accessory Power adapter Wireless Remote Control IR Remote Control Ceiling Mount RS232 Cable Wall Mount User Manual USB3 0 Cable NO Port Definition 1 DTR Data Terminal Ready 2 DSR Data Set Ready 3 TXD Transmit Data 4 GND Signal Ground 5 RXD Receive ...

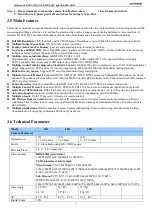
Page 12: ...otary DIP Switch Dial up video format Dial up video format 0 1080P60 8 720P30 1 1080P50 9 720P25 2 1080I60 A 1080P59 94 3 1080I50 B 1080I59 94 4 720P60 C 720P59 94 5 720P50 D 1080P29 97 6 1080P30 E 720P29 97 7 1080P25 F video format to be set on the menu NO Port Definition 1 DCD Data Carrier Detect 2 RXD Receive Data 3 TXD Transmit Data 4 DTR Data Terminal Ready 5 GND System Ground 6 DSR Data Set ...

Page 13: ...T28181 RTSP RTMP protocols Supports RTMP push mode which can easily be connected to streaming server Wowza FMS Supports RTP multicast mode Supports network full command VISCA control protocol Control Interface RS422 compatible with RS485 RS232 IN RS2323 OUT RS232 cascade connection Multiple Control Protocol Supports VISCA PELCO D PELCO P protocols and automatic identification protocols Quiet Pan T...

Page 14: ...ms Video Compression Format LAN Interface H 265 H 264 Dual stream output USB3 0 Interface YUY2 MJPEG H 264 NV12 H 265 Audio Input Interface Stereo unbalanced 3 5mm input Audio Output Interface HDMI SDI LAN USB3 0 Audio Compression Format AAC MP3 G 711A Control Interface RS232 IN RS232 OUT RS422 compatible with RS485 Control Protocol VISCA Pelco D Pelco P Baud Rate 115200 38400 9600 4800 2400bps Po...

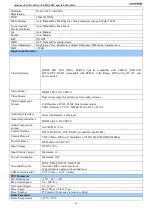
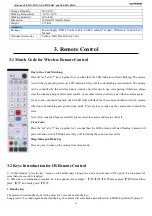
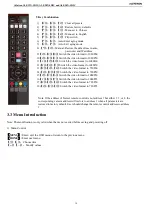
Page 15: ...ed LED light will flash for 20 seconds and then switch off camera will stop code matching and go into sleep mode Press any key to wake up the camera and re match the code Note After code matching successfully please select the camera address to control it Clear Code Press the set and keys together for 3 seconds then the LED indicator will start flashing Camera will power off and on the LED indicat...

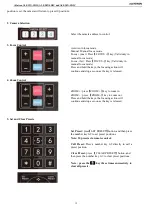
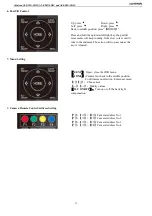
Page 16: ...nue and stop as soon as the key is released 4 Zoom Control ZOOM press ZOOM key to zoom in ZOOM press ZOOM key to zoom out Press and hold the keys the focusing action will continue and stop as soon as the key is released 5 Set and Clear Presets Set Preset press SET PRESET button and then press the number key 0 9 to set preset positions Note 10 presets via remote control Call Preset Press a number k...

Page 17: ...om slow to fast until it runs to the endpoint The action will stop as soon as the key is released 7 Menu Setting MENU Open close the OSD menu HOME Camera lens back to the middle position Confirms menu selection Enter next menu Choose item Modify values BLC ON OFF Turn on or off the back light compensation 8 Camera Remote Control Address Setting F1 Camera Address No 1 F2 Camera Address No 2 F3 Came...

Page 18: ...20P60 14 5 Switch the video format to 720P50 15 6 Switch the video format to 1080P30 16 7 Switch the video format to 1080P25 17 8 Switch the video format to 720P30 18 9 Switch the video format to 720P25 Note If the address of former remote control is not address 1 but either 2 3 or 4 the corresponding camera address will restore to address 1 when all parameters are restored to factory default User...

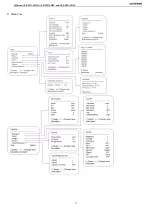
Page 19: ...Alfatron ALF 12X SDIC ALF 20X SDIC and ALF 30X SDIC 15 2 Menu Tree ...

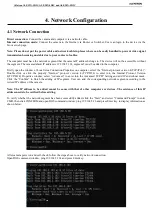
Page 20: ...er select the Internet protocol version 4 TCP IPv4 Double click or click the property Internet protocol version 4 TCP IPv4 to enter into the Internet Protocol Version 4 TCP IPv4 Properties window select Advanced to enter into the Advanced TCP IP Setting and add IP and subnet mask Click the Confirm to finish the adding of IP segment User can add the corresponding network segment according to the re...

Page 21: ...s no option for configuration Note Web access supports most web browsers IE 360 browsers and etc Chrome login is available after firmware update but only supports basic configuration and preview video no functions of recording videos voice volume video capture and playback 3 Web Login Preview When logged in to the camera s web interface the preview of the camera image is available to view in the p...

Page 22: ...ive XXX For example The default IP address of the camera is 192 168 5 163 The way to obtain the RTSP video stream is as per below rtsp 192 168 5 163 554 live av0 av0 main stream rtsp 192 168 5 163 554 live av1 av1 sub stream The default IP address of the camera is 192 168 5 163 the way to obtain RTMP video stream is as per below rtmp 192 168 5 163 1935 live av0 av0 main stream rtmp 192 168 5 163 1...

Page 23: ...r a domain name or an IP address Host port server default port number Stream name live test live XXX Username and password the username and password set by the server or leave it empty Access url rtmp host domain name host port live xxx Or rtmp host IP address host port live xxx 4 4 Software Upgrading 1 Login to the web page to manage camera settings The default page is preview interface where use...

Page 24: ...es Command packet Note Syntax Error z0 60 02 FF Returned when the command format is different or when a command with illegal command parameters is accepted Command Not Executable z0 61 41 FF Returned when a command cannot be executed due to current conditions For example when commands controlling the focus manually are received during auto focus 5 2 VISCA Protocol Control Command Command Function ...

Page 25: ...B Gain Up 8x 01 04 04 02 FF Down 8x 01 04 04 03 FF Direct 8x 01 04 44 00 00 0p 0q FF pq B Gain CAM_AE Full Auto 8x 01 04 39 00 FF Automatic Exposure mode Manual 8x 01 04 39 03 FF Manual Control mode Shutter priority 8x 01 04 39 0A FF Shutter Priority Automatic Exposure mode Iris priority 8x 01 04 39 0B FF Iris Priority Automatic Exposure mode Bright 8x 01 04 39 0D FF Bright mode CAM_Shutter Reset ...

Page 26: ...04 3F 01 pq FF Recall 8x 01 04 3F 02 pq FF CAM_LR_Reverse On 8x 01 04 61 02 FF Image Flip Horizontal ON OFF Off 8x 01 04 61 03 FF CAM_PictureFlip On 8x 01 04 66 02 FF Image Flip Vertical ON OFF Off 8x 01 04 66 03 FF CAM_ColorSaturation Direct 8x 01 04 49 00 00 00 0p FF P 0 E 0 60 1 70 2 80 3 90 4 100 5 110 6 120 7 130 8 140 9 150 10 160 11 160 12 180 13 190 14 200 CAM_IDWrite 8x 01 04 22 0p 0q 0r ...

Page 27: ...AM_ZoomPosInq 8x 09 04 47 FF y0 50 0p 0q 0r 0s FF pqrs Zoom Position CAM_FocusAFModeInq 8x 09 04 38 FF y0 50 02 FF Auto Focus y0 50 03 FF Manual Focus y0 50 04 FF One Push mode CAM_FocusPosInq 8x 09 04 48 FF y0 50 0p 0q 0r 0s FF pqrs Focus Position CAM_AFSensitivityInq 8x 09 04 58 FF y0 50 01 FF High y0 50 02 FF Normal y0 50 03 FF Low CAM_AFZoneInq 8x 09 04 AA FF y0 01 04 AA 00 FF Top y0 01 04 AA ...

Page 28: ... 50 02 FF On y0 50 03 FF Off IR_ReceiveReturn y0 07 7D 01 04 00 FF Power ON OFF y0 07 7D 01 04 07 FF Zoom tele wide y0 07 7D 01 04 38 FF AF ON OFF y0 07 7D 01 04 33 FF Camera _Backlight y0 07 7D 01 04 3F FF Camera _Memery y0 07 7D 01 06 01 FF Pan_titleDriver CAM_BrightnessInq 8x 09 04 A1 FF y0 50 00 00 0p 0q FF pq Brightness Position CAM_ContrastInq 8x 09 04 A2 FF y0 50 00 00 0p 0q FF pq Contrast ...

Page 29: ...on Response 0xFF Address 0x00 0x5D Value High Byte Value Low Byte SUM 5 5 Pelco P protocol command list Function Byte1 Byte2 Byte3 Byte4 Byte5 Byte6 Byte7 Byte 8 Up 0xA0 Address 0x00 0x08 Pan Speed Tilt Speed 0xAF XOR Down 0xA0 Address 0x00 0x10 Pan Speed Tilt Speed 0xAF XOR Left 0xA0 Address 0x00 0x04 Pan Speed Tilt Speed 0xAF XOR Right 0xA0 Address 0x00 0x02 Pan Speed Tilt Speed 0xAF XOR Upleft ...

Page 30: ...remote control addresses need to be put back to 1 too b Check whether the batteries are in the remote controller or if they are low c Check that the camera working mode is in normal operating mode see Table 2 2 and Table 2 3 d Check if the menu is closed Camera control through remote controller is only available after exiting the menu If video output is from LAN menu will not be displayed menu wil...

Page 31: ...use of the Company s components 1 10 The Company will at its sole option provide one of the following three remedies to whatever extent it shall deem necessary to satisfy a proper claim under this limited warranty 1 10 1 Elect to repair or facilitate the repair of any defective parts within a reasonable period of time free of any charge for the necessary parts and labor to complete the repair and ...

Reviews: