background image

Maintenance and repair 

(continued)


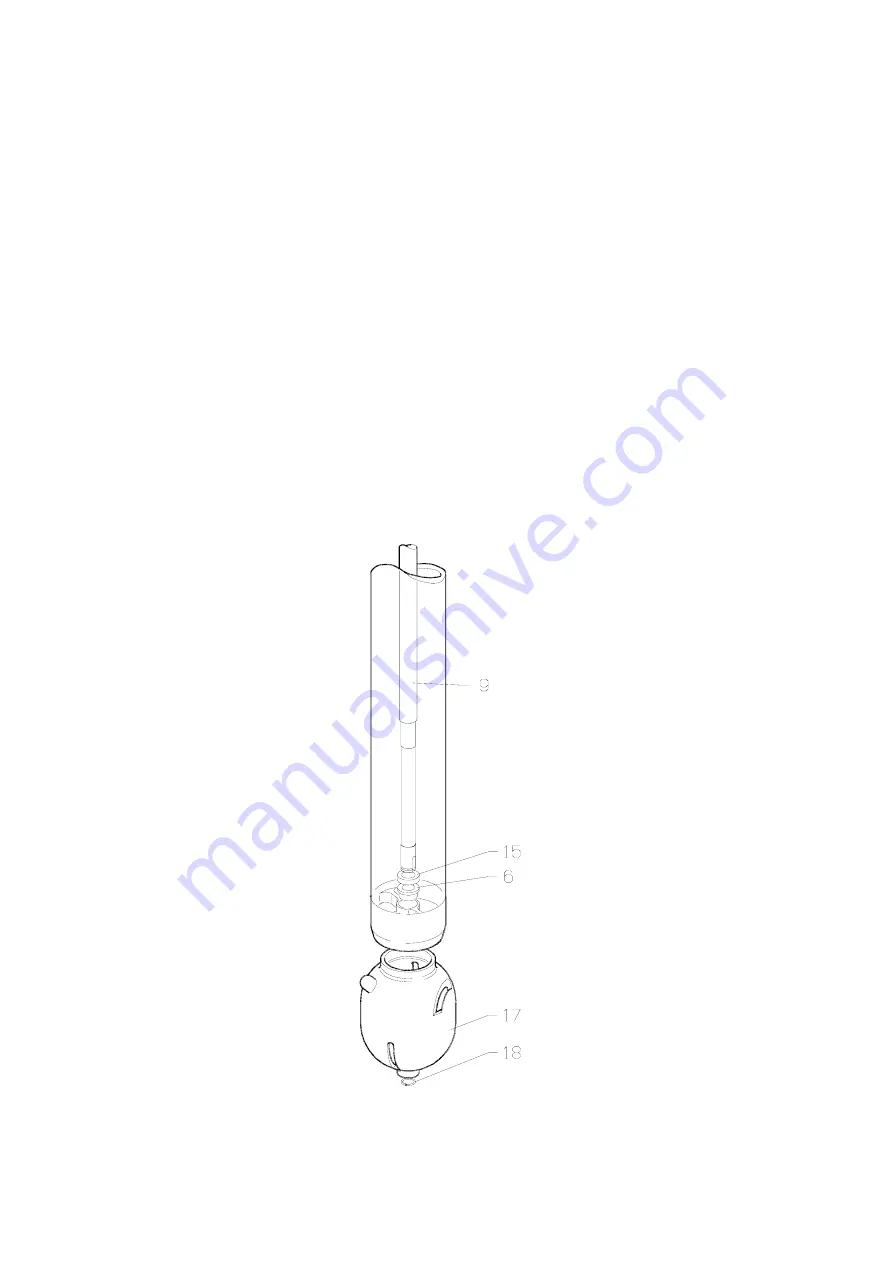
Cleaner Head Assembly 

Disassembly: 

It is necessary to disconnect the cleaner from any piping etc. and dismount it from the tank. Place the 
machine on a level surface. 
 
1. 

Dismount the Clamp ring, Inlet connection and Gasket (Pos. 20, 19  and 21). 

2.  Push up the Cleaner head (Pos. 17) and remove the Lock ring (Pos. 18). If necessary hold Drive 

shaft (Pos. 9) in position when pushing up Cleaner head. 

3. 

Pull off Cleaner head. 

Reassembly: 

Reassembly is carried out in the opposite order.  


Page 12 

Instruction Manual Toftejorg SaniMega 


IM-TE91A590-EN1 

ï

Return to menu

Summary of Contents for Toftejorg SaniMega

Page 1: ...IM TE91A590 EN1 August 2005 Toftejorg SaniMega Instruction Manual Return to menu...

Page 2: ...ration 9 Maintenance and repair 10 Preventive Maintenance 10 Turbine and Gear Assembly 11 Cleaner Head Assembly 12 Reference List of Parts 13 Rotacheck 14 Installation Guide 14 How to Order Spare Part...

Page 3: ...nce on the contrary means good performance no unscheduled stops and superior total economy The information in this manual is simple to follow but should you require further assistance our Customer Ser...

Page 4: ...he Turbine into rotation It then continues downwards to the Cleaner head and out through the slots The rotation of the Turbine is via the Gear transmitted to the Drive shaft which makes the Cleaner he...

Page 5: ...e length 1 200 or 1 500 mm Min tank opening 72 5 mm Materials Stainless steel AISI 316L PTFE PEEK EPDM Options A non invasive electronic Rotation Sensor to validate speed of the cleaner can be include...

Page 6: ...cal Data continued Principal dimensions Dimensions in mm Dimensions for Options For welding end 65 99mm For NW100 DIN Union 234 mm Page 6 Instruction Manual Toftejorg SaniMega IM TE91A590 EN1 Return t...

Page 7: ...Technical Data continued Performance Data Flow Rate Rotating speed Instruction Manual Toftejorg SaniMega Page 7 IM TE91A590 EN1 Return to menu...

Page 8: ...grinding dust scale and other foreign matter Note The machine shall be installed in accordance with national regulations for safety and other relevant regulations and standards Precautions shall be m...

Page 9: ...team sterilisation Pressure Please make sure that the connections are correctly mounted before opening of the washing valve Put on pressure gradually in order to avoid hydraulic shocks which might str...

Page 10: ...manual Never assemble components without previous cleaning This is especially important at all mating surfaces Work in a clear well lighted work area Every 300 500 working hours Inspect the gear turbi...

Page 11: ...e removed 3 Remove Circlip Pos 11 and pull out the Pinion Pos 1 releasing the Worm wheel pos 2 and Washer Pos 14 4 Remove the Circlip Pos 11 and pull off the Horizontal shaft Pos 12 Reassembly Reassem...

Page 12: ...el surface 1 Dismount the Clamp ring Inlet connection and Gasket Pos 20 19 and 21 2 Push up the Cleaner head Pos 17 and remove the Lock ring Pos 18 If necessary hold Drive shaft Pos 9 in position when...

Page 13: ...ft Stainless steel 9 TE12A530 33 1 Drive shaft Stainless steel 10 TE12A507 1 Shaft Stainless steel 11 TE51C202 3 Circlip Stainless steel 12 TE12A513 1 Horizontal shaft Polymer 13 TE51C004 1 Pin Stainl...

Page 14: ...the relay Technical Data Dimensions 12x12x30 mm Connection electrical 2m PVC cable 2x0 34mm 2 Supply voltage 5 24 V DC Supply voltage Ex approv Max 8 2 V DC Current consumption Magnet sensed 3 mA Curr...

Page 15: ...r for sensor Polymer 5 TE12A356 1 Magnet complete Working Instructions 1 Remove the Inlet connection Pos 19 page 13 2 Remove Circlip Pos 11 and Gear wheel Pos 4 page 13 3 Fit Magnet Pos 5 in Gear whee...

Page 16: ...ion Material 3 TE51C017 2 Cylindrical Pin Stainless steel 6 TE20G549 2 Bearing f Turbine shaft Polymer 11 TE51C202 3 Circlip Stainless steel 12 TE12A513 1 Horizontal shaft Polymer 18 TE12A559 1 Lock r...

Page 17: ...of Machine Serial No Length mm Date No of Working Hours Maintenance Actions Exchanged Parts Remarks Sign 0 Machine put into operation V 94 2 Instruction Manual Toftejorg SaniMega Page 17 IM TE91A590 E...

Page 18: ...c shock be disregarded Yes No Inlet line flushed before installation of tank cleaner Yes No Working hours before failure hours Cleaning Programme Cleaning media and conc Temperature Time Recirculation...

Page 19: ...installed in inlet line Yes Mesh size mm No Is tank cleaner flushed with clean water after tank cleaning Yes No Type of Soilage Tank Contents to be removed Name formula concentration of material to be...

Reviews: