Alcolizer Centurion Quantum User Manual Download Page 16

Centurion Quantum 

User Manual 


REF: Centurion Quantum User Manual V2.docx 


Page 16    


© Alcolizer Technology 

Uncontrolled when printed.


6


User Controls 

6.1


Buttons 

Inside the Centurion Quantum are buttons which can be used to access certain menus 
during setup and fault finding. Users should not access the machine and press these buttons 
unless following instructions in this manual, or instructions verbally given when in contact 
with your Alcolizer Technology technical representative.  
Access the buttons by unlocking the Centurion Quantum and swinging it gently open. The 
buttons are located on the main circuit panel.  


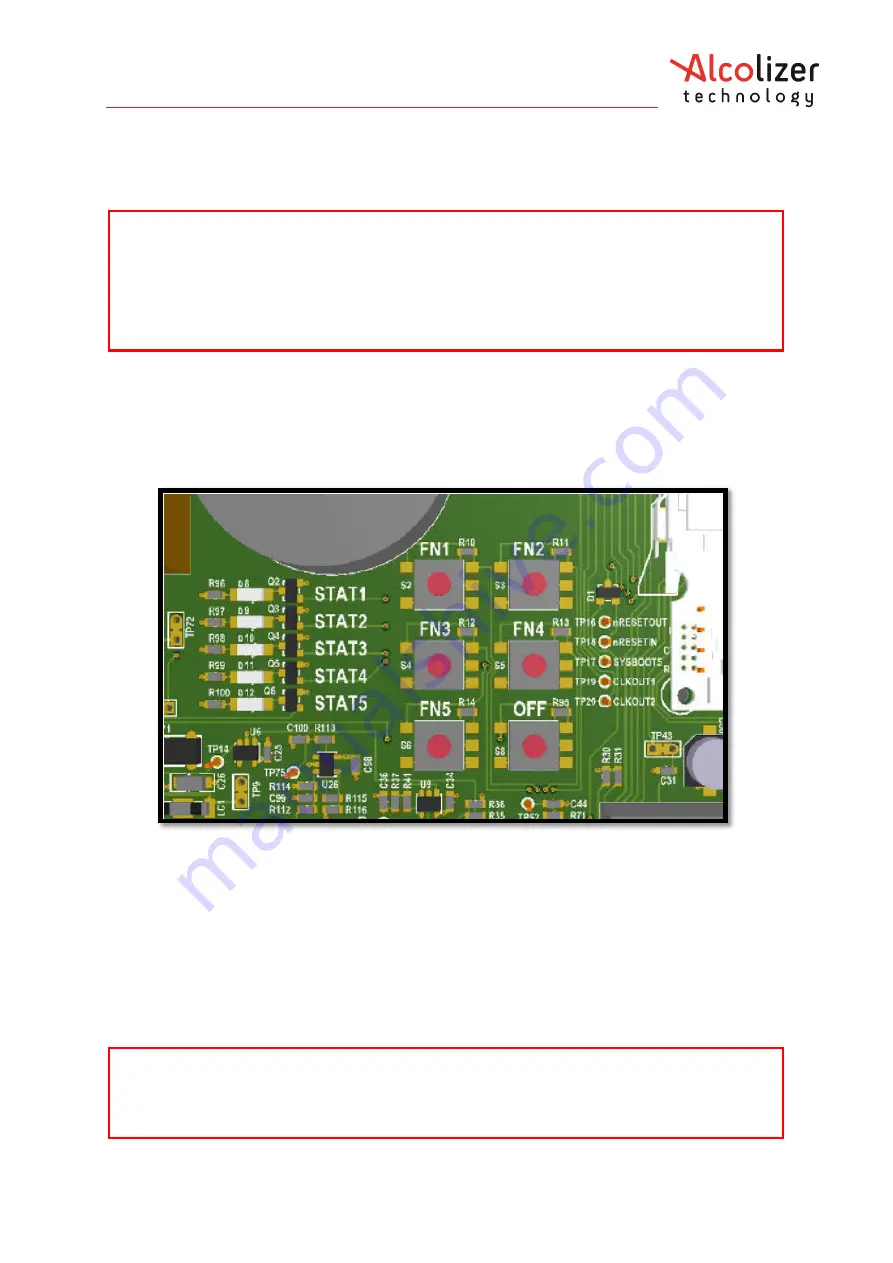
The only buttons that users need to operate are FN1, FN4 and OFF. Do not touch the other 
buttons. 
The buttons have the following functions: 


FN1:

 Show/hide the Status page. Does the same as pressing F1 on the keyboard. 


FN4:

 Save the event log to USB flash memory. 

This opens the ‘Functions Menu’ on 

the instrument front screen.


OFF: 

Power-off and power-on the instrument. 

o


If the instrument is running, press and release once to power down. 

o


If the instrument is powered off, press once to start up. 

WARNING 

When the unit is open or not installed on the back plate, electrical components are 

exposed. The following steps require the user to open the Centurion Quantum with 

power applied. During the procedures ensure only the buttons mentioned are activated.  

Do not come in contact with any exposed components.


WARNING 

The only correct way to power the instrument down is to press & release the OFF button. 

Pressing and holding the OFF button is a service only function and may cause irreparable 

damage to the instrument. 

Summary of Contents for Centurion Quantum

Page 1: ...d by correct use of this device is only considered accurate at the time of testing Great care has been taken to ensure the accuracy of each reading Neither the manufacturer the distributor nor the owner accepts liability or responsibility due to any action or claim arising from the reading produced by this device whether used correctly or incorrectly ...

Page 2: ...t and Position 9 3 1 3 Choosing a suitable mounting location 9 3 1 4 Mounting Instructions 9 3 2 Mounting and Starting the Instrument 10 3 2 1 Mounting 10 3 2 2 Electrical Connection 10 3 2 3 Electrical Power Supply Plug 10 3 2 4 Other Electrical Connections 10 3 2 5 Initial Start Up 11 4 Operating Instructions 12 4 1 Providing a Breath Sample 12 4 2 Analysing the Breath Sample 13 5 Owner Servicin...

Page 3: ... 2 Background Graphics 22 7 5 3 Custom Text 23 7 6 Intervals 23 7 7 Logs 24 7 7 1 View 24 7 7 2 Export 25 7 7 3 Exporting 25 7 7 4 Erase Event Logs 25 7 8 Networks 26 7 8 1 Configuration 26 7 8 2 Network Setup 26 7 8 3 Services 27 7 8 4 Authorisation Over Network 27 7 8 5 Alcolizer Portal 27 7 8 6 Enabling AlcoCONNECT Data Management Portal 28 7 9 Email 29 7 9 1 Email Settings 29 7 9 2 Settings Ma...

Page 4: ...ware 37 9 1 Saving software into the USB stick 37 9 2 Installing the update on your Centurion 37 9 3 Checking the software version in your Centurion 38 10 Calibration 39 10 1 Calibration Interval 39 10 2 Alcohol Sample Module ASM calibration 39 10 3 Instructions for replacing the ASM 39 10 3 1 Turn the instrument OFF 39 10 3 2 Exchanging the ASM 40 10 3 3 Main Module servicing 40 11 Printer Setup ...

Page 5: ...mation with ease It includes Warnings Cautions and Notes applicable to the Centurion Quantum instrument SAFETY WARNING This device contains no owner serviceable parts Should the instrument require servicing please contact Alcolizer Technology on 1300 789 908 This appliance is not intended for use by persons including children with reduced physical sensory or mental capabilities or lack of experien...

Page 6: ...ries require specific installation and operating instructions Please contact your Alcolizer Technology representative for further advice 2 3 Specifications Item Specification Dimensions 410m H x 210mm W x 110mm D Weight 5kg Power 100 240V 50 60Hz 60W Housing Steel construction Sensor Alcohol specific electrochemical fuel cell Response Time Within 3 5 seconds for a 0 100g 210L BrAC reading Display ...

Page 7: ...Equipment Overview With a long lasting and durable steel construction Centurion is manufactured to withstand long term use Weighing under 10kg Centurion can be wall mounted in multiple accessible locations A large display screen also makes for clearer and easier reading of displayed results 2 4 1 External View 2 4 2 Internal View ...

Page 8: ...Centurion Quantum User Manual REF Centurion Quantum User Manual V2 docx Page 8 Alcolizer Technology Uncontrolled when printed Male Lift Off Hinge Mounting Holes Mounting Holes ...

Page 9: ...idity controlled environment This is typically what you would find in a normal office environment The Quantum is designed for industrial and commercial uses which may not lend itself to the ideal mounting location and may necessitate its mounting outdoors or in other uncontrolled environments In this case consideration must be made towards optimizing the mounting and ensuring the instrument operat...

Page 10: ...ove any packing materials 6 Remove the screen protector film from the front of the display screen 3 2 2 Electrical Connection The Quantum should be provided with an independent electrical supply and should not be dependent upon a third party device for power Quantum will automatically power up in the presence of a mains input 3 2 3 Electrical Power Supply Plug The Quantum is provided with an elect...

Page 11: ...tart Up Perform the following steps for the initial start up 1 The Centurion will automatically begin the start up process once you plug it into mains power 2 The instrument will take several minutes to start up The loading screen will be visible 3 The instrument is ready to use when the display screen is visible and ready to receive a sample ...

Page 12: ...ccurate testing results food beverages medications smoking vaping or substances that contain alcohol should not be consumed for at least 15 minutes prior to testing Allow 15 minutes for any potential interfering alcohol to be cleared from the donor before testing again It is recommended not to clean the instrument with high alcohol content materials residual alcohol can cause background interferen...

Page 13: ...so be indicated by a long beep f After each test ensure straws are disposed appropriately according to your local authority disposal regulations 4 2 Analysing the Breath Sample The instrument will perform an analysis and then display the result The colour of the display is programmed to change according to the level of alcohol detected If the BrAC detected is zero the display will be green ...

Page 14: ...splayed while the instrument resets itself ready for the next test For zero readings this will typically be about ten seconds but will be longer for increased alcohol readings Invalid Sample The invalid blow screen is displayed if the user stops blowing before 1 0L of breath is recorded blows too softly blows too hard doesn t blow for long enough If the blow is invalid cease blowing wait until the...

Page 15: ...o not use alcohol based cleaning products abrasive cleaning pads or chemicals Non alcohol based cleaning wipes can be used to clean the Centurion Quantum As part of routine cleaning use the brush provided to clean out the Centurion Quantum sample port as follows Insert the brush bristles into the sample port Do not exceed the length of the bristles through the sample port Continue a backward forwa...

Page 16: ...ns The buttons have the following functions FN1 Show hide the Status page Does the same as pressing F1 on the keyboard FN4 Save the event log to USB flash memory This opens the Functions Menu on the instrument front screen OFF Power off and power on the instrument o If the instrument is running press and release once to power down o If the instrument is powered off press once to start up WARNING W...

Page 17: ...king patterns are noticed contact your authorised Alcolizer service technician on 1300 789 908 6 3 Keyboard A standard 101 style keyboard with a standard USB connection or a wireless keyboard can be connected to the Centurion to access certain menus during setup and fault finding Users should not access the machine and attach a keyboard unless specifically following instructions in this manual or ...

Page 18: ...sc Toggle instrument configuration menu Alt up Switch to previous configuration page Alt down Switch to next configuration page Alt left Switch to previous tab or page Alt right Switch to next tab or page Ctrl Alt P Write screen shot to USB TAB Used to navigate within the page across different sections Note Use only the left Alt key The right Alt key has no function The spacebar has the same funct...

Page 19: ...the F1 key to access the Centurion Quantum User Menu area 3 Press the left Alt key to bring up available menu choices 4 Press the down key and move down to the required menu e g Settings 5 Press left Alt to hide the menu and give clear access to the selected page 7 2 Status The status page provides a variety of information for the user NOTE A mouse can be used to operate the various User Interface...

Page 20: ...alysis is disabled if an alert is active Warning The instrument has discovered a problem but is able to function normally for the time being Notice Information that might be useful to a technician but in no way represents a problem with the instrument Breath analysis is enabled if a notice is active Disabled Breath testing is disabled for a reason other than a fault or alert 7 2 4 Network Connecti...

Page 21: ...f the instrument is connected to the internet via the wired Ethernet connection There is no need to manually adjust if connected to the internet In order for the Centurion to display the correct date and time the time zone must be set correctly The display format is set to YYYY MM DD HH MM SS and cannot be changed 7 4 3 Authorisation The authorisation feature when enabled prevents the Centurion fr...

Page 22: ...rmation The front screen can be customised to suit specific customer requirements Various images and messages can be displayed The supported image formats are PNG BMP and GIF however PNG is recommended The available space for the image is 800 pixels wide and 234 pixels high To save time in uploading a background image have only one image on the storage device 7 5 2 Background Graphics To import a ...

Page 23: ...on the screen as follows 1 Connect a keyboard mouse and access the User Menu in accordance with the procedures at paragraph 7 1 2 From the User Menu access the custom appearance screen by scrolling down to Custom Appearance and pressing Enter key The Custom Appearance screen will appear 3 Tick the Use Custom Text box in the elements field 4 Select the desired screen 5 Type the required text in the...

Page 24: ...e log record can contain the below events but not limited to Result The result of a breath test System Shutdown The instrument was shut down to be powered off or rebooted System Started The instrument was started System Time Changed The instruments time or date was changed Fault Cleared A fault status item cleared Fault Set A fault status item set Alert Cleared An alert status item cleared Alert S...

Page 25: ...ternatively the records can be exported by inserting a USB flash drive and pressing FN4 on the PCBA Refer to paragraph to see button location These are the formats which logs can be exported CSV Comma Separated Values with one log record per row and record fields separated by commas within rows This is suitable for import into most spreadsheet applications JSON JavaScript Object Notation in a form...

Page 26: ...c IP address Establish an internet connection as follows 1 Connect the Centurion to an internet receptacle via the Ethernet cable 2 Connect a keyboard mouse and access the User Menu in accordance with the procedures at paragraph 7 1 3 From the User Menu access the network configuration screen by scrolling down to Network and press enter The Network Configuration page will appear 4 Complete the Con...

Page 27: ...twork connections on the specified port This is disabled by default Port The TCP port number The Americium serial protocol operates on both serial ports with the following settings Protocol version am spec 02 Date Time local time not UTC Please contact your Alcolizer Technology representative for further advice 7 8 5 Alcolizer Portal The Alcolizer Portal enables your device to post logs and status...

Page 28: ...ECT Data Management Portal Open the device Insert the USB connection for a keyboard Press F1 Press Esc Arrow down the menu to network Press Tab Right arrow to Services tab Press Tab twice to select Alcolizer Portal Press Space bar to insert X to enable Alcolizer Portal Wait for status to show as below Status Succeeded Log Succeeded Changes Succeeded ...

Page 29: ...o tabs Settings and Reports 7 9 2 Settings Mail Template The Mail Template panel allows configuration of the format and recipients of emails sent from the instrument Default Recipients A list of email recipients for emails produced by the instrument e g someone bigmine com au Add additional recipients as required separating each with a space Sender Address This is the email address used to send th...

Page 30: ...characters Hostname URL of the SMTP server e g smtp gmail com Port The TCP IP port number used by the SMTP server Leave blank to use a default value Use SSL If enabled then use secure sockets layer to connect to the SMTP server 7 9 4 Test Mail The Test Email panel allows sending a test email from the system confirm email settings and provide feedback on any issues the instrument has sending emails...

Page 31: ...ar Email Queue tab at the bottom 7 9 6 Email Reports The Reports panel allows setup the breath test results and instrument status that will be sent via email The frequency that the report will be sent can be set up on this panel 7 9 7 Breath Test Results The instrument can be configured to send an email detailed result of a breath test This can be done for both negative and positive results If ins...

Page 32: ...mail if a notice is asserted or cleared 7 9 9 Event Log Report The instrument can be configured to send periodic emails containing log information for the given period The interval for the report can be configured from hourly through to monthly and the day or hour the report will occur on is dependent on the start date For example The current date is the 3rd of October 2021 The Start Time chosen i...

Page 33: ... and closed passes current when the relay is triggered 7 10 2 Configuration There are three relays available Their behaviour can be configured on the Relays page For each relay the following properties can be configured Enabled If checked indicates that the relay should respond to breath test results and enables remaining configuration items for the relay Duration If the relay is enabled and a bre...

Page 34: ...h drive to an available USB port 2 Press FN4 key Then Functions screen will be displayed 3 Having the Export logs option selected press FN4 to start the download 4 Use the Menu button to select Exit and press FN4 to return to the operational screen 5 On the operational screen you should see a progress bar Note If the log data to download is small you may not see the progress bar when back on the o...

Page 35: ...ed self checks of the instrument to validate the instrument configuration and behaviour Each test indicates whether it has been recently tested and lists a title as well as provides a description of what the test does One many or all tests can be run Some tests require a degree of user interaction and if this occurs instructions will appear on the screen indicating how to proceed ...

Page 36: ...ding on model being used Two RS 232 serial ports Serial 1 and Serial 2 running the americium serial protocol Any number of direct network connections running the americium serial protocol HID input device attached to a USB port keyboard card reader etc 8 1 Authorisation Code Entry These settings are only accessible if breath test authorisation is enabled They apply to authorisation code entry usin...

Page 37: ...update on your Centurion 1 Open the Centurion to have access to the hardware and verify if there is a SDHC card present If not contact Alcolizer to provide this card Note The card must be a SDHC type with 2GB capacity or more It must be formatted as FAT32 2 Turn the Centurion on 3 Ensure the device has started correctly It should display the message Start Blowing on the screen 4 Insert the USB sti...

Page 38: ...nnect it 6 Ensure Apply Software Update is highlighted Press Select button FN4 Button on the Centurion board to accept software update Note The Centurion will restart and apply the software update It will take several minutes to complete DO NOT REMOVE THE USB STICK DURING UPGRADE SOFTWARE PROCESS 9 3 Checking the software version in your Centurion Once centurion has restarted and is displaying the...

Page 39: ...er Technology service technician however due to our patented technology and design only the Alcohol Sample Module ASM is required to be exchanged during the calibration process 10 3 Instructions for replacing the ASM 10 3 1 Turn the instrument OFF The ASM is not intended to be a Hot Swop device therefore Quantum must be powered OFF before the ASM is replaced Turn the instrument OFF by pressing rel...

Page 40: ... Gently remove the sample module by lowering it slightly then pulling it out A pre calibrated sample module will have been sent to you prior to your current sample module s expiry Insert this one now To replace your pre calibrated ASM the same method applies in reverse Ensure the thumb bolt is not screwed in too tightly Note The sample module that was removed needs to be sent to your nearest Alcol...

Page 41: ...TM T20 USB model 1 Unpack printer 2 Remove any tape used to secure parts for transport then fit paper roll 3 It is recommended to turn the Centurion off 4 Carefully open the Centurion 5 Connect printer to the Centurion using USB cable supplied with the printer Use any available USB port located on the board 6 Close the Centurion Then turn on the Centurion and the printer The printer should now be ...

Page 42: ...nt the instrument malfunctions or a warning message should appear on the screen consult Alcolizer Technology in the first instance Contact Alcolizer Technology by any of the following means Phone 1300 789 908 Email service alcolizer com Web www alcolizer com 12 1 3 Returning equipment to Alcolizer If the machine is to be returned to Alcolizer prepare it for shipment in accordance with the followin...

Page 43: ...colizer com My instrument is displaying a warning icon in the bottom left corner Either there are status items requiring attention press FN1 to identify items requiring attention or the service life may shortly be about to expire Contact Alcolizer immediately to arrange service T 1300 789 908 E service alcolizer com W www alcolizer com How do I locate FN buttons to access menu FN buttons are locat...

Reviews: