background image

INFORMATION

The shipped version of this device compies with the requirements 

of EEC directives 2004/108/CE "Eletromagnebc compabblity and 

2006/95/EC "Low votage directive"

WASTE ELECTRICAL PRODUCTS SHOULD NOT BE DISPOSED 

OF WITH HOUSEHOLD WASTE. PLEASE RECYCLE WHERE 

FACILITIES EXIST. CHECK WITH YOUR LOCAL AUTHORITY FOR 

RECYCLING ADVICE.


CE marking

IMPORTANT

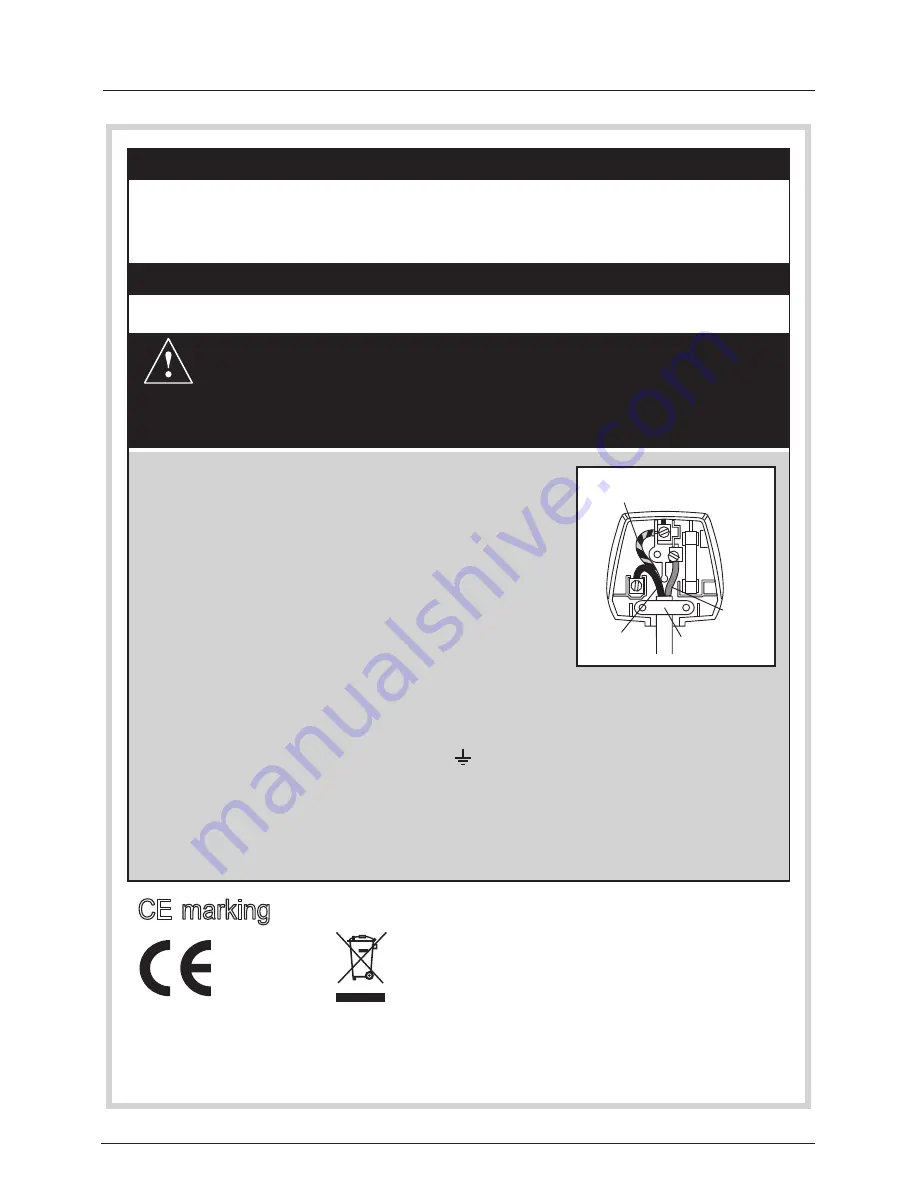
This unit is a Class 1 Appliance and must be fitted 

with an Earthed Plug fitted with a 13A fuse. 
The wires in this mains lead are coloured as follows:

Yellow & Green-Earth

Blue-Neutral  

Brown-Live

As the colours of the wires in the mains lead of this 

apparatus may not correspond with the coloured

markings identifying the terminals in your plug,

proceed as follows:
The wire which is Coloured Yellow & Green must be connected to the terminal 

which is marked E or the earth symbol (    ). The wire which is coloured blue must 

be connected to the terminal which is marked with N or coloured blue. The wire 

which is coloured brown must be connected to the terminal which is marked L 

or coloured brown. Always ensure that the plug cord grip is fastened correctly. 

If a 13A (BS1363) fused plug is used it must be fitted with a 

 conforming 

to BS1362 and be ASTA approved. If in doubt contact a qualified electrician.

3A fuse

If you need to replace the fitted plug.

Plug Replacement

WARNING :

Never connect live or neutral wires to the earth terminal of the plug.

Only fit an approved 13 Amp BS1363/A plug and the correct rated fuse.

If in doubt, consult a qualified electrician.

Check that the voltage marked on the product corresponds with your supply voltage.

This product is fitted with a 10A plug complying with BS1363. If this plug is unsuitable 

or needs to be replaced, please note the following :

Connecting to Power

BROWN

(LIVE)

CABLE

GRIP

BLUE

(NEUTRAL)

YELLOW & GREEN

(EARTH)

ALBA | HD Ready LCD TV | Instruction Manual | Helpline: 0845 604 0105

32

Summary of Contents for L26M1

Page 1: ...Instruction Manual Instruction Manual Please keep for future reference 26 32 42 Digital LCD TV FAV DUAL EPG YPbPr CH LIST AD FREEZE MENU EXIT INFO Vol...

Page 2: ......

Page 3: ...LL MOUNTING 6 PERIPHERAL CONNECTION GUIDE 8 OPERATING INSTRUCTIONS 9 TO USE THE FRONT PANEL CONTROL 9 TO USE THE REMOTE CONTROL 10 VIEWING MODE ILLUSTRATIONS 12 CONNECTING EQUIPMENT 13 TO USE THE MENU...

Page 4: ...all not be exposed to excessive heat such as sunshine fire or the like NOTICE 1 The changes or modifications not expressly approved by the party responsible for compliance could void the user s author...

Page 5: ...rs or aerosol cleaners to clean the display Make sure to unplug the unit when not in use for a long period of time days Do not cover or block any vents and openings Inadequate ventilation may shorten...

Page 6: ...he label If you are not sure of the type of power supplied to your home consult your dealer or local power company 14 Unplug this apparatus during lightning storms or when unused for long periods of t...

Page 7: ...ER SERVICE GROUNDING ELECTRODE SYSTEM GROUND CLAMPS ELECTRIC SERVICE EQUIPMENT GROUND CLAMP EXAMPLE OF ANTENNA GROUNDING AS PER NATIONAL ELECTRICAL CODE Note to the CATV system installer This reminder...

Page 8: ...tighten the base to the stand For 26 32 model For 42 model PREPARINGYOUR LCD HDTV FOR WALL MOUNTING We suggest that you keep your TV at least 2 36 inches 60 mm from the wall to prevent cable interfere...

Page 9: ...POWER key on the Remote control or the side panel control knobs The TV will be turned on in a minute with display on the screen Power Key For 42 model NOTE Wall mount bracket screws are not included P...

Page 10: ...out HALF SCART transmits S Video CVBS video in out and audio in out Note SCART1 2 has monitor out CVBS YPbPr ATV DTV PC IN Connect the video and audio cables from a computer here COMPONENT Y Pb Pr wi...

Page 11: ...amme number 4 CH CH Press to select the next lower Programme number 5 MENU Menu key Press to open or exit the OSD on screen display menu 6 INPUT Input key Press to select the input source 7 i POWER Po...

Page 12: ...OM Select the display aspect from Auto Normal 4 3 Wide 16 9 subtitle full screen or 14 9 mode DUAL Press to select from mono stereo Dual I or Dual II AUDIO ADJ Press to choose from Personal Speech Mus...

Page 13: ...arked as subtitle In Text mode Select the next page marked as a subtitle page and request it as the display page HOLD Press to stop the scrolling of pages The text decoder stops receiving data REVEAL...

Page 14: ...e has to fill the entire screen of the display 16 9 Content 4 3 Content ZOOM Mode For those wide format images which are originally programmed into 4 3 frames with black bars around this mode would st...

Page 15: ...2 42 1 Turn off the HDTV 2 Connect the coaxial RF connector from your antenna or cable out of the wall not from the Cable Box to the TV ANTENNA connector at the rear of the HDTV 3 Turn on the HDTV 4 S...

Page 16: ...igital display for added security and protection Refer to your HDTV Set Top Box user manual for more information about the video output requirements of the product or consult your cable or satellite o...

Page 17: ...RCE button on the remote side of the HDTV or directly by pressing theYPbPr button on the Remote Control NOTE Refer to your HDTV Set Top Box user manual for more information about the video output requ...

Page 18: ...Connect a HDMI cable to the HDMI output of your DVD player and the other end to the HDMI Input at the rear of the HDTV 3 Turn on the HDTV and DVD player 4 Select HDMI using the SOURCE button on the re...

Page 19: ...associated with the Component output on your DVD player and connect the other end to the audio connectors associated with the Component input at the rear of the HDTV 6 Turn on the HDTV and DVD player...

Page 20: ...HDTV and VCR or Video Camera 2 Connect the SCART socket of yourVCR orVideo Camera to the SCART socket of the HDTV 3 Turn on the HDTV and VCR or Video Camera 4 Select AV using the SOURCE button on the...

Page 21: ...a predefined picture setting from Standard Vivid Movie Eco or Personal 2 Brightness To brighten the dark parts of the picture 3 Contrast To sharpen the picture quality 4 Colour To add or reduce colour...

Page 22: ...be connected to several types of external audio amplifiers and the STB may be connected to several types of external screens 6 AVL Choose On or Off to adjust volume to be consistent across programmes...

Page 23: ...ons on the remote control the program position can be skipped Tip The skipped program may not be found by pressing CH buttons but can be access by pressing number buttons directly Tip The skipped prog...

Page 24: ...select the teletext language Decode Page Language To set the teletext language to the regional location 6 Common Interface This menu appears with your CI supplier information 7 HDMI Scan Info HDMI on...

Page 25: ...t the side of the TV 2 Turn on the TV and press MENU and select the TV submenu Common interface will be displayed if the CA module is detected Wait for few moments until the card is activated Picture...

Page 26: ...or internet Operation 1 When you search the channel You will get a information Software ID XXXXXXXX A New Version of software is detected Do you want to upgrade it Over Air Download Select Next Accept...

Page 27: ...If the screen requires additional cleaning use a clean damp cloth Do not use liquid cleaners or aerosol cleaners Mobile telephone warning To avoid disturbances in picture and sound malfunctioning of y...

Page 28: ...nd PC Audio Headphone mini jack Recommended 1360x768 60Hz ComponentVideo and L R Audio input Supported resolution 480i 576i p 720p 1080i 1080p 42 only HDMI input Supported scan rates 480p 480i 576p 57...

Page 29: ...c 4x10 mm Metric 6x10 mm Metric 6x10 mm POWER Power Consumption 120 130 200 Standby 1W Mains Power AC220 240V 50 60Hz AC220 240V 50 60Hz AC220 240V 50 60Hz Audio Power 5W 5W 5W 5W 10W 10W AmbientTempe...

Page 30: ...brightness settings Check the Closed Captions control Some TEXT modes could block the screen Good picture but no sound Increase theVOLUME Check if the TV is muted press the MUTE button on the remote...

Page 31: ...audio and video signals Designed for use withVCRs or other accessories in order to receive higher picture resolution and offer sound connection options Menu An on screen listing of features shown on t...

Page 32: ...24 75 12 48 363 VESA 1024x768 60 004 13 56 476 VESA 1024x768 70 069 14 60 023 VESA 1024x768 75 029 15 61 08 IBM XGA 2 1024x768 75 781 16 44 772 VESA CVT 1280x720 59 855 17 47 776 VESA 1280x768 59 87 1...

Page 33: ...port 480i 480p 576i 576p 720p 1080i 1080p 42 only format with HDCP 2 Digital interface with 4 channels TMDS signal Scart input output description TV Source Screen Display Source SCART1 Out SCART2 Out...

Page 34: ...e wire which is coloured blue must be connected to the terminal which is marked with N or coloured blue The wire which is coloured brown must be connected to the terminal which is marked L or coloured...

Page 35: ...uct must be correctly installed and operated in accordance with the instructions contained in this manual It must be used solely for domestic purpose The guarantee will be rendered invalided if the pr...

Page 36: ......

Page 37: ......

Page 38: ......

Page 39: ......

Page 40: ...Q41G26MV672 3A 4 08...

Reviews: