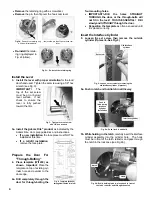


4
•
Remove
the retaining ring with a screwdriver.
•
Remove
the pin, then flip over the hook cam lever.
•
Re-install
the retain-
ing ring displayed in
Fig. 2c (arrow).
Install the Lever
3. Install the lever with proper orientation
for the lock/
door hand used. Tighten the set screw using a 1/8" hex
wrench (see Fig. 3).
IMPORTANT!
The
top of the set screw
must be at (or below)
lever surface. If not,
check to ensure the
lever is fully pushed
toward the trim.
3a. Install the Adams Rite
®
product
as indicated by the
Adams Rite
®
door prep guidelines and instructions.
•
If a new installation
, the face place must NOT be
installed at this time.
•
If a retrofit installation
,
remove the face plate.
Prepare the Door For
"Through-Bolting"
4. Place template (WI1459) as
shown.
Important
: Place the
template on top of existing cyl-
inder hole and
parallel
to the
door edge.
4a. Drill
completely
through the
door for through-bolting the
four mounting holes.
•
IMPORTANT!--Drill the holes STRAIGHT
THROUGH the door, or the through-bolts will
not fit in the lock! THIS IS ESSENTIAL! Drill
slowly and
STRAIGHT
through the door.
•
Reposition the template
as often as needed until
it is placed correctly.
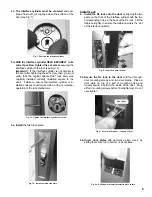
Insert the Interface Cylinder
5. Loosen the set screw, then remove the outside
cylinder (if present--See Fig. 6)
.
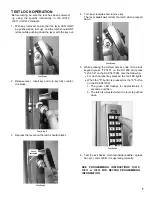
5a. Push in latch
and hold latch in all the way
.
5b. While holding in the latch
, carefully insert the interface
cylinder assembly into the cylinder hole. The hook
must be
in front of
the latch retractor and pass
through
the notch in the lock case (see Fig. 6b).
Fig. 6a: Push latch in and hold
Push in
latch during
interface
cylinder
installation
Fig 2b:
Remove the retaining ring
with a small screwdriver...
...remove the pin, then flip over hook cam
lever.
Fig. 4: Template (WI1459)
through-bolt holes (circled)
Fig. 2c: Re-install the retaining ring
Fig. 3: Tighten lever set screw
with 1/8" hex wrench
Fig. 6: Loosen set screw before removing the
old interface cylinder (if present)
Old interface
cylinder
Set screw
Interface cylinder
Fig. 6b: While holding latch in, place hook
in front of
the latch retractor and
through
the notch
Notch
Hook