


Pre-Installation Checklist (continued)
SkyBell Digital Doorbell Adapter
The SkyBell Digital Doorbell Adapter is available for purchase
through the Alarm.com Partner Portal.
Wi-Fi password check
Make sure you have the password for the Wi-Fi network in the home
where you plan to install the doorbell camera. Verify the Wi-Fi
credentials before you begin by connecting a smartphone or laptop
to the Wi-Fi network and attempting to access a website.
Internet & Wi-Fi speed check
A Wi-Fi Internet upload speed of
at least 2 Mbps is required
at the
location where the doorbell camera is installed.
Follow these steps to check the connection speed:
❶
Go to the location where the doorbell camera will be installed
❷
Close the door
❸
Disable the cellular (LTE) Internet connection on your device
and connect to the home’s 2.4 GHz or 5.0 GHz for Slim Line II
Wi-Fi network
❹
Run a speed test (for example, SpeedOf.me or speedtest.net) to
determine the Internet speed
❺
In the test results, note the upload speed. The Alarm.com Doorbell
Cameras require an upload speed of at least 2 Mbps.
Hardware installation
Alarm.com Doorbell Cameras
Alarm.com’s Doorbell Camera hardware must be used:
∙
Alarm.com Wi-Fi Doorbell Camera
∙
Alarm.com Slim Line II Doorbell Camera
SkyBell HD consumer hardware is not supported. Slim Line II
Doorbell Camera hardware is not supported on the SkyBell platform
or other service provider platforms.
Remove existing doorbell button
Take care to prevent the existing doorbell wires from slipping into
the wall.
Attach the doorbell mounting bracket to the wall
Feed the existing doorbell wires through the hole in the center of the
bracket. Affix the bracket firmly to the wall by driving the provided
wall screws through the top and bottom holes in the bracket.
Failure to make the bracket flush to the wall could cause a poor
power connection between the bracket and the doorbell camera.
Connect power wires to the mounting bracket
Loosen the terminal screws and insert the wires beneath the
screws. Do not short (touch together) the wires during this process.
Tighten the screws. The wires must be of approximately equal
thickness, and the screws should be tightened approximately the
same amount so that the screwheads are flush. If the wires are
thick, splice short lengths of additional thinner wire. The splice joints
can be hidden inside the wall, and the thinner wire can be used to
connect to the mounting bracket.
Attach the doorbell camera to the mounting bracket
Slide the top of the doorbell camera down onto the mounting
bracket and push the front of the doorbell camera toward the wall.
Tighten the set screw located on the bottom of the camera, being
careful not to damage it (power tools should not be used with the
set screw). The camera’s LED should begin to illuminate.
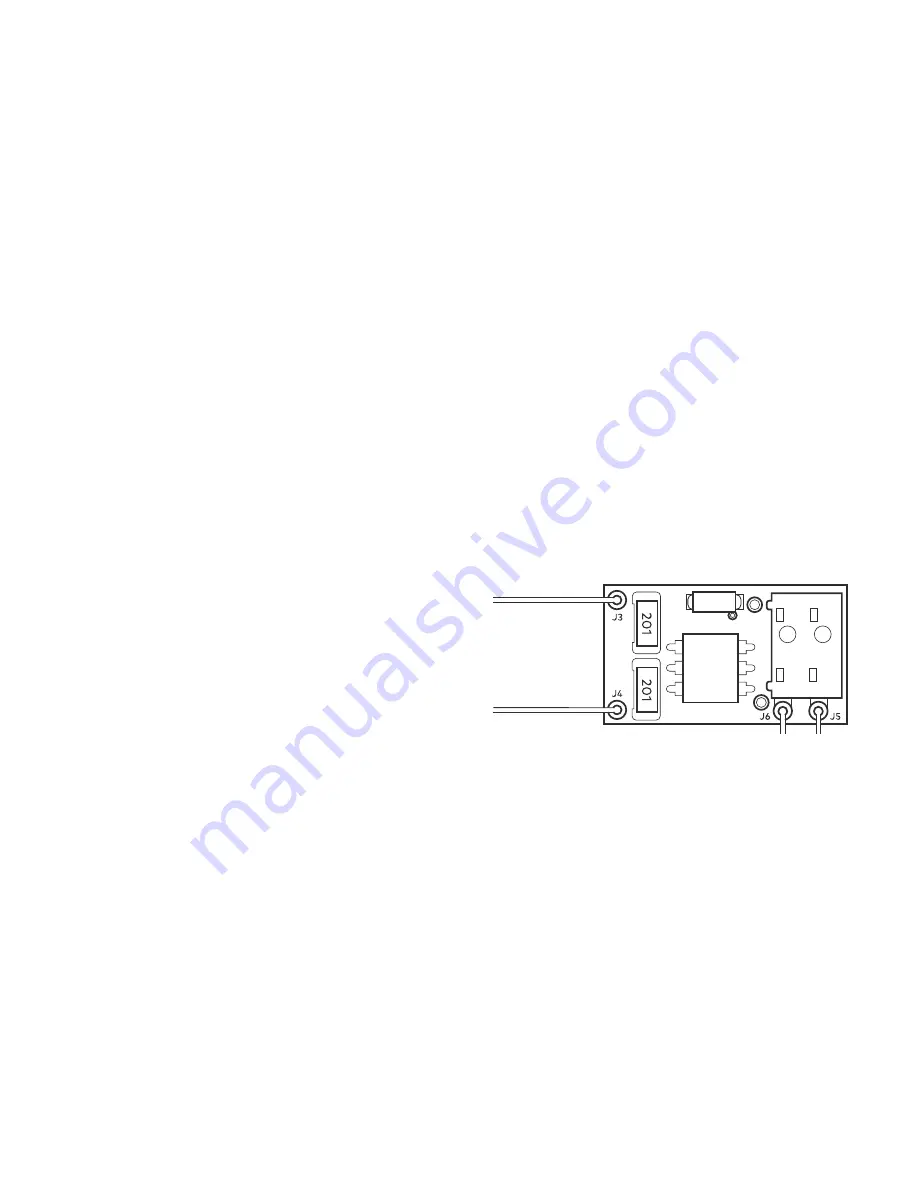
Connecting the SkyBell Digital Doorbell Adapter
If the home has a mechanical chime, you may skip this section. If the
home has a digital chime, a SkyBell Digital Doorbell Adapter is
required.
Remove the cover from the digital chime and locate the wire
terminals. Completely remove the screws from the terminals and
temporarily move the wires out of the way. Some digital chimes
come installed with a diode in place. In these circumstances, the
diode must be removed prior to installing the SkyBell Digital
Doorbell Adapter. If the diode remains in place, it may cause the
SkyBell Digital Doorbell Adapter to fail, leading to issues such as
constant ringing. Connect the SkyBell Digital Doorbell Adapter
wires to the chime:
∙
J4 -> “Front” Terminal (on Digital Doorbell)
∙
J3 -> “Trans” Terminal (on Digital Doorbell)
Connect the J5 wire to a wire from the wall, and connect the J6 wire
to a wire from the wall. Reassemble and reinstall the digital chime
in its original location.
Note:
The adapter may say “TO SKYBELL” on the side.
Please disregard.
2


