background image

- 7 -

Before Switching On Your TV

Power Connection

IMPORTANT:

The TV set is designed to oper-

ate on

220-240V AC, 50 Hz.

• After unpacking, allow the TV set to reach the

ambient room temperature before you con-
nect the set to the mains.

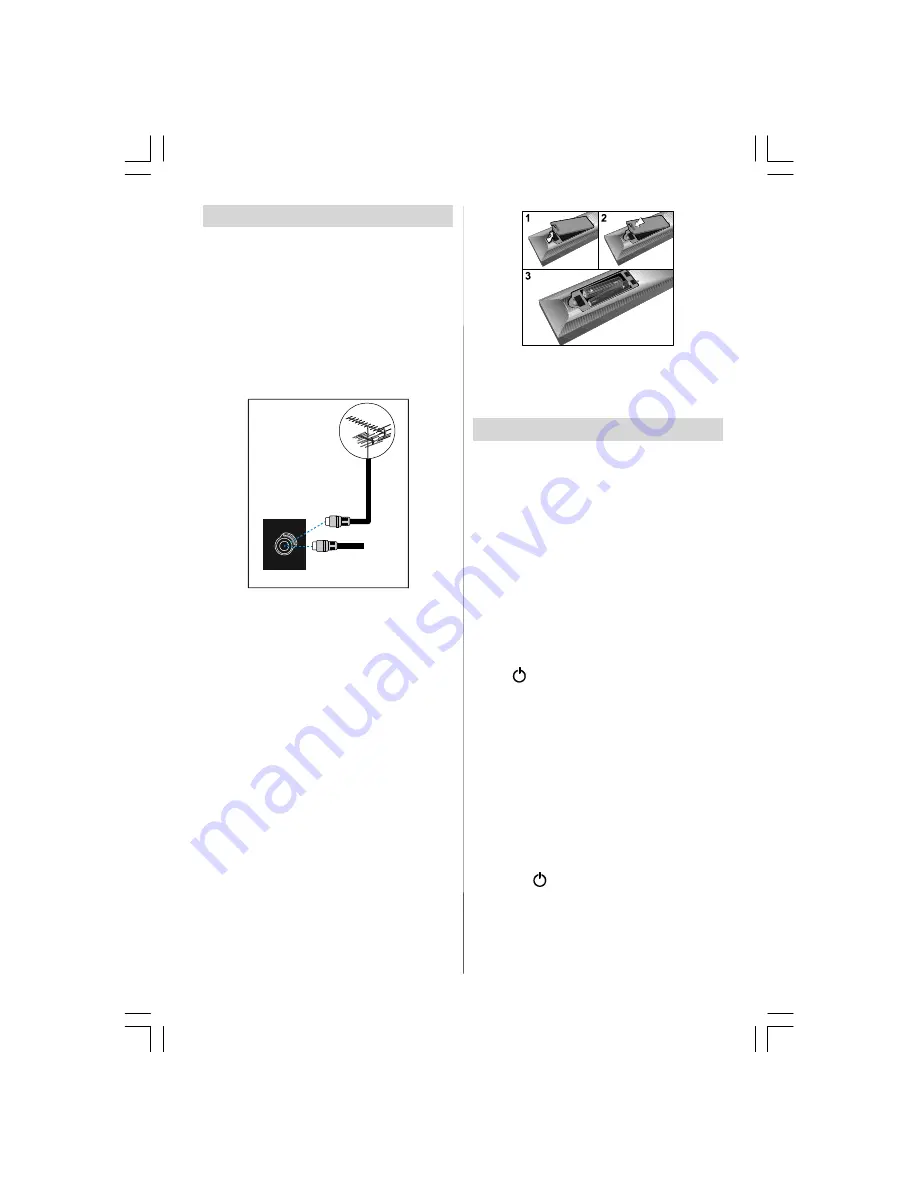
Connections To The Aerial Input
Socket

VHF/UHF

75

REAR OF THE TV

CABLE TV

• Connect the aerial to the aerial socket on the

Tv, you may also connect a VCR or other box
at the same time.

How To Connect Other Devices

IMPORTANT:

Switch off the TV before connect-

ing any external device.

Sockets for external connections are at the
rear side of the TV. For connection of other
devices via Scart refer to the manuals of the
related devices.

Inserting Batteries In The Remote
Control Handset

• Remove the battery cover located on the back

of the handset by gently pulling downwards
from the indicated part.

• Insert two

AAA/R03

or equivalent type batter-

ies inside. Place the batteries in the right
directions.

• Replace the battery cover.

NOTE:

Remove the batteries from remote con-

trol handset when it is not to be used for a long
period.Otherwise it can be damaged due to

any leakage of batteries.

Switching The TV ON/OFF

To switch the TV on:

Your TV will switch on in two steps:

1-

Connect the power supply cord to the sys-
tem. Press On/Off switch at the rear of the
TV. Then the TV switches itself to stand-by
mode and the LED becomes BLUE located
on the front of the TV.

2-

To switch on the TV from stand-by mode
either:

Press a digit button on the remote control so
that a programme number is selected,

or,

Press “

”, "

-P/CH

" or "

P/CH+

" button on the

right side of the TV or press

“-P/CH”

or

“P/

CH+”

button on the remote control, so that last

switched off programme is selected.

By either ways the TV will switch on and the
LED will turn off.

To switch the TV off:

• Press the “stand-by” button on the remote

control, so the TV will switch to stand-by
mode and the LED will become

BLUE

,

or,

Press the “

” button located on the right side

of the TV, so the TV will switch off and the LED
will become BLUE.

To power down the TV completely, press On/
Off switch,or

unplug the power cord from the mains socket.

ENG-26720W-1549UK-26 INCH 17MB15 OEM-(WO VGA-WO PIP)(HD READY)(S)(OZEL)-50100182.p65

16.01.2007, 18:05

7

Summary of Contents for AV26720-HD2

Page 1: ...AV26720 HD2 OPERATING INSTRUCTIONS 26 LCD TV COLOUR TELEVISION...

Page 2: ...m Modes 14 Teletext 15 To Operate Teletext 15 To Select A Page Of Teletext 16 To Select Index Page 16 To Select Teletext With A TV Programme 16 To Select Double Height Text 16 To Reveal Concealed Info...

Page 3: ...following recommended safety precautions carefully for your safety 1 Power Source The receiver must only be operated on a 220 240V AC 50 Hz supply 2 Power Cord Do not place the set a piece of furnitu...

Page 4: ...to qualified person nel Do not remove the cover yourself as this may result in an electric shock WARNING When the device is not in use for a long time disconnect from power Instructions for waste dis...

Page 5: ...4 LCD TV FRONTVIEW REARVIEW MENU P CH TV AV ENG 26720W 1549UK 26 INCH 17MB15 OEM WO VGA WO PIP HD READY S OZEL 50100182 p65 16 01 2007 18 05 4...

Page 6: ...switch Component Video YPbPr Inputs Component Audio Inputs s HDMI Input EXT 5 Scart 1 EXT 1 Scart 2 EXT 2 Aerial PC Audio Input EXT 4 EXT 3 L R S VHS 220V 240V AC 50 Hz POWER G H I J K L M F ENG 2672...

Page 7: ...4S and EXT 5 Yellow FEATURE Call Function Menu Blue INSTALL Call Programming Menu Stop Videotext Update Videotext No Function GUIDE Indexpage Videotext Show PC No Function Enlarge Videotext WIDE Pictu...

Page 8: ...rol handset when it is not to be used for a long period Otherwise it can be damaged due to any leakage of batteries SwitchingTheTVON OFF To switch the TV on Your TV will switch on in two steps 1 Conne...

Page 9: ...in Menu System section Volume Setting Press the V button to increase volume Press the V button to decrease volume A volume level scale slider will be displayed at the bottom of the screen Programme S...

Page 10: ...se one of these options Natural Cinemaand Dynamic Contrast By pressing button select Contrast Press button to increase contrast Press button to decrease contrast Contrast level can be adjusted between...

Page 11: ...ss button to increase volume level Press button to decrease volume level Volume level can be adjusted between 0 and 63 Equalizer By pressing button select Equalizer Press or OK button to enter equaliz...

Page 12: ...nguage using mode option AVL Automatic Volume Limiting AVL function ad justs the sound to obtain fixed output level between programs having different sound levels Pressing button will turn this featur...

Page 13: ...eo outputs Default Zoom By pressing button select Default Zoom You can set Default Zoom to Pan oramic 4 3 or 14 9 Zoom by pressing button If there is no WSS or aspect ratio picture size information an...

Page 14: ...t this item Off Store Program By pressing button select Store Pro gram Press or OK button to store the adjustments Program Stored will be dis played on the screen Program menu By pressing button selec...

Page 15: ...th icon Source menu appears on the screen TV EXT 1 EXT 2 EXT 3 EXT 4S EXT 4 EXT 5 SOURCE TV In source menu highlight a source by press ing button and switch to that mode by pressing or OK button Other...

Page 16: ...ll screen 16 9 Subtitle This zooms up the wide picture 16 9 aspect ratio with subtitles to the full screen Default Zoom Modes 4 3 Use to view a normal picture 4 3 aspect ratio as this is its original...

Page 17: ...period of time Press the button to stop the automatic page change Press the button again to allow the next page to be displayed To Select A Subcode Page Subcode pages are subsections of long Tele tex...

Page 18: ...using a DVI to HDMI cable use PC Audio In input for sound connection Via The Scart LCD TV has 2 Scart sockets If you want to connect peripherals e g video decoder etc which have Scart sockets to theTV...

Page 19: ...your camera or camcorder toAV EXT 4 input at the right side of the TV Connect your equipment to the TV viaVIDEO yellow AUDIO R red andAUDIO L white inputs You must connect the jacks to the input usin...

Page 20: ...rial RF Lead VCR to Satellite from RF Lead from VCR to TV Satellite LNB lead Aerial Scart Lead to on TV EXT 1 LCD TV camcorder connection headphone connection either connect the aerial straight to you...

Page 21: ...be incorrectly set Mute mode may be selected Check sound settings volume level press Mute button Remove headphones from socket Sound only from one speaker Balance incorrectly set Enter sound menu and...

Page 22: ...how that this appliance must not be placed with ordinary household waste at the end of its useful life To prevent possible harm to the environ ment or human health from uncontrolled waste disposal ple...

Page 23: ...NGVOLTAGE 220 240V AC 50 Hz AUDIO German Nicam Stereo AUDIO OUTPUT POWER WRMS 10 THD 2 x 8 POWER CONSUMPTION W 160 W 2 7 W Stand by PANEL 16 9 display 26 Screen Size DIMENSIONS mm 211 100 810 810 480...

Page 24: ...ellow must be connected to the terminal which is marked with the letter E or by the earth symbol or coloured green or green and yellow The wire which is coloured blue or black must be connected to the...

Reviews: