8. Menu Operation.
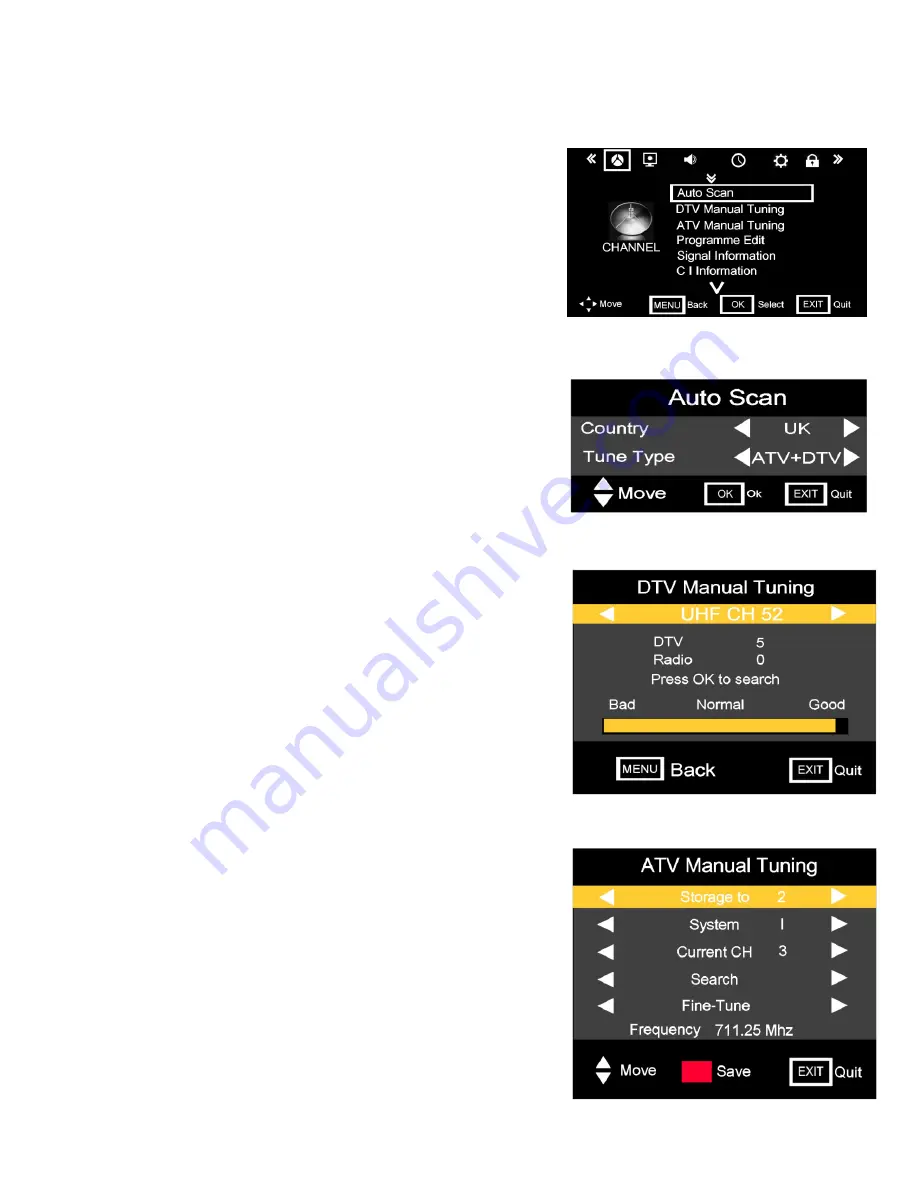
Fig 4
Fig 6
Fig 5
11
Menu.
To enter the Menu functions press the “MENU” button on either
the TV or the R/C. Fig 4 will be the first menu to be displayed. At the
top of the Menu are a number of symbols, these symbols display the
type of menu function, these are “in order” :- Tuning, Picture, Sound,
Timer, Options and Lock. To select any of these functions use the
►
/
◄
buttons. To Enter the menu use the
▲
/
▼
buttons.
Tuning.
Autoscan.
Should the TV need retuning due to, relocation or DTV
upgrades, select AutoScan and press OK. Fig 5 will be displayed.
Use the
▲
/
▼
buttons to select “Country” and the
►
/
◄
buttons to
select. (UK is default).
TuneType.
In the UK select ATV/DTV. If in an area that has fully
converted to Digital TV select DTV.
Note : Users in the Rep of Ireland. Select “ ATV”.
DTV Manual Tuning.
“Fig 6”.
Occasionally Manual tuning may be required. Use the
►
/
◄
buttons
change the Channel number. At the bottom of the menu, a Signal
Quality/Strength bar is shown, any signal below normal will probably
display a “Freezing or Pixilated” picture. Press “OK” to start the Manual
Tuning. The OSD will then show the number of stations received on
that channel.
Note :- In certain areas where two Digital TV areas overlap, e g Wales,
the stronger signal may take “priority”. In this case Manual Tuning is
essential.
ATV Manual Tuning.
“Fig 7”.
Occasionally Manual tuning may be required.
Storage to.
This is the “Memory location” and can be changed with the
►
/
◄
buttons.
System.
This is the “Sound setting”. In the UK this is “I”. In Western
Europe it is “B/G”, in Eastern Europe it is “D/K”. France is “L” or “LL”.
“Default is “I”. Select using the
►
/
◄
buttons.
Current CH
. This is the actual channel location the TV is receiving.
If adding a TV game or other device with a TV signal output, set this to
a channel with no signal. Select using the
►
/
◄
buttons.
Search. Use the
►
button to increase the frequency. Use the
◄
button
to decrease the frequency. To stop searching press “Exit”. If a signal is
found, check that it is the one required. Use the
▲
/
▼
buttons to select
“
Storage to
”, change the number using the
►
/
◄
buttons and press the
RED button to save all the settings.
Fine Tune.
In some unusual circumstances the Sound or Picture may
need “Fine Tuning”. Use the
►
/
◄
buttons. To increase or decrease the
frequency. Each press of the button changes the frequency by 5 Khz.
Press the RED button to save all the settings.
Fig 7
12


