background image

7. Menu Operation.

Programme Edit. (Digital) (Fig 14).
Favourite “Green”.

To add channels to your Favourite library, use the 

cursor buttons to select the channel you wish to add. Press the GREEN 
button. A Yellow Star will be displayed in the Flags Column adjacent to 
the station name. To remove the channel from the Favourite library, 
simply press the GREEN button again.

Delete “Yellow”. 

Should it be necessary to Delete a station, use the 

cursors to select the station to be deleted. Press the Yellow button, this 
will delete the station immediately.  Note :- Any deleted station is 
removed from the memory and must be retuned if required.

Lock. “Blue”.

To stop use of any stations you may wish to “Lock” that 

station. Use the cursor buttons to select the channel you wish to Lock. 
Press Blue and a Lock symbol will be shown next to the channel 
selected. To remove the Lock function, press the Blue button again.
This function will only be operational if the “Child Lock” is activated , 
“See page 14”

Common Interface.  

See page 16

Timer Menu (Fig 15).

Sleep Timer.  

Select Sleep Timer using the 

/

buttons and set the 

required time using the 

/

buttons. The selections are :-0, 15, 30, 45, 

60   75, 90, 105 and120 minutes.  When the set time has been reached 
the TV will switch to Standby.

OSD Timer.

This sets the time the “On Screen Display” is displayed and 

is selected from 5 – 30 seconds. 

Function Menu (Fig 167).

Language.    

You may set the OSD language to English, French or 

Spanish. “English is default”.

Video Size.

You may set the screen size to your preferred setting. You 

may chose from :-Full screen, Auto, 4 : 3, 14 : 9, 16 : 9.

Blue Screen.  This may be turned On or Off. When set to ON, under “No 
signal” conditions a Blue screen is displayed.

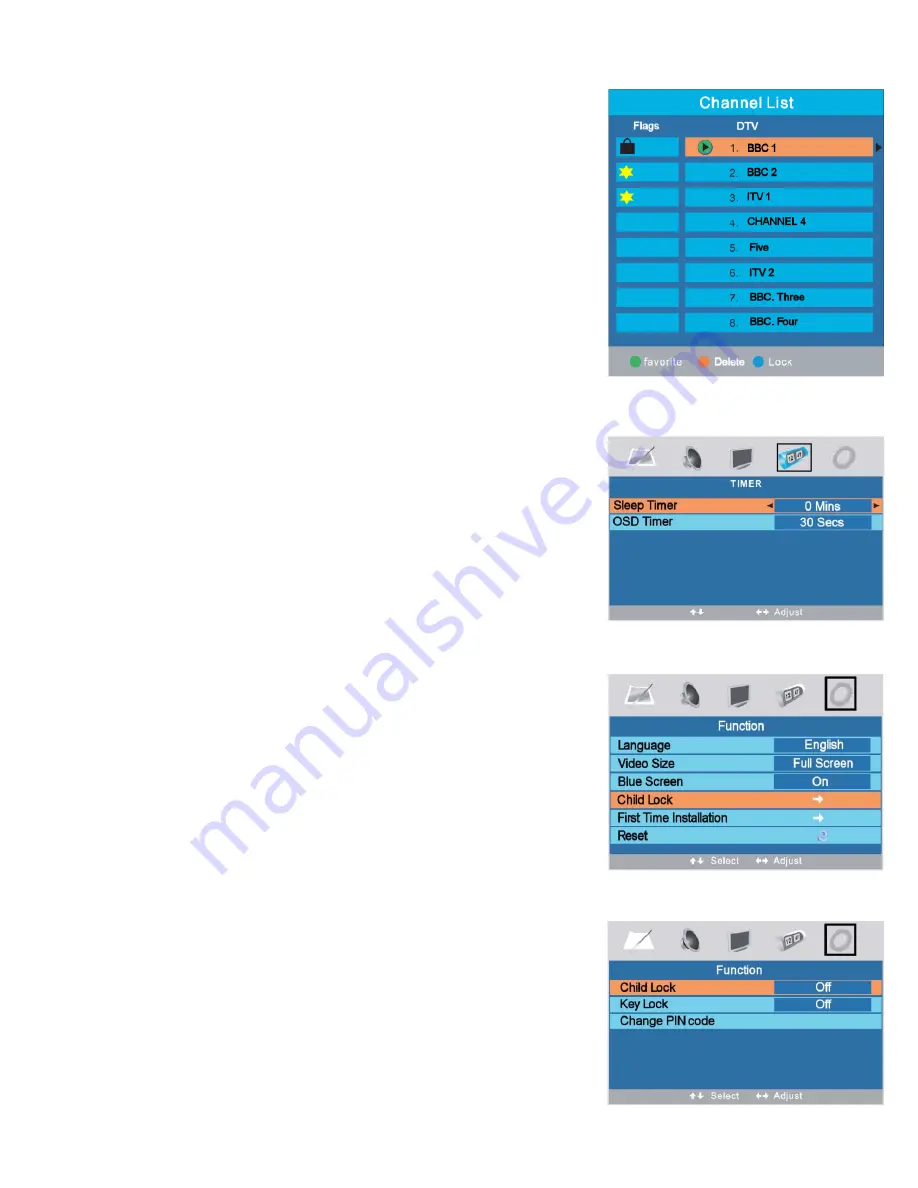
Child Lock. (Fig 17).

Child Lock prevents un authorised selection of any channels that have 
been selected in the (LOCK) mode.  If any channel has been locked, the 
user will be requested to insert the PIN code, failure to do so will not 
allow that channel to be viewed.
Select Child lock using the 

/

buttons and turn On and Off using the

/

buttons.

Fig 14

Fig 15

14

Fig 16

Fig 17

Summary of Contents for ADLTDVD3233

Page 1: ...ADLTDVD3233 Digital LCD TV with DVD DVBt Freeview HDMI Customer Help Line 0845 293 7698 Website www ekey co uk...

Page 2: ...User Controls 5 5 Remote Control 6 6 Connections 7 7 Menu Operation 10 8 Teletext 17 9 EPG Electronic Programme Guide 18 10 DVD Operation 18 11 DVD Setup menu s 19 12 Trouble Shooting Guide 20 13 Disc...

Page 3: ...rolled waste disposal please keep separate from other household waste and recycle it responsibly to promote the sustainable reuse of material resources Household users should contact either the retail...

Page 4: ...moist cloth with a dilute mild detergent Do NOT use petrol based fluids or abrasive materials LCD Screen Do not hit or cause impact to the LCD screen The screen consists of many individual pixels and...

Page 5: ...3 Accessories Please check the contents of the TV before you continue If any item is missing please contact your point of purchase User Manual Remote Control Mains lead 4...

Page 6: ...se level being adjusted 5 TV AV Selects the different input sources each press will select another input source 6 Menu Selects the MENU function If in a sub menu will revert to previous level of menu...

Page 7: ...peat tracks or chapters in DVD mode 1 STANDBY Switches TV to Standby and Operation 3 0 9 Numeric buttons for direct channel selection or track chapter numbers 5 Allows multi digit entry of channel num...

Page 8: ...r 2 Fit two AAA batteries Ensure the battery polarities are correct i e to and to 3 Replace the battery cover To prevent injury do NOT break open or throw exhausted batteries in a fire Do not mix batt...

Page 9: ...Re connect mains supply to both TV and source Use SOURCE button to select HDMI Disconnect TV from mains supply Connect CVBS and Audio L R if required Re connect mains supply to TV and source Use SOURC...

Page 10: ...to appliance Use SOURCE to select SCART In some circumstances the TV will automatically select scart when the appliance is used Headphones Disconnect TV from mains adaptor Plug in headphones Re conne...

Page 11: ...as been connected to the power the menu Fig 1 will be displayed Press the LCD MENU button on the Remote Control The menu as in Fig 1 will be shown Using the buttons select COUNTRY and then use the but...

Page 12: ...le when using NTSC sourced material from the AV inputs Sharpness Adjusts the clarity of the picture If the signal is noisy analog then this setting should be reduced to mask the noise Colour Temperatu...

Page 13: ...o select the required colour system PAL is used in the UK and most of Europe SECAM is used in France The TV is defaulted to AUTO Program Label Use the to select Program Label and then use the button t...

Page 14: ...adjacent to the station name To remove the channel from the Favourite library simply press the GREEN button again Skip Yellow You may wish to Skip certain channels when using the CH CH buttons Use th...

Page 15: ...tional if the Child Lock is activated See page 14 Common Interface See page 16 Timer Menu Fig 15 Sleep Timer Select Sleep Timer using the buttons and set the required time using the buttons The select...

Page 16: ...st Time Installation and menu Fig 19 will be shown It is recommended that you De select both Analog and Digital services and Search both Analog and Digital services See page 11 RESET Fig 16 Selecting...

Page 17: ...module away from the TV Reconnect the TV and switch on Select DTV Insert your Pay per view card Do NOT touch the gold contacts Press the LCD Menu button and select TV Setting menu Select CI Informati...

Page 18: ...sub pages To access these press this button and then enter the page number using the numeric buttons Press again to exit the feature COLOUR BUTTONS Red Green Yellow Blue are used as fast access butto...

Page 19: ...s Some boxes may be blank the data may not available To exit the EPG press the EPG button again Fig 27 18 Fig 28 10 DVD Operation To select DVD press the SOURCE button and using the buttons select DVD...

Page 20: ...ve a Rating this is to stop in appropriate material being viewed The rating is stated on the disc Set the rating as required using the buttons The level will be stored when you press ENTER Default Thi...

Page 21: ...sting Analog Poor aerial signal Have aerial signal checked If indoor aerial it may need an outdoor aerial TV Picture freezing and breaking up Digital Poor aerial signal Have aerial signal checked If i...

Page 22: ...soft dry cloth For stubborn dirt use a soft cloth with dilute detergent Ensure the disc is completely dry before placing into the player DO NOT USE CHEMICAL CLEANERS OR VYNYL DISC FLUID 14 Wall Mount...

Page 23: ...t OSD Language English Audio Nicam stereo Mono Analog Wall Mounting 400mm x 200 mm Disc size 12 CM only Disc Media DVD CD VCD VCD2 CDG JPEG Remote Control Infra Red Remote Control batteries 2 x AAA ce...

Page 24: ...accordance with the diagram as in Fig 33 The Brown wire Live should be connected to the terminal L The Blue wire Neutral should be connected to the terminal N The Green Yellow wire Earth should be co...

Reviews: