


4
A
C
E
B
D
F
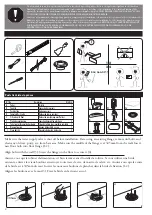
1 Stainless steel hinge cap/Capuchon de finition en acier inoxydable
2
2 Stainless steel screw/Vis en acier inoxydable
2
3 Stainless steel hinge base/Base de la charnière en acier inoxydable 2
4 Hinge gasket/Joint d’étanchéité de la charnière
2
5 Nylon screw/Vis en nylon
2
6 Rubber ring/Anneau en caoutchouc
2
7 Nylon washer/Rondelle en nylon
2
8 Nylon nut/Écrou en nylon
2
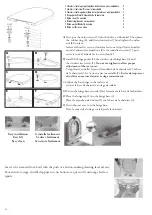
A) First, put the nylon screws (5) into the holes, as illustrated. Then place
the rubber ring (6), add the nylon washer (7) and tighten the nylon
nut (8) in place.
Insérez d’abord les vis en nylon dans les trous tel qu’illustré. Installez
ensuite l’anneau de caoutchouc (6) et la rondelle en nylon (7), puis
serrez le tout à l’aide de l’écrou en nylon (8).
B) Install the hinge gasket (4), the stainless steel hinge base (3) and
the stainless steel screw (2).
Do not overtighten to allow proper
adjustment of the seat cover.
Tel qu’ilustré, installez le joint d’étanchéité de la charnière (4), la base
de la charnière (3) et la vis en acier inoxydable (2).
Évitez de trop serrer
afin d’être en mesure d’ajuster le siège correctement.
C) Adjust the base hinge to the toilet seat.
Ajustez la base de charnière au siège de toilette.
D) Fasten the hinge base securely./Fixez fermement la base de la charnière.
E) Place the hinge cap (1) on the hinge base (3).
Placez le capuchon de finition (1) sur la base de la charnière (3).
F) Fisten the seat cover on the hinge base.
Fixez le couvercle du siège sur la base de la charnière.
Easy installation
Easy lift
Easy clean
S’installe facilement
S’enlève facilement
Se nettoie facilement
Seat can be removed from bowl with the push of a button, making cleaning fast and easy.
Pour enlever le siège, il suffit d’appuyer sur un bouton, ce qui rend le nettoyage facile et
rapide.


