background image

21

Connecting VHF and UHF Antennas

20

Antennas with 75-ohm Round Leads

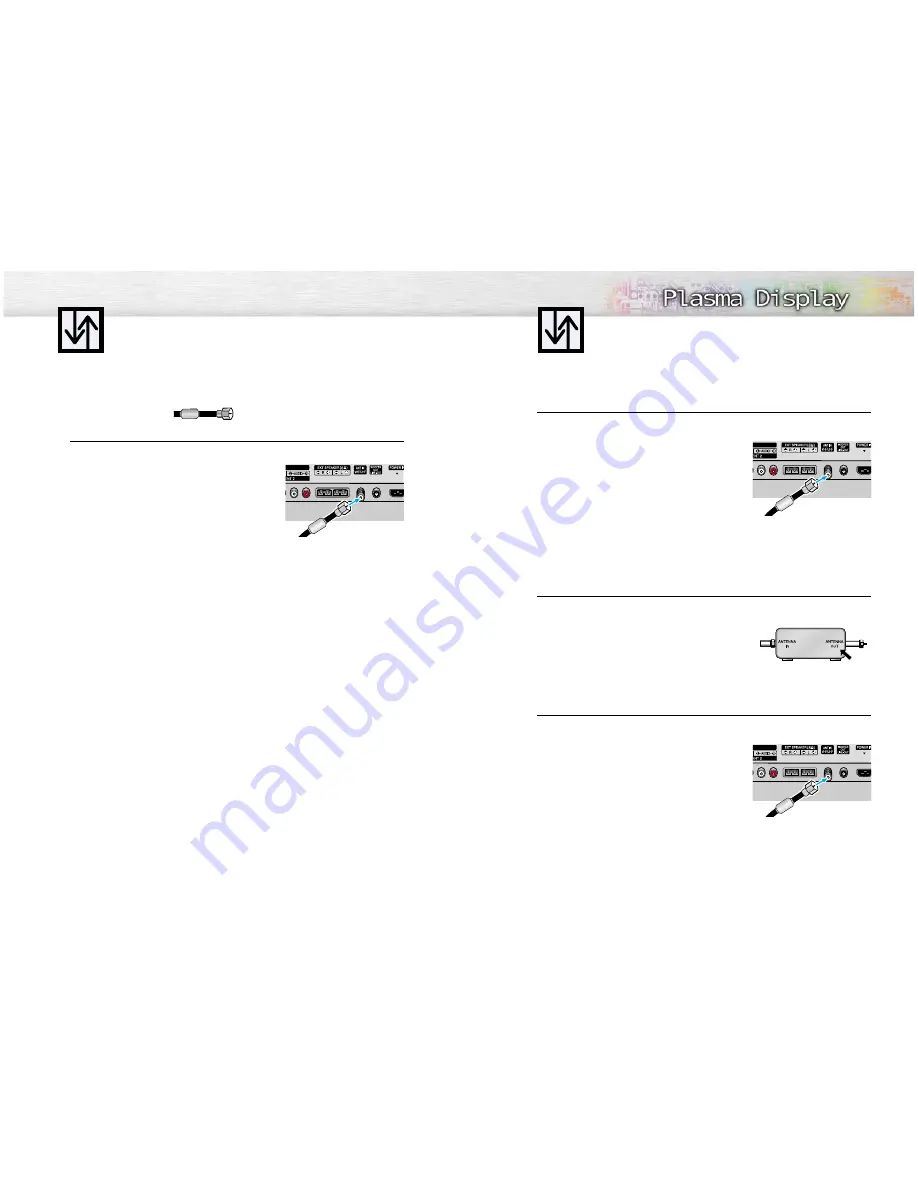
If your antenna looks like this: 

it has 75-ohm round leads.  

1

Plug the antenna lead into the VHF/UHF terminal on the PDP.

Use the Antenna Cable, an accessory included 
in the product package. 

Connecting Cable TV

You can connect different cable systems to your PDP, including cable without a cable box, 
and cable with a cable box that descrambles some or all channels.

Cable without a Cable Box

Plug the incoming cable into the VHF/UHF terminal on the PDP.

Use the Antenna Cable, an accessory included 
in the product package. 

Cable with a Cable Box that Descrambles All Channels.

Find the cable connected to the ANTENNA OUT terminal on your cable box. This terminal
might be labeled "ANT OUT", "VHF OUT", or simply "OUT".

Connect the cable to the VHF/UHF terminal on the PDP. 

Use the Antenna Cable, an accessory included 

in the product package. 

Summary of Contents for PDP4294

Page 1: ...Owner s Instructions PDP4294 BN68 00504A 00 ...

Page 2: ...e ventilation and that you ve followed the manufacturer s instructions for mounting Operate your PDP only from the type of power source indicated on the marking label If you are not sure of the type of power supplied to your home consult your appliance dealer or local power com pany Use only a grounded or polarized outlet For your safety this PDP is equipped with a polarized alter nating current l...

Page 3: ...ire to an antenna discharge unit size of grounding conductors location of antenna discharge unit connection to grounding electrodes and requirements for the grounding electrode Do not attempt to service the PDP yourself Refer all servicing to qualified service personnel Unplug the unit from the wall outlet and refer servicing to qualified service personnel under the following conditions when the p...

Page 4: ...l the screen if your model offers this feature and con stantly moving Displaying stationary graphics and images on screen such as the dark side bars on non expanded standard format television video and programming should be limited to no more than 5 of the total television viewing per week Additionally viewing other stationary images and text such as stock market reports video game displays statio...

Page 5: ...P L A S M A D I S P L A Y P A N E L General Information Your New Plasma Display Panel 10 Remote Control Buttons 12 Wall Installation Instructions 14 ...

Page 6: ... jacks Connect external speakers Antenna jack Connect to antenna Sub woofer speaker output jack Connect to the Sub woofer speaker jack Power Input jack Connect the supplied power cord Speakers optional SOURCE button Press to display all of the available video sources ie Video S Video Component1 Component2 PC MENU button Displays the main on screen menu VOL button Press to increase or decrease the ...

Page 7: ... button Activates picture in picture Aspect button Press to change the screen size P Mode button Adjust the PDP picture by selecting one of the preset factory settings or select your personal customized picture settings S Mode button Adjust the PDP sound by selecting one of the preset factory settings or select your personal customized sound settings ÔMode button Selects a target device to be cont...

Page 8: ...DP and prevent problems avoid the following places Do not install next to smoke and fire detectors Do not install in an area subjected to vibration Do not install in an area subjected to high voltage Do not install near or around any heating apparatus 3 Use only recommended parts and components Screws 4 EA Insulation holders 4 EA Installation Notes Parts Wall attachment panel is sold separately Ch...

Page 9: ... captive screw in the direction of the arrow after assembling the bracket 1 Secure the PDP to the wall mount bracket Please refer to the following instructions 2 Set the angle by pulling the upper end of the PDP attached to bracket in the direction of the arrow 3 The angle can be adjusted from 0 to 20 by 2 Changeing the angle 1 Contact an authorized technician when installing the wall attachment p...

Page 10: ...I S P L A Y P A N E L Connections Connecting VHF and UHF Antennas 20 Connecting Cable TV 21 Connecting Speakers 23 Connecting a VCR 24 Connecting a Camcorder 25 Connecting a DVD Player 26 Connecting a DTV Receiver 27 ...

Page 11: ...ithout a cable box and cable with a cable box that descrambles some or all channels Cable without a Cable Box 1 Plug the incoming cable into the VHF UHF terminal on the PDP Use the Antenna Cable an accessory included in the product package Cable with a Cable Box that Descrambles All Channels 1 Find the cable connected to the ANTENNA OUT terminal on your cable box This terminal might be labeled ANT...

Page 12: ... RF A B switch and the VHF UHF terminal on the PDP After you ve made this connection set the A B switch to the A position for normal viewing Set the A B switch to the B position to view scrambled channels When you set the A B switch to B you will need to tune your Set Top Box to the cable box s output channel which is usually channel 3 or 4 23 Connecting Speakers External speakers are sold seperat...

Page 13: ...Video attach one of these ferrite cores to the cable near the connector When you connect the audio cable PC DVI S Video Video to the connectors bind the ferrite core around the cable to secure it Ferrite Cores Connecting a VCR Audio Cable Video Cable Power Plug Connect a Video Audio cable between the AUDIO L R VIDEO jacks on the PDP and the VIDEO AUDIO OUTPUT jacks on the camcorder Viewing Tapes 1...

Page 14: ...s How to Connect 1 2 PDP DVD Player Watching DTV Video Cable Audio Cable DVI Cable or Power Plug Connect the cable or antenna to the antenna input jack on the DTV Connect a Video cable between the Y Pb Pr COMPONENT 1 2 or DVI jack on the PDP and the Y PB PR VIDEO OUTPUT JACKS on the DTV receiver Connect an Audio cable between the COMPONENT 1 2 L R AUDIO or DVI jacks on the PDP and the AUDIO OUTPUT...

Page 15: ...P L A S M A D I S P L A Y P A N E L Operation Turning the PDP On and Off 30 Memorizing the Channels 32 Setting Up Your Remote Control 36 ...

Page 16: ...f your PDP s features Viewing the Menus 1 With the power on press the Menu button on the remote control The main menu appears on the screen The Picture menu is selected 2 Use the joystick up down button to move items in the menu Use the joystick left right button to display change or use the selected items Use the joystick button to enter items in the menu On screen menus disappear from the screen...

Page 17: ...C and IRC identify various types of cable TV systems Contact your local cable company to identify the type of cable system that exists in your particular area At this point the signal source has been selected Proceed to Storing Channels in Memory next page Channel Ant CATV Auto Program Fine Tune LNA Ch Scan Move Select Menu Ant Off 0 Channel Ant CATV Auto Program Fine Tune LNA Ch Scan Move Select ...

Page 18: ...umber buttons on the remote control Ant 4 Ant 4 Added To View Memorized Channel PIP Mode 1 Press the Menu button Move the joystick up or down to select Channel then press the joystick to enter 2 Move the joystick up or down to select Ch Scan then press the joystick to enter Only the memorized channels are chosen Move the joystick right to stop Channel Ant CATV Auto Program Fine Tune LNA Ch Scan Mo...

Page 19: ...erate your VCR When your remote control is in Cable box or DVD mode the VCR control buttons Stop REW Play Pause FF still operate your VCR Changing Channels Using the Channel Buttons Press the CH or CH buttons to change channels When you press the CH or CH buttons the PDP changes channels in sequence You will see all the channels that the PDP has memorized The PDP must have memorized at least three...

Page 20: ...e Control Customizing the Picture 40 Using Automatic Picture Settings 41 Selecting the Color Tone 42 Viewing the Picture in Picture 43 Changing the Screen Size 49 Freezing the Picture 50 Remote Control Codes VCR Codes Cable Box Codes DVD Codes ...

Page 21: ... 40 1 Press the Menu button then press the joystick to enter 2 Move the joystick up or down to select Adjust then press the joystick to enter You will also see the items Contrast Brightness Sharpness Color and Tint 3 Move the joystick up or down to select the item you wish to change 4 Move the joystick left or right to change the value of the item 5 Press the Menu button to exit Note In the PC DVI...

Page 22: ...cting the PIP Screen 1 Press the Menu button Move the joystick up or down to select PIP then press the joystick to enter 2 Move the joystick left or right to select On The PIP image will appear in the corner of the screen 3 Press the Menu button to exit PIP Settings PIP Select Select Menu Off PIP Select Source Swap Size Locate Ant CATV Channel Move Select Menu On TV Large Ant Ant 5 Quick way to ac...

Page 23: ...arge Ant Ant 5 PIP Select Source Swap Size Locate Ant CATV Channel Move Select Menu On TV Large Ant Ant 5 PIP Select Source Swap Size Locate Move Select Menu On Video Large Quick way to access the PIP source Just press Source button in the cover on the remote control Swapping the Contents of the PIP Image and Main Image 1 Press the Menu button Move the joystick up or down to select PIP then press ...

Page 24: ... Ant 5 Quick way to access the PIP size Just press the Size button in the cover on the remote control Changing the Location of the PIP Image 1 Press the Menu button Move the joystick up or down to select PIP then press the joystick to enter 2 Move the joystick up or down to select Locate 3 Move the joystick left or right to move the PIP screen where you want 4 Press the Menu button to exit PIP Sel...

Page 25: ... this order Wide Panorama Zoom1 Zoom2 Normal Note If you watch a still image or the Normal 4 3 mode for a long time over 2 hours an image may be burned onto the screen View the monitor in Wide or Panorama mode as much as possible Changing the PIP Channel 1 Press the Menu button Move the joystick up or down to select PIP then press the joystick to enter 2 Move the joystick up or down to select Ant ...

Page 26: ... 52 Using Automatic Sound Settings 53 Choosing a Multi Channel Sound MTS Soundtrack 54 Using the Auto Volume 55 Using Dolby Virtual 56 Using a Subwoofer 57 Freezing the Picture Still Press the Still button on the remote control to freeze a moving picture Press again to cancel ...

Page 27: ...stick up or down to select Sound then press the joystick to enter 2 Move the joystick up or down to select Adjust then press the joystick to enter You will also see the items Bass Treble and Balance 3 Move the joystick up or down to select the item you wish to change 4 Move the joystick left or right to change the value of the item 5 Press the Menu button to exit Sound Mode Adjust MTS Auto Volume ...

Page 28: ...gnal conditions which can make it necessary to adjust the volume every time the channel is changed Auto volume lets you automatically adjust the volume of the desired channel by lowering the sound output when the modula tion signal is high or by raising the sound output when the modulation signal is low 1 Press the Menu button Move the joystick up or down to select Sound then press the joystick to...

Page 29: ...encies of 130Hz and lower 6 Press the Menu button to exit Sound Mode Adjust MTS Auto Volume Dolby Virtual Woofer Move Select Menu Custom Mono Off Off Sound Mode Adjust MTS Auto Volume Dolby Virtual Woofer Move Enter Menu Standard Mono Off Off Woofer Woofer Volume Cutoff Freq Move Select Menu On 50 120Hz Woofer Woofer Volume Cutoff Freq Move Adjust Menu On 50 120Hz 65 Volume Woofer Woofer Volume Cu...

Page 30: ...P L A S M A D I S P L A Y P A N E L Channel Control Fine Tuning Channels 60 LNA Low Noise Amplifier 61 ...

Page 31: ... Ant CATV Auto Program Fine Tune LNA Ch Scan Add Erase Adjust Menu Ant Off 3 Channel Ant CATV Auto Program Fine Tune LNA Ch Scan Add Erase Adjust Menu Ant Off 3 LNA Low Noise Amplifier If the TV is operating in a weak signal area sometimes the LNA function can improve the reception a low noise preamplifier boosts the incoming signal 1 Press the Menu button Move the joystick up or down to select Ch...

Page 32: ... S P L A Y P A N E L Connecting a PC and Operation Connecting to a PC 64 Adjusting the PC Screen 68 Changing the Position of the Image 69 Changing the Size of the Image 70 Information 71 Picture Quality Adjustment 72 ...

Page 33: ...screen Refer to pages 68 and 74 Connecting a PC to the PDP Audio Cable PC Cable DVI Cable Power Plug 1 2 Pin Configuration D Sub Cable DVI D Cable Digital Only Connector 15Pin Signal Cable based on protruded pin Setting up Your PDP Plug and Play Our adoption of the new VESA Plug and Play solution eliminates complicated and time consuming setup It allows you to install your monitor in a Plug and Pl...

Page 34: ...tion The table below shows all of the display modes that are supported The interlace mode is not supported The PDP operates abnormally if a non standard video format is selected Notes When this PDP is used as a PC display 32 bit color is supported Depending on the manufacturer your PC display screen might appear different and depending on your particular version of Windows Check your PC instructio...

Page 35: ...ess the Menu button to exit Picture Mode Adjust Color Tone Color Adjust Move Select Menu Custom Custom Picture Mode Adjust Color Tone Color Adjust Move Select Menu Custom Custom Picture Mode Adjust Color Tone Color Adjust Move Enter Menu Custom Custom Adjust Red Green Blue Move Adjust Menu 50 50 50 82 Red Changing the Position of the Image After connecting the PDP to your PC adjust the position of...

Page 36: ... Select Menu Wide PC Position Adjust Scaling Information Auto Adjust Move Select Menu Normal Information Preset Press the Source button then move the joystick up or down to select PC Press the joystick to select PC mode 1 Press the Menu button Move the joystick up or down to select PC then press the joystick to enter 2 Move the joystick up or down to select Informa tion then press the joystick to ...

Page 37: ... Adjust Move Enter Menu Wide PC Position Adjust Scaling Information Auto Adjust Move Enter Menu Wide Adjust Corase Fine Move Adjust Menu 50 7 53 Coarse 72 Picture Quality Adjustment Picture Automatic Adjustment Preset Press the Source button then move the joystick up or down to select PC Press the joystick to select PC mode 1 Press the Menu button Move the joystick up or down to select PC then pre...

Page 38: ...lect PC then press the joystick to enter 2 Move the joystick up or down to select Adjust then move the joystick left or right to enter 3 Move the joystick up or down to select Fine Remove picture noise vertical stripes on the screen by moving the joystick left or right If Fine is not set properly vertical stripes will appear on the screen 4 Move the Menu button to exit PC Position Adjust Scaling I...

Page 39: ...ss the Menu button Move the joystick up or down to select Function then press the joystick to enter 2 Move the joystick up or down to select Time then press the joystick to enter 3 Move the joystick left or right to select hour then move the joystick up or down to select the correct hour 4 Move the joystick left or right to select minute then move the joystick up or down to select the correct minu...

Page 40: ...the joystick left or right to select hour then move the joystick up or down to select the correct hour 5 Move the joystick left or right to select minute then move the joystick up or down to select the correct minute Function Language Time Caption NR Auto Power Off V Chip Film Mode Move Select Menu English Off Off Off Function Language Time Caption NR Auto Power Off V Chip Film Mode Move Enter Men...

Page 41: ...n to select Time then press the joystick to enter 3 Move the joystick up or down to select On Time Volume Move the joystick left or right to adjust volume level 4 Move the joystick up or down to select On Time Channel Move the joystick left or right to select the channel Function Language Time Caption NR Auto Power Off V Chip Film Mode Move Select Menu English Off Off Off Function Language Time Ca...

Page 42: ...enu English Off Off Off Function Language Time Caption NR Auto Power Off V Chip Film Mode Move Enter Menu English Off Off Off Caption Caption Mode Channel Field Move Select Menu On Caption 2 1 Caption Caption Mode Channel Field Move Select Menu On Text 2 1 1 Press the Menu button Move the joystick up or down to select Function then press the joystick to enter 2 Move the joystick left or right to s...

Page 43: ...tton Move the joystick up or down to select Function then press the joystick to enter 2 Move the joystick up or down to select NR 3 Move the joystick left or right to select On 4 Press the Menu button to exit Function Language Time Caption NR Auto Power Off V Chip Film Mode Move Select Menu English Off Off Off Function Language Time Caption NR Auto Power Off V Chip Film Mode Move Select Menu Engli...

Page 44: ...control buttons in the following sequence which resets the pin to 0 0 0 0 Power Off Mute 8 2 4 Power On Function Language Time Caption NR Auto Power Off V Chip Film Mode Move Select Menu English Off Off Off Function Language Time Caption NR Auto Power Off V Chip Film Mode Move Enter Menu English Off On Off V Chip Enter Pin Enter Pin V Chip V Chip Lock TV GuideLines MPAA Rating Change Pin No Move E...

Page 45: ...ngs FV Fantasy violence D Sexually Seggesive Dialog L Adult Language S Sexual situation V Violence Note 2 The V Chip will automatically block certain categories that are more restrictive For example if you block TV Y category then TV Y7 will automatically be blocked Similarly if you block the TV G category then all the categories in the young adult group will be blocked TV G TV PG TV 14 and TV MA ...

Page 46: ...gory then R NC 17 and X will automatically be blocked also How to Reset the TV after the V Chip Blocks a Channel Emergency Escape If the TV is tuned to a restricted channel the V Chip will block it The screen will go blank and the following message will appear Excessive rating To resume normal viewing tune to a different channel using the number buttons Under certain conditions depending on the ra...

Page 47: ...n move the joystick left or right to select On or Off On Automatically senses and processes film signals from all sources and adjusts the picture for optimum quality Off Switches off the Film mode 3 Press the Menu button to exit Note Film mode is supported in Video S Video Component 480i Function Language Time Caption NR Auto Power Off V Chip Film Mode Move Select Menu English Off Off Off Function...

Page 48: ... care your PDP will give you many years of service Please follow these guidelines to get the maximum performance from your PDP Identifying Problems Do not put the PDP near extremely hot cold humid or dusty places Do not put the PDP near appliances that create magnetic fields Keep the ventilation openings clear Do not place the PDP on a rough and slanted surface such as cloth or paper Liquids Do no...

Page 49: ... DVI VIDEO S VIDEO COMPONENT 1 COMPONENT 2 PC RGB DVI 10W 10W 8 Ω Subwoofer 500mv RMS at 1KHz Model Dimensions Display Remote Control Weight Display Remote Control Voltage Power Consumption Number of Pixels Screen Size ANTENNA input VIDEO input AUDIO input AUDIO output Exterior design and product specifications are subject to change without prior notice to improve the performance of this product T...

Page 50: ...99 Memo 98 Memo ...

Reviews: