background image

11

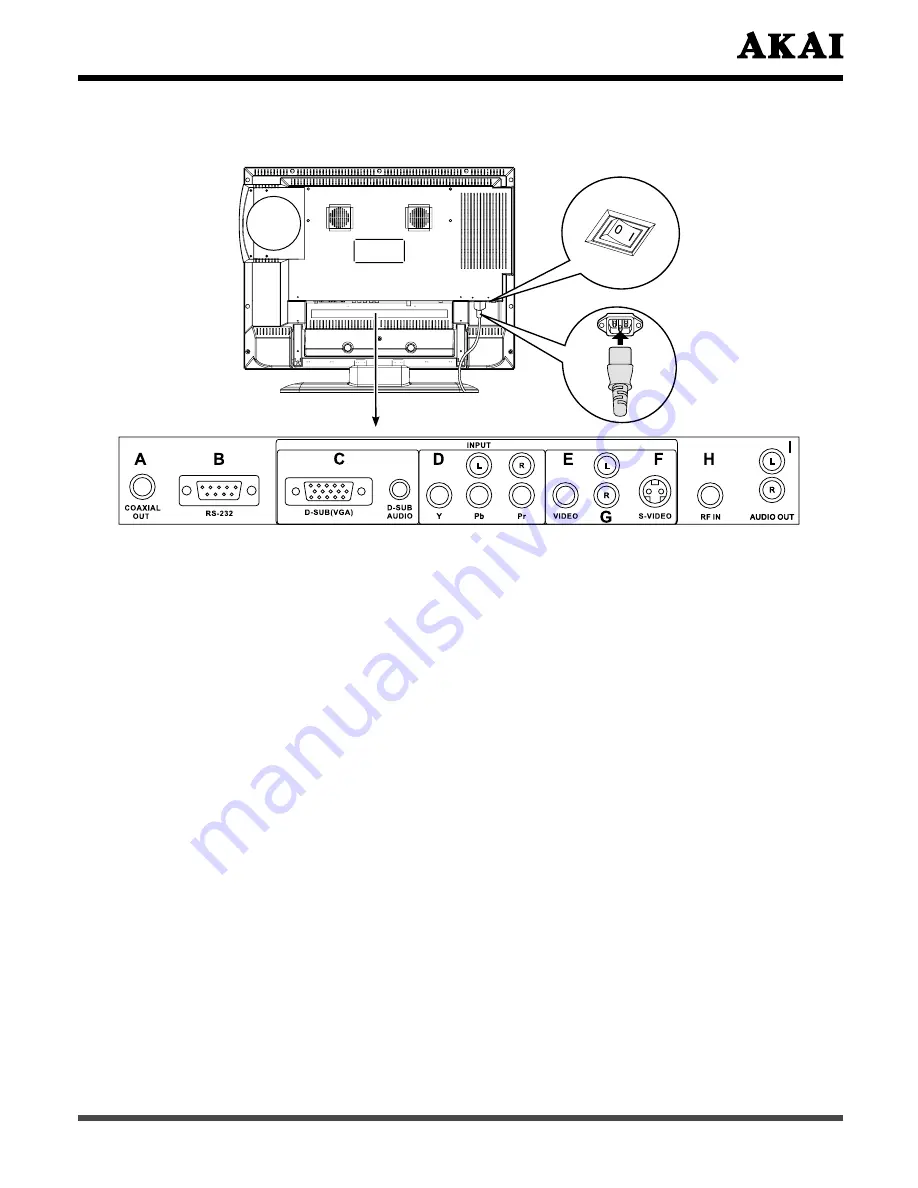
4.3 Rear View

 Push the power switch (O: Off, I: On). The power indicator on the front of the panel 

  should now display red, indicating that the LCD TV is in standby mode.

 Use the included power cord and connect to an earthed 100-240V, 50/60Hz AC outlet.

  Note: Shut down the power switch, turn on it again after the power indicator is extinguished 


  entirely.

 Signal input and other terminals:

   A. 

COAXIAL OUT

: This terminal is used as a digital audio output to audio amplifier.

   B. 

RS-232

: The D-SUB 9 pins terminal is used as a control port for serial communication  

    between PC and Panel. (For after sales service use only.)

   C. 

D-SUB(VGA) INPUT

: For PC display purpose. Connects to the Mini D-Sub 15 pins 

    analog output connector of the PC display card.


D-SUB(VGA) AUDIO INPUT

: Connect the audio terminal to the audio output terminal 

    of the PC.

   D. 

YPbPr INPUT

: Connect the separate component video cables to the device having 

    component video outputs (YPbPr) to the 

YPbPr

 terminal of the TV.


YPbPr AUDIO INPUT

: Connect the audio cable to device’s audio 

L

 and 

R

 terminal  

    and to the 

L

 and 

R

 audio terminal of the TV.

   E. 

VIDEO INPUT

: Connect the video input terminal to the output terminal of the video 

    output device.

   F. 

S-VIDEO INPUT

: Connects to the S-Video output terminal of your video equipment  

    that has S-Video.

   G. 

AUDIO INPUT

: Connect the audio input terminal to the audio output terminal of    

    the video output equipment. With S-VIDEO audio input signals share this terminal.

   H. 

RF IN

: Connect the antenna or cable set-top box with 75 Ohm F type connector into the  

    RF IN terminal. 

    I. 

AUDIO OUTPUT

: Connect to the audio amplifier that with audio input.

Sketch map

Summary of Contents for LCT2765TD

Page 1: ......

Page 2: ...following measures Reorient or relocate the receiving antenna Increase the separation between the equipment and receiver Connect the equipment into an outlet on a circuit different from that to which the receiver is connected Consult the dealer or an experienced radio TV technician for help FCC Warning To assure continued FCC compliance the user must the provided grounded power supply cord and the...

Page 3: ... the user Prohibition Warning Attention symbol indicating Electric Shock Never place TV on an unstable cart stand or table The TV may fall causing serious personal injury death or serious damage to the TV Never overload wall outlets and extension cords Never allow anything to rest on or roll over the power cord and never place the TV where the power cord is subject to wear or abuse Keep the produc...

Page 4: ...ed to protect the TV from overheating and to help maintain reliable operation of the TV Do not use the product if any abnormality occurs If any smoke or odor becomes apparent unplug the connector and contact the manufacturer immediately Do not try to repair the product by yourself Never use a damaged power cord Heavy objects heat or tensile force may damage the power cord and cause fire or electric...

Page 5: ...k Unplug the connector The power cable should be kept away from heat sources The heat produced by any heat source may melt the covering of the power cable Always make sure the antenna system is properly grounded to provide adequate protection against voltage surges and built up static charges see Section 810 of the National Electric Code Antenna lead in wire Antenna discharge unit NEC Section 810 ...

Page 6: ...AM radios and video equipment under certain installed condition In particular it may affect electronic equipment beyond the residential until where a LCD TV is used 3 The screen on this TV is manufactured from glass To prevent damage never strike the glass with a sharp or heavy object 4 Your LCD television contains a small amount of Mercury When the television is no longer useful please follow loc...

Page 7: ...power cord from being walked on or pinched particularly at plugs convenience receptacles and the point where they exit from the apparatus 11 Only use attachments accessories specified by the manufacturer 12 Use only with the cart stand tripod bracket or table specified by the manufacturer or sold with the apparatus When a cart is used use caution when moving the cart apparatus combination to avoid i...

Page 8: ...u 28 Adjustment of Bass 28 Adjustment of Treble 28 Adjustment of Balance 29 Selection of Surround 29 3 Using the Miscellaneous Menu 30 Selection of Language 30 Selection of Closed Caption 30 Setting of V Chip 32 Contents Setting of Parental 36 Selection of Blue Mute 38 Using Default 38 4 Using the TV Menu 39 Using the Auto Search 39 Using the Tuner Mode 39 Using the Channel Skip 40 Using the Chann...

Page 9: ...at all standard accessories and items are included Whenever possible use the handles on the back of the Display for transport 1 2 Installation Please use caution if wall mounting this product Follow all directions from the manufacturer of the wall mount and be sure to securely fasten the product to the mount While the TV can be wall mounted improper wall installation may void the warranty Due to t...

Page 10: ...The RF input terminal is for ANTENNA and CABLE TV channels 2 Power Management Function The machine provides an automatic power control function 3 WXGA LCD TV Panel The WXGA LCD TV panel provides high resolution and high contrast image The number of pixels is 1366 H x 768 V The contrast is 1000 1 4 Build in slot in DVD player This LCD TV build in a slot in DVD player and compatible for DVD CD CD R ...

Page 11: ...A They are used as buttons in the OSD Menu screen B Press to adjust the volume CH A They are used as buttons in the OSD Menu screen B Press to scan through channels To scan quickly through channels press and hold down either channels MENU Press to display the menu Press again to exit the menu SOURCE Press to cycle display TV AV S Video Component DVD and VGA source menu When display the OSD menu pr...

Page 12: ... the PC display card D SUB VGA AUDIO INPUT Connect the audio terminal to the audio output terminal of the PC D YPbPr INPUT Connect the separate component video cables to the device having component video outputs YPbPr to the YPbPr terminal of the TV YPbPr AUDIO INPUT Connect the audio cable to device s audio L and R terminal and to the L and R audio terminal of the TV E VIDEO INPUT Connect the vid...

Page 13: ...hrough the different POP or PIP modes such as Basic PIP LR POP and exit 0 9 Number Buttons In TV mode press 0 9 to select a channel the channel changes after 2 seconds In DVD mode press 0 9 to input the items Zoom Press to zoom the image max from 8 times to minimally 1 8 times Recall Press to return to previous channel P Mode Press repeatedly to cycle Continued on next page through the picture mod...

Page 14: ...eo Component DVD or VGA Sleep Press repeatedly until it displays the time in minutes 5 Min 10 Min 15 Min 30 Min 60 Min 90 Min 120 Min and OFF that you want the TV to remain on before shutting off To cancel sleep time press Sleep button repeatedly until sleep OFF appears Display Press to display the channel information and it disappear after 3 seconds Play Pause Press to play or pause the DVD disc ...

Page 15: ...ram menu Press it again to exit Sub title Press to select desired DVD subtitle Title Press to display to DVD disc title Note Press Ch on the remote control can turn on TV set from last preview mode Insertion of Batteries Turn the remote control upside down press and slide off the battery cover Insert two 1 5V AA batteries into the compartment take care to observe the and markings indicated inside ...

Page 16: ... window Care For Remote Control Avoid spilling liquids on the remote Avoid dropping or otherwise jarring the remote Always store the remote control at dry and normal room temperature place If the remote is nor performing satisfactorily replace the batteries The batteries should be replaced after one year If the remote control will be idled for a long time above 1 month take out the batteries to av...

Page 17: ...Component L R terminal 3 Press Power to turn on the LCD TV Turn on external equipment also 4 Press Source to select COMPONENT signal source DVD or other equipment Red White Red Green Connecting the Computer Switch off LCD TV and external equipment before connecting cables 1 Connect a computer s VGA Out to the LCD TV s VGA In terminal 2 Connect a computer s Audio Out to the LCD TV s Audio In termin...

Page 18: ... s L R terminal by a Audio cable in this stage the S VIDEO and VIDEO is sharing this L R Audio in channels 4 Press Power to turn on the LCD TV Turn on external equipment also 5 Press Source to select AV or S VIDEO signal source Connect audio amplifier or other TV set Switch off LCD TV and external equipment before connecting cables 1 Connect the LCD TV Audio Out R L to the audio amplifier In R L 2 P...

Page 19: ... to coaxial input mode 4 When DVD is playing you can enjoy coaxial digital audio by Audio Amplifier Mixer VHF Antenna 1m above Special Antenna UHF Antenna 75Ω Coaxial Aerial RF VHF UHF terminal Insert the Disc to slot in DVD Player 1 Press Source button to select DVD signal source 2 Insert a disc into the slot in DVD Player s disc tray please confirm the disc s screen is face to us 3 The DVD Play wi...

Page 20: ...t When no signal is inputted for about 14 minutes A No signal and going to power down wording will appear In DVD mode if no disc playing for about 5 minutes there is a screensaver as big DVD logo run and change color continuously 6 3 Other Function Freeze Press it to hold the current video and press again to cancel and return to normal viewing Zoom Press it repeatedly the size of image will change...

Reviews: