


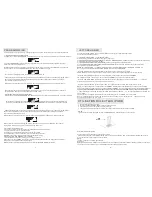
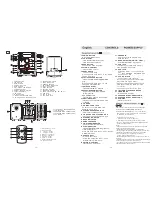


1
.
POWER
BUTTON
-Press
POWER
button
on
2
.
LCD
DISPLAY
- show the AM/FM dial frequency
- show the number of tracks
3
.
BASS
BUTTON
-to
enhances
bass
response
4
.
VOLUME
+
CONTROL
- adjust volume
up level.
5
.
SEARCH BACK
-
to
select
back
track
- press
and
hold
more
than
1
.
5
sec
BACK
search
intra
track
6
.
PLAY/PAUSE/USB BUTTON
- start or pause MP3
/
CD
/
USB
/
SD
/
MMC
play
- Press
and
hold
more
than
1
.
5
sec
change
to
CD
/
USB
mode
.
7
.
TUNING CONTROL
- select AM/FM/FM ST. Stations
8
.
REPEAT/RANDOM BUTTON
- repeat
a track/CD/MP3
/
USB
/
SD
/
MMC
/
program
RANDOM BUTTON
- play CD
/
MP3 tracks in random order
9
.
FUNCTION SELECT
- select source of sound MP3
/C
D
,
AUX,
or RADIO
.
10
.
CD
DOOR
11
.
SD
/
MMC
CARD
JACK
- To
listen
to
your
SD
/
MMC
card
with
Mp3
music
files
.
12
.
STEREO HEADPHONE JACK
- 3.5 mm stereo headphone jack.
13
.
CD DOOR OPEN
/
CLOSE
BUTTON
- press here to open/close the CD door.
14
.
STANDBY
INDICATOR
15
.
BASS INDICATOR
16
.
REMOTE
SENSOR
17
.
FM STEREO INDICATOR
- show the FM stereo indicator
18
.
STOP/SD BUTTON
- stop CD
/
MP3
/
USB
/
SD
/
MMC playback;
erase a CD program.
-Press
and
hold
more
than
1
.
5
sec
change
to
MMC
(
SD
)
mode
.
19
.
SEARCH NEXT
-to
select
nest
track
- press
and
hold
more
than
1
.
5
sec
forward
search
intra
track
.
20
.
VOLUME
-
CONTROL
- adjust volume
down level.
21
.
PROGRAM
-program and review programmed
track numbers.
22
.
BAND SELECTOR (AM
·
FM
·
FM ST.)
- select AM/FM/FM ST. wave
band
23
.
USB
JACK
To
listen
to
your
USB
flash
memory
stick
with
Mp3
music
files
.
24
.
AUX
JACK
-Push FUNC button , select
AUX
station.
play
、
、
Mp3
DISCMAN
WALKMAN AUX
.
insert when no disc
25
.
AUX
-
IPOD
JACK
(
The
special
of
ipod
connects
)
-Push
fuction
button
select
AUX
station
,
play
IPOD
and
supply
power
.
-After connecting
audio equipment to the
AUX INPUT JACK
,
the
IPOD
will
have
no
funciton
.
-The
unit
does
not
control
the
ipod
.
26
.
LEFT&RIGHT
SPEAKER
BOXES
27
.
FM ANTENNA
- to improve FM reception
28
.
SPEAKER
WIRE
CONNECTOR
(
R
)
29
.
SPEAKER
WIRE
CONNECTOR
(
L
)
30
.
AC MAINS
- inlet for power cord
.
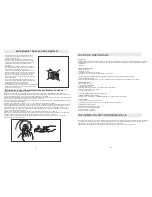
REMOTE CONTROL HANDSET (See )
1
10
The remote control buttons function is the same
as the button of CD/MP3
section .
/USB/SD
~
1
2
.
LCD
DISPLAY
3
.
BASS
BUTTON
4
.
VOLUME
+
BUTTON
5
.
BACK
BUTTON
6
.
PLAY
/
PAUSE
/
USB
BUTTON
7
.
TUNING
CONTROL
8
.
REPEAT
/
RANDOM
BUTTON
.
9
.
FUNCTION
SELECT
10
.
CD
DOOR
11
.
MMC
/
SD
CARD
12
.
STEREO
HEADPHONE
JACK
13
.
CD
DOOR
OPEN
/
CLOSE
BUTTON
.
POWER
BUTTON
14
.
STANDBY
INDICATOR
15
.
BASS
INDICATOR
16
.
REMOTE
SENSOR
17
.
FM
STEREO
INDICATOR
18
.
STOP
/
SD
BUTTON
19
.
NEXT
BUTTON
20
.
VOLUME
-
BUTTON
21
.
PROGRAM
BUTTON
22
.
BAND
SELECTOR
(
AM
·
FM
·
FM
ST
.
)
23
.
USB
JACK
24
.
AUX
IN
JACK
25
.
AUX
-
IPOD
JACK
Select
the
CD
/
MP3
tracks
by
(+
10
)/(-
10
)
button
.
-
The
remote
control
volume
button
no
function
in
the
AUX
or
radio
mode
.
27
26
28
29
30
26
.
LEFT
&
RIGHT
SPEAKER
BOXES
27
.
FM
ANTENNA
28
.
SPEAKER
WIRE
CONNECTOR
(
R
)
29
.
SPEAKER
WIRE
CONNECTOR
(
L
)
30
.
AC
MAINS
25
26
1
11
12
1
2
3
4
5
6
7
8
9
10
13
14
15
16
17
18
19
20
21
22
23
24
SD
/MMC
CA RD
US B
/
SD
/
PR O
.
RE P
.
/
RA N
.
BA SS
IR
BA SS
FM
ST
.
STAN DB Y
AU X
MP 3/ CD
RADIO
AM
FM
FM
ST
.
TU NI NG
1
.
Play
/
pause
( )
/usb
2
.
Stop
/
sd
button
3
. -
10
/
FOL
-
button
4
. +
10
/
FOL
+
button
5
.
Back
( ) /
search
( )
6
.
Next
( ) /
search
( )
7
.
Volume
-
button
8
.
Volume
+
button
9
.
Repeat
/
Random
button
10
.
Program
button
1
2
4
5
7
9
3
6
8
10
/
VOL
-
/
STOP SD
/
VOL
+
/USB
-
-
10/FOL
+
+
10/FOL
PROG
.
REP
./
RAN
.
-15-
-16-
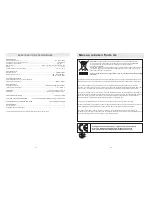
Install
battery
1. Open the battery cover to remove it.
2. Insert CR battery (not included) correctly so that
the + and - polarities match the polarity diagrams inside
the battery compartment.
remote
control
Note:
* About half a year of normal operation can be expected
when using the general batteries.
* When the battery are exhausted, the commander
should no longer operate the system. Replace it a new one.
* When the commander is not to be use for a long time,
remove the battery to avoid damage caused by
battery leakage and corrosion.
* Avoid keeping the commander in extremely hot or humid
locations.
* Between remote controller and remote sensor there should
be no obstacle and have to within 30 range.
* The remote controller s operating distance is about 0.2M to
6M away from the remote sensor.


