Akai AMP-45 User Manual Download Page 11


A>press “ program” knob of remote control  one time


,

 displaying will be show: 

in stop position  the

program- using remote control, program function can be operated
 when the unit is stop position

1>> when the unit is playing CD DISC:

C>Repeat the above operation to program the next favorite track unit  complete, you can  
press                   to select your favorite track

E>press STOP button


one


time to stop the program


play

press STOP button one


more


time


to


erasing


a


program


!


A>press “ program” knob of remote control  one time

,

 displaying will


 be show: 


in


stop


position   the

C>Repeat the above operation to program the next favorite track unit  complete, you can 


 press                 to select your favorite track

  E>press STOP button to stop the program


to


erasing


a


program


!


play

press


STOP


button


one


more


time

2>> when the unit is playing Mp3 DISC:

Different  play modes: Program

D>Press PLAY button to play the programmed tracks, the displaying of unit  will  show: 

D>Press PLAY button to play the programmed tracks,the displaying of unit  will  show: 


        PLAY    PROGRAM                                 Mp 3

Playing a USB

/

SD

PLAY     PROGRAM

PROGRAM

MP3

PLAY

PROGRAM

MP3

PROGRAM

MP3

PLAY     PROGRAM

PROGRAM

PLAY

PROGRAM

PROGRAM

B>Using                to select you're favorite track No. and then the LCD


display of unit will

show


as


following

,

.

then press “ program” again to confirm

B>Using                to select you're favorite track No. and then the LCD


display of unit will

show


as


following

,

.

then press “ program” again to confirm

Notice:  the former  programmed  tracks can not be deposited by unit  automatically;


  -

the max program function  is 99 tracks

.

after


the


99


tracks


of


program


is


full


program


don

'

t


be


continue

.

          -

If


it


is


playing


a


USB


or


a


SD

/

MMC

the


LCD


will


display


USB


or


CARD

.


-

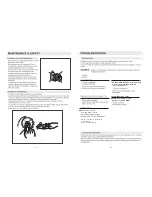
Different  play modes: BASS

BASS

-Advancing the bass function directly

notice: BASS function has NO Indicator  on


unit’ LCD displaying when it is working

.

1>press BASS  button one   time  to work; and the BASS  function will be erased pressing BASS 


buttons in double time

.

USB audio functions

1) PLAY/PAUSE/STOP

2) NEXT/FW, BACK/FB skip search

3) +10 track/ -10 track skip search

4) Folder Increment/ Folder decrement skip search

.


5) Program


tracks(99 tracks)

6) Repeat

/

random : normal->repeat 1->repeat all->  repeat album->random  ->normal

     (There is no


repeat


album mode in program  PLAY mode)


-

Press and hold the [PLAY] key more than 1.5sec at CD mode , system will change to USB


mode.


Then “USb“ will be display. At this moment,


system will read the USB .then


press


play


button


to


start


playback

.


-

Press and hold the [STOP] key more than 1.5sec at CD


or


USB mode , system will change to SD


mode.


Then “Sd“ will be display. At this moment,


system will read the SD .then


press


play


button


to


start


playback

.


 -

Press and hold the [PLAY] key more


 than 1.5sec at USB

/

SD mode , system will change


to CD mode.


Then “- - -“ will be display.


Press


PLAY


button


to


start


playback

- If a device is successfully read, then the correspond device is ready to play a file.

- If a device fails to be read, then “NO” will be appear on the Display to indicate that there  is no device .

*Notice : If no device is attached or the player fails to read the device when user switch


over

 USB to MMC(SD) with pressing [STOP] key, then “NO” is display and the system moves 

into the STOP mode.


Notice

:

-When


the


unit


has


not


a


disc

,

inserting


the


USB/SD


card


will


read


the


usb

/

sd


card


automatically

,


it


read


the


USB


first


while


having


a


USB

.

-

The unit can only support FAT32 HDD format

cannot


support


FAT


&


NTFS


formats

.

Kindly note the max capacity the unit can support via USB port is 500 GB.

Please be aware => the unit can only support 3.5”


HDD


with


self


power


supply

;

it


cannot


support


any2.5”&1.8”


HDDs

.

Using


the


IPOD


player

1

.

Press


the


IPOD


on


to


the


IPOD


holder .

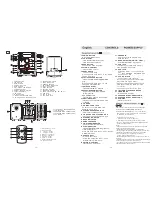
2.Select AUX position in the FUNCTION SELECTOR(Button N


.9)

3.The IPOD 


will begin to charge when connected.

4.The IPOD 


is now active and can be controlled using the IPOD 


directly.

Note:
*After connecting audio equipment to the AUX INPUT JACK,the IPOD 


will have no function.

R

R

R

R

R

R

ō

R

-19-

-20-

PLAYING AN IPOD ®  OR ANY DIGITAL PLAYERS (AUX IN)

-Slide the function knob to 

AUX

 position.

-Other connection with iPod® is using 3.5mm AUX cable to connect between iPod earphone jack and the AUX jack 3.5mm (25) 
on the unit.
-Use the iPod own control panel to play the music.
*The Micro System does not control the iPod® .

Summary of Contents for AMP-45

Page 1: ...AMP 45 Lire attentivement la notice avant d utiliser l appareil Before operating this product please read user manual completely USER MANUAL MANUEL D INSTRUCTIONS 1 13 Français English AMP 45 ...

Page 2: ... Pour toute réparation s adresser à un technicien qualifié PREPARATION AVANT UTILISATION ALIMENTATION SECTEUR 1 Vérifiez que le voltage indiqué sur la plaque signalétique au dos de l appareil corresponde à votre installation électrique 2 Branchez Le cordon d alimentation secteur situé à I arrière de I appareil sur la prise de courant domestique L appareil est maintenant branché et prêt pour utilis...

Page 3: ...çon aléatoire les pistes CD MP3 9 SELECTEUR DE FONCTION MP3 CD AUX RADIO Sélection de la source audio MP3 AUX RADIO 10 TIROIR CD Permet d accéder au compartiment CD 11 LECTEUR DE CARTES COMPATIBLE SD MMC Permet de connecter et de lire des pistes au format MP3 contenues dans votre carte mémoire SD MMC 12 PRISE CASQUE STEREO NON FOURNI Permet la connection à un casque muni d une prise 3 5mm stéréo 1...

Page 4: ...t pour accéder au début de la plage en cours de lecture Appuyez de nouveau sur la touche une fois brièvement pour accéder à la plage précédente ou appuyez successivement sur cette touche pour atteindre la plage désirée RECHERCHE D UN PASSAGE MUSICAL DANS UNE PLAGE 1 Pour rechercher un passage particulier d un morceau musical appuyez et maintenir enfoncée la touche ou Le disque est lu à vitesse rap...

Page 5: ...ES BASS est allumé Connectez un appareil USB ou une carte SD MMC dans les ports compatibles appropriés Les Fonctions sont les suivantes 1 LECTURE PAUSE STOP PLAY PAUSE STOP 2 Saut de plage précédent Saut de plage suivant 3 TOUCHE RECHERCHE PRECEDENTE TOUCHE RECHERCHE SUIVANTE permet de passer les recherches 4 TOUCHE 10 FOL TOUCHE 10 FOL 5 TOUCHE PROGRAMMATION PROGRAM permet de programmer jusqu à 9...

Page 6: ...re lu c est qu il est probablement sale ou endommagé Lorsque vous nettoyez le disque essuyez en mouvements rectilignes en allant du centre vers le bord Ne jamais nettoyer le disque en mouvements circulaires Les CD doivent être rangés dans leur boîtier après utilisation afin d éviter de les abîmer Evitez toute exposition prolongée aux rayons directs du soleil à des températures extrêmes ou à l humi...

Page 7: ...rdinaire La présence de substances dangereuses dans les équipements électriques et électroniques peut avoir des effets potentiels sur l environnement et la santé humaine dans le cycle de retraitement de ce produit Ainsi lors de la fin de vie de cet appareil celui ci ne doit pas être jeté avec les déchets municipaux non triés Les appareils électriques et électroniques doivent être traités séparémen...

Page 8: ... any descriptive labels that may be found on either the front or top cabinet of the unit Do not remove any labels located on either the back or button cabinet of the unit AUX IN CONNECTIONS WAYS 13 14 Power Supply After connecting external audio equipment to the AUX INPUT JACK 24 push FUNC button and select MP3 CD in order to play extermal audio source REMARK Play MP3 DEVICES Ext Source via Aux in...

Page 9: ... L 30 AC MAINS inlet for power cord REMOTE CONTROL HANDSET See 1 10 The remote control buttons function is the same as the button of CD MP3 section USB SD 1 2 LCD DISPLAY 3 BASS BUTTON 4 VOLUME BUTTON 5 BACK BUTTON 6 PLAY PAUSE USB BUTTON 7 TUNING CONTROL 8 REPEAT RANDOM BUTTON 9 FUNCTION SELECT 10 CD DOOR 11 MMC SD CARD 12 STEREO HEADPHONE JACK 13 CD DOOR OPEN CLOSE BUTTON POWER BUTTON 14 STANDBY...

Page 10: ...Repeat Random button 5th time Random indicator goes off the displaying will be show 4 release tracks in playing mode after press Repeat Random button 4th time Repeat indicator goes off and go to Random mode the displaying will be show Different play modes Repeat Random 3 Press the 10 FOL or 10 FOL button on the remote to the select tracks or folder You can use to select a particular track The LCD ...

Page 11: ...10 track skip search 4 Folder Increment Folder decrement skip search 5 Program tracks 99 tracks 6 Repeat random normal repeat 1 repeat all repeat album random normal There is no repeat album mode in program PLAY mode Press and hold the PLAY key more than 1 5sec at CD mode system will change to USB mode Then USb will be display At this moment system will read the USB then press play button to start...

Page 12: ...SB SD playback does not work CD MP3 USB SD badly scratched dirty Replace clean CD MP3 USB SD see maintenance The CD MP3 skips tracks CD MP3 damaged or dirty Replace or clean CD MP3 CD R is blank or the disc is not finalized Use a finalized CD R 21 22 ...

Page 13: ...cal and electronic equipments can have potential consequences on the environment and human health in the cycle of reprocessing this product Therefore at the end of its lifetime this product shall not be disposed with other non recycled waste Used electrical and electronic equipment must be treated separately and in accordance with legislation that requires proper treatment recovery and recycling o...

Reviews: