background image

35

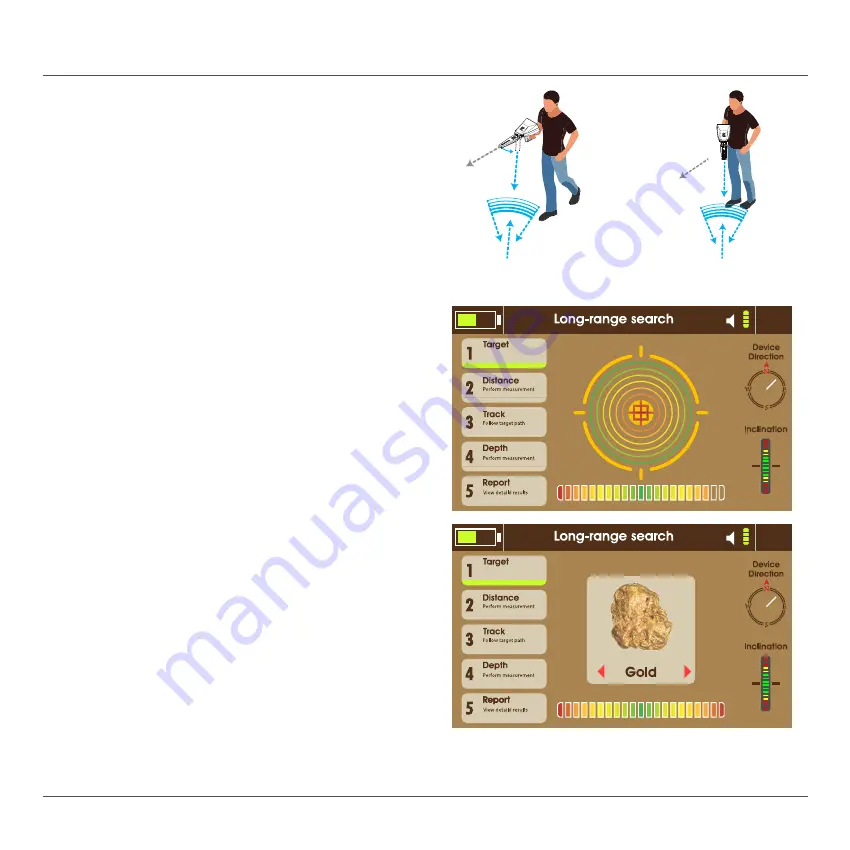
Face the targeted search area and wait for 

the device to receive a signal indicated by the 

antennas moving towards targets directions . 

Then turn with the antennas, in the meanwhile, 

wait for the interactive meter to finish the 

evaluation and detection process . 

The interface shows the found target or targets in 

the search area . 

To list the detected targets, press 

H

 or 

I

 keys to 

see the target types .

Select one of the detected targets to locate its 

position and measure its distance .

When the target is selected from the list of 

detected targets the interface proceeds to the 

next phase in the system, which is the distance 

measuring .

Auto Long-range Search

18:46

18:46

Summary of Contents for Alpha

Page 1: ...User Manual ...

Page 2: ...DETECTION TECHNOLOGY USER MANUAL ...

Page 3: ...ABILITY OR FITNESS FOR A PARTICULAR PURPOSE IN NO EVENT SHALL AJAX ITS DIRECTORS OFFICERS EMPLOYEES OR AGENTS BE LIABLE FOR ANY INDIRECT SPECIAL INCIDENTAL OR CONSEQUENTIAL DAMAGES INCLUDING DAMAGES FOR LOSS OF PROFITS LOSS OF BUSINESS LOSS OF USE OR DATA INTERRUPTION OF BUSINESS AND THE LIKE EVEN IF AJAX HAS BEEN ADVISED OF THE POSSIBILITY OF SUCH DAMAGES ARISING FROM ANY DEFECT OR ERROR IN THIS ...

Page 4: ...ification Summary 8 Package Contents 9 Package Contents 10 Overview 11 Hard Keys 12 Hard Keys 13 Battery Assembly 14 Assembly 15 Initial setup 16 User Interface 17 Main Menu 17 Settings 18 Language 18 Time and Date 18 Display 19 Sound 20 Power Mode 21 Storage 22 Info 23 Security 24 Reset 25 Quick Settings 26 ...

Page 5: ...41 Charging the battery 41 Precautions for the operation environment 41 Battery 42 Battery charging tips and precautions 42 Contact Information 43 WEEE Waste Electrical and Electronic Equipment Statement 45 Battery Information 46 ...

Page 6: ...rence Keep this device away from humidity Make sure that your electrical outlet provides the same voltage as is indicated on the Charger before connecting to the electrical outlet All cautions and warning on the device and in the user manual should be noted If any of the following situations arises get the device checked by service personnel Liquid has penetrated into the device The device has bee...

Page 7: ...ers underground The device has two search systems which are Manual Long Range Locator Automatic Long Range Locator Thank you for purchasing the AJAX IOTA detection device This quick Start section provides demonstration about how to assemble your device Some of the installations also provide video demonstrations Please link to the URL to watch it with the web browser on your phone or tablet You may...

Page 8: ...3 Notifications Sound and tactile feedback Languages Multilingual User Interface with 8 supported languages Date and Time Real Time Clock Login Restriction Configurable PIN Dimensions 49x21x15 cm Overall Dimensions 54x50x20 cm Package Total Weight 3 5 kg Assembly Weight 1 kg Operating temperature From 10 C to 60 C Storage temperature From 10 C to 80 C Humidity Can be stored and operated at relativ...

Page 9: ...9 Package Contents 1 2 4 3 5 7 6 figure 1 Package Contents ...

Page 10: ...y not be compatible with other devices Appearances and specifications are subject to change without prior notice You can purchase additional accessories from your local AJAX retailer Make sure they are compatible with the device before purchase Use only AJAX approved accessories Using unapproved accessories may cause the performance problems and malfunctions that are not covered by the warranty Av...

Page 11: ...11 Overview Headphone Jack Charge Port Main Unit Control Buttons Display Screen figure 2 Device Overview ...

Page 12: ...12 Hard Keys Power Back Navigation Arrows OK Quick Settings Grip figure 3 Hard Keys ...

Page 13: ... for the ease of access while searching Turning the device on and off Press and hold the Power key for a few seconds to turn on the device When you turn on your device for the first time or after performing a data reset follow the on screen instructions to set up your device To turn off the device press and hold the Power key Follow all posted warnings and directions from authorized personnel in a...

Page 14: ...e ridges and push outwards to remove the battery cover 2 Insert the battery pack inside the compartment 3 Connect the wires and make sure they are securely attached 4 Insert the connector inside the compartment and put the cover back on the grip figure 4 Battery Assembly ...

Page 15: ...15 Assembly 1 2 1 Align the notches in front of the device with the back of the High Gain Antenna 2 Press firmly until the Antenna is secured back into the device figure 5 High Gain Antenna Assembly ...

Page 16: ...y 1 2 3 1 Insert the antennas into the connectors located in front of the main unit 2 Screw the antennas into the connector securely 3 Grab the tip of the antenna and extend it figure 6 Roaming Antennas Assembly ...

Page 17: ... 1 Turn on the device Press and hold Dto turn the device on 2 Select a language Select your preferred device language and select B 3 Set Time and Date Press H I to move and J M to change values After setting the parameters the Main Menu will show on the display Note The time format is 24h hh mm e g 19 42 The date format is day month year DD MM yyyy e g 30 03 2019 Deutsch English Español Français T...

Page 18: ...18 User Interface 18 46 Battery Indicator Volume Time Settings Icon Search Systems Main Menu ...

Page 19: ...nt languages for the interface English French German Spanish Italian Russian Turkish and Arabic Select language and press B to set the language to the device Time and Date Press H I to move and M J to change values Note The time format is 24h hh mm e g 19 42 The date format is day month year DD MM yyyy e g 30 03 2019 ...

Page 20: ...t the brightness The value is adjustable from 0 to 100 brightness in a 1 increments Maximum brightness is 250 nits Sleep Mode Set the automatic dimming for the brightness to preserve power This setting can be set to 15 30 45 or 60 seconds or it can be turned off completely ...

Page 21: ...n addition to sound 2 Silent mode The device does not respond with any type of feedback 3 Vibration mode The device only responds with vibration feedback 4 Normal mode The device only responds with sound feedback II Key tone This setting controls the volume for the feedback of pressing the buttons To set volume press H I III Search Volume This setting controls the volume for the search results and...

Page 22: ...mode to change the power mode move the cursor H I and press Bto confirm I Power Saving mode This mode saves power by disabling idle modules in order to preserve power for long search operations II Optimum Mode This mode sets all of the device modules on for a steady performance and operation ...

Page 23: ...07 2017 01 19 23 007 03 07 2017 18 26 05 008 03 07 2017 19 00 14 009 03 07 2017 23 36 29 010 04 07 2017 00 11 37 Settings Storage This menu shows the previously saved search results The user can view or delete the results Then the results list shows the saved searches Navigate the list and press B to view or delete the highlighted result ...

Page 24: ...1 8 5 2 1 134h27m Info This menu shows Device Version The current hardware revision Software Version The current software revision and edition Model The device model number and SKU identifier Uptime The device working time ...

Page 25: ...25 Settings 18 46 18 11 2018 Security This menu shows Secure Start state To change state press J then Bto confirm Enter a new PIN then press K Enter the PIN again for confirmation ...

Page 26: ...izing options I Clear Memory This option erase all saved results from memory II Reset settings This option resets all the settings to default values III Factory Reset This option resets all the settings to default values and erase all saved results ...

Page 27: ...nsity Sleep mode It can be set to 5 settings 15 30 45 or 60 seconds or be set off completely Power mode It can be set by pressing B to change the power mode into Optimum mode Power save mode Sound Press M to increase or J to decrease the current value while pressing B will change the sound value for the device keys P or the search Q 18 46 Time Set the current time by pressing M or J Note To exit t...

Page 28: ...r the located targets and shows the target type on display automatically and calculating the target distance from the device with high precision The user can also determine the depth after acquiring the target location automatically The device provides the user with a comprehensive report regarding the search process with the ability to save the report for review The High Gain Antenna and Roaming ...

Page 29: ...teorite Diamond and Emerald The target can be selected using H I 2 Search Distance Starts from 100 meters up to 2250 meters It can be set using H I 3 Depth Starts from 1 meter up to 50 meters It can be increased or decreased using H I 4 Start Search Displays an overview of the search parameters Press B to proceed to the search interface 18 46 18 46 18 46 18 46 Manual Long range Search ...

Page 30: ...e signal frequency output operating and transmitting correctly 2 The compass shows the device current direction 3 Inclination indicator shows the holding position of the device during the search process so the user could keep it at the green range 4 Target information box shows the selected search parameters 5 Save icon is to store the current search information for review 6 Roaming Antennas indic...

Page 31: ...ion towards another direction The user turns with the antennas pointing towards the new path direction Reset the tracking indicator by pressing the grip key initializing the indicator back to the middle If the antennas stay on the same path then the target path is correct if the antennas turned towards another direction the user should repeat the previous steps again After that the user can walk t...

Page 32: ...n a straight course Once the target point is passed the antennas will turn all the way left or right then the user should stop and this is the first stop Rotate with the antennas movement to track the new path The antennas will stabilize on the same first path line but in the opposite direction Keep walking down this direction until the antennas turn again Here the user should stop again and this ...

Page 33: ...33 This page is left blank intentionaly ...

Page 34: ...ntennas on the middle After holding the device properly press B or the Grip Key The interface shows 1 Search indicator in the middle of the interface 2 Compass showing the current device direction 3 Balance indicator shows the holding position of the device during the search process so the user could keep it at the green range 4 Interactive target detection indicator 5 Search phases and current ph...

Page 35: ...uation and detection process The interface shows the found target or targets in the search area To list the detected targets press H or I keys to see the target types Select one of the detected targets to locate its position and measure its distance When the target is selected from the list of detected targets the interface proceeds to the next phase in the system which is the distance measuring A...

Page 36: ... direction must be sustained Here the start point should be selected Either left or right of the current point Press B and the arrow shows a prompt for moving 25 meters left or right depending on the selection After walking the 25 meter distance hold the device and wait for the antennas reading The reading is indicated by the antennas turning towards the target direction and intersecting with the ...

Page 37: ...w then the arrow will blink indicating that the user should move another 25 meters Then press B key to see the arrows forming a triangle with target distance from the search point The interface proceeds to the next phase which is the target tracking Auto Long range Search 18 46 ...

Page 38: ...path then the path to the target is correct but if the antennas change direction the user should repeat the previous steps Walk to track the target path and locate it The device makes interactive sounds towards the target direction Walk toward it If the antennas turn away from the correct path slightly to the left or right the display shows arrows guiding the user to adjust the direction on a stra...

Page 39: ... to track the new path The antennas will stabilize on the same first path line but in the opposite direction Keep walking down this direction until the antennas turn again Here the user should stop again and this is the second stop The target point is the midpoint between the first and second halt Once the target tracking phase is finished the device proceeds to the depth measuring phase 1 2 1 ...

Page 40: ...tion again When the reading is complete the depth result shows on the interface then the system proceeds to the last stage which is the report Report Offers a summary of the search process including the target type distance the followed path and depth The user can save this report in the device storage for later review or discard the report by exiting the interface and confirming the process Auto ...

Page 41: ...41 ...

Page 42: ...ly accessible while charging 1Plug the DC cable into the device s Charge jack 2Plug the power adapter into an electric socket 3After fully charging disconnect the charger from the device Then unplug the charger from the electric socket Battery Precautions for the operation environment Your device may heat up due to the environment in the following conditions Use caution to avoid shortening the bat...

Page 43: ... charging but it may take longer to fully charge the battery If the device receives an unstable power supply while charging the device may not function If this happens unplug the charger from the device While charging the device and the charger may heat up This is normal and should not affect the device s lifespan or performance If the battery gets hotter than usual the charger may stop charging I...

Page 44: ...souri 64116 USA Telephone 1 816 298 0485 1 816 399 3744 E mail info ajaxdetection com Web site http www ajaxdetctioncom AJAX DEDEKTOR Turkey Address İOSB Mutsan M10 No 27 34480 Başakşehir İstanbul Türkiye Telephone 90 212 485 85 46 90 537 393 49 49 Web site http www ajaxdetector com tr E mail info ajaxdetector com ...

Page 45: ...45 NOTE ...

Page 46: ...k requirements at the end of life of AJAX branded products that are sold into the EU You can return these products to local collection points Environmental Policy The product has been designed to enable proper reuse of parts and recycling and should not be thrown away at its end of life Users should contact the local authorized point of collection for recycling and disposing of their end of life p...

Page 47: ...local regulations Taiwan 廢電池請回收 For better environmental protection waste batteries should be collected separately for recycling or special disposal California USA The button cell and Li ion battery may contain perchlorate material and requires special handling when recycled or disposed of in California For further information please visit http www dtsc ca gov hazardouswaste perchlorate Battery In...

Page 48: ......

Reviews: